User guide
Introduction
Poserframes is script plugin for Photoshop that draws black borders, inspired by film negatives scanned with visible rebate. It’s fueled by serendipity and randomly combines shapes, colors and movement in near infinite ways, making sure each rendered frame is unique.
Poserframes is designed and written by Joakim Hertze and made available “as is”, meaning I’m happy to receive feedback and comments, but I can’t promise to provide support. I’ve included common issues and workarounds at the end of this page. E-mail me at poserframes@hertze.se.
Installing and updating Poserframes
-
Download and unzip the software, if the latter isn’t done automatically. The resulting folder contains the main script Poserframes.jsx and a folder with a number of Photoshop action sets in the form of files ending in .atn.
-
Copy the script Poserframes.jsx to Photoshop’s scripts folder. On Mac it’s in /Applications/Photoshop 202x/Presets/Scripts and on Windows 10 it’s in C:\Program Files\Adobe\Adobe Photoshop 202x\Presets\Scripts. You may have to change the permissions of this folder to copy the script there.
-
Restart Photoshop and make sure Poserframes shows up in the menu File/Automate.
-
Install the Photoshop actions by double-clicking on the action files ending in .atn, or by clicking on the hamburger menu in the actions palette in Photoshop, choosing Load Actions… and then select all action files and click on Open.
If you want to update Poserframes you simply download the new version, replace Poserframes.jsx in Photoshop’s scripts folder and replace your installed actions with the new ones.
Overview of how to use Poserframes
If you install the script file and Photoshop actions as instructed above, it should work out of the box.
It is meant to be run by using one of the ready-made actions that comes with the script file, or by a droplet made from one of those actions. I’ve provided a starter set of actions, grouped by aspect ratio, as well as a folder of exploration actions, meant to show a few additional script options.
If you want to, you can stop reading now and start playing with the actions, or you can read on and learn how to create your own actions, batching folders of images and troubleshooting.
Color or black and white?
The script tries to determine if your image is in color or in black and white, and then generates scanner artifacts in color or grey scale accordingly. The method used for this is not foolproof (i.e. some black and white images actually contain a little color) and because of this, I recommend that you bypass this color check by adding the keyword color or bw to the file meta data of your image. This is easily done in Adobe Lightroom CC or Adobe Bridge and those keywords are passed on to exported images.
Using and editing the ready-made actions
Poserframes actions are built from recipes (script settings), that determine the look of the rendered border. By default, the images won’t be saved after the script runs, leaving them intact. Because of this, the actions won’t work for automation (such as droplets) just yet. If you make a droplet at this stage you’ll be prompted to save the image on every droplet run.
When you’re ready to have an action save the resulting image, or when you want to edit the recipe of an action, expand the action (click on the right bracket) to show the recorded script name, Poserframes. When you double-click on this, a dialog will open where you can edit the saved recipe. Click the button labeled Use this recipe to save your changes.
If you check Save and close when done the script will start saving and closing the image after it runs, so leave this unchecked while you’re still trying out different recipes.
Making droplets
Make sure to check Save and close when done in the dialog when you edit the script, when you’re ready to make a droplet from an action (such as for batch processing). Please refer to the Photoshop instructions for how to make a droplet.
Making your own actions
Make your own recipe actions by duplicating an existing action (click on the small hamburger menu in the upper right corner of the Actions palette and choose Duplicate) and change the name (by double-clicking on it) and edit the recipe as outlined above.
You can also record your own actions from scratch by having an image open and then click on the plus icon in the Actions palette, name the action and start recording. Choose Poserframes from the File/Automate menu, paste the recipe you want, make sure Save and close when done isn’t checked (otherwise the image will close and you can’t stop the recording) and click Use this recipe to run the script. When it’s finished, open the recipe again as outlined above, check Save and close when done and save the recipe, if you’re ready for the script to start saving your images.
You can make as many actions with different settings as you like.
Recipe settings
A recipe is a text string with script settings that follows a specific syntax. It contains a number of settings, separated by a ; (semicolon) and an optional blank space for readability. All settings must always be specified and in the following order (the name of the setting in bold isn’t written in the recipe, only the value):
- fancy: If set to
true, the script will simulate a scan with visible scan mask edges. If you like a clean cropped look, set this tofalse. - halation: If set to
truethe script will render halation on the film rebate adjacent to bright border pixels. - burn_negative_edges: If set to
truethe edges of the negative (adjacent to the rebate) will be burned and the contrast increased. - transparent_matte: If set to
truescanner artefacts will be omitted and the outside of the black scanner mask will be transparent. - artifacts: If set to
truethe script will add artifacts at the outside of the mask border, often seen with real film as a consequence of the scanning and editing process. Set it tofalsefor a crisper look. - rebate_grain: If set to
truePoserframes will render a grain-like noise on the rebate. Set it tofalseif you intend to add grain to your image after Poserframes has run. If your image already has grain, there is a risk of interference effects around the edges. Instead, the optionhalation, that only adds grain to the halation effect on the rebate, might be a better choice. - adjust_blackpoint: Adjusts the black point of the rebate, from an automatic attempt at matching the visual black point of the image. Accepts whole numbers, both positive and negative, between
-60and60. For instance,5will systematically make the rebate five levels lighter and-5five levels darker. - mask_variant_2x3: The style of scanner mask to use with 2:3 images. The script comes with ten styles, numbered from
1to10. If set toauto, a random style will be used. - mask_variant_4x3: The style of scanner mask to use with 4:3 images. The script comes with five styles, numbered from
1to5. If set toauto, a random style will be used. - mask_variant_6x7: The style of scanner mask to use with 6:7 images. The script comes with three styles, numbered from
1to3. If set toauto, a random style will be used. - mask_variant_4x5: The style of scanner mask to use with 4:5 images. The script comes with two styles, numbered from
1to2. If set toauto, a random style will be used. - mask_variant_square: The style of scanner mask to use with square images. The script comes with three styles, numbered from
1to3. If set toauto, a random style will be used. - negative_variant_square: The look of the negative, where
1has a look drawn from Rolleiflex square formats and2from Hasselblad square formats. If set toauto, a random style will be used. - negative_variant_4x3: The look of the negative, where
1has a look drawn from Pentax 4x3 negatives,2from Contax 4x3 negatives and3a look from Hasselblad 4x3 negatives. If set toauto, a random style will be used. - border_width_2x3: Border width (whole number/integer value) for 35mm format, when fancy =
false. - border_width_4x3: Border width (whole number/integer value) for 4x3 format, when fancy =
false. - border_width_6x7: Border width (whole number/integer value) for 6x7 format, when fancy =
false. - border_width_4x5: Border width (whole number/integer value) for 4x5 format, when fancy =
false. - border_width_square: Border width for square format, when fancy =
false. - short_side_factor: Factor that changes the thickness of the short side of 2:3, 6:7 and square formats, when fancy =
false. Given as a percentage, from1to999, where100equals the same thickness as the long side. - movement_min_long: Defines the floor (lowest value) for all possible image movements of the long edge from a centered position, given as a whole number from
0to100. - movement_max_long: Defines the ceiling (highest value) for all possible image movements of the long edge from a centered position, given as a whole number from
0to100. - movement_min_short: Defines the floor (lowest value) for all possible image movements of the short edge from a centered position, given as a whole number from
0to100. - movement_max_short: Defines the ceiling (highest value) for all possible image movements of the short edge from a centered position, given as a whole number from
0to100. - movement_direction: When set to
randomthe script may move the image relative to the mask in all four directions (up/down/left/right). When set tobottomrightit will only move it towards the bottom right corner and when set totoplefttowards the top left corner. - matte_top: The thickness of the top matte, in percentages of the original image height.
- matte_right: The thickness of the right matte, in percentages of the original image width.
- matte_bottom: The thickness of the bottom matte, in percentages of the original image height.
- matte_left: The thickness of the left matte, in percentages of the original image width.
- filmburn: If set to
truea film burn effect will be rendered, whilefalseswithches the effect off. - ragged_filmburn: If set to
truethe rendered burn effect will have a jagged edge, similar to torn paper. If set tofalsethe burn edge will be smooth. - filmburn_min_reach: The minimum percentage of the image that the film burn effect may cover.
- filmburn_max_reach: The maximum percentage of the image that the film burn effect may cover.
- force_format: If set to one of the formats
2x3,4x3,6x7,4x5orsquarethe automatic format detection will be overridden and negative variant and a mask variant in that format will be stretched to fit your image. This setting is optional.
The full geeky syntax for a recipe looks like this:
[true|false]; [true|false]; [true|false]; [true|false]; [true|false]; [true|false|halation]; [-60-60]; [1-10]; [1-6]; [1-3]; [1-2]; [1-3]; [1-2]; [1-3]; [1-99]; [1-99]; [1-99]; [1-99]; [1-99]; [0-400]; [0-100]; [0-100]; [0-100]; [0-100]; [random|bottomright|topleft]; [1-100]; [1-100]; [1-100]; [1-100]; [true|false|monochrome]; [true|false]; [1-100]; [1-100](; [2x3|4x3|4x5|6x7|square])?
An actual recipe for the default settings, ready to copy-and-paste into Poserframes, looks like this:
true; true; true; false; true; false; 0; 1; 1; 1; 1; 1; 1; 1; 20; 20; 20; 20; 20; 100; 0; 40; 0; 40; random; 12; 12; 12; 12; false; true; 10; 30
Hard-coded settings
There are a number of additional settings available in the script file. These settings are always active, even when the script is run in recipe mode.
- force_8_bit: When set to
true, the script converts a 16 bit image to 8 bits, before running the spatter filter to dirty up outer mask edges. If set to false, no bit conversion takes place and the spatter filter is skipped. - feather_factor_2x3: How much feathering of the border you like for 35mm. The lower the value, the more the feathering.
- feather_factor_4x3: How much feathering of the border you like for 4x3. The lower the value, the more the feathering.
- feather_factor_6x7_square: How much feathering of the border you like for square and 67. The lower value, the more feathering.
- feather_factor_4x5: How much feathering of the border you like for 4x5. The lower value, the more feathering.
- mask_flip_probaility: The probability of the scanner mask being rotated 180 degrees, from
0to100. - green_burn_odds: The probability of rendering a green film burn, from
0to100. - blending_factor: The factor multiplied with feather_factor_[format] to increase the softness of the negative edge against the image. A larger factor also means that the negative rebate will bleed over more into your image. Given as a percentage, where
100means no increased softness and300means three times as soft. - color_check_threshold: Threshold (cut-off) for telling a color image from a black and white image, by comparing the color histogram to a desaturated histogram. Given as a percentage.
- blackpoint_threshold: Cumulative threshold for establishing visual black point in the image. Given as per mille. The lower the value, the lower the set black point.
- neg_rotation: The amount of possible rotation added to the negative shape, given in degrees. If set to
0no random rotation will be added. If movement_min_long, movement_max_long, movement_min_short and movement_max_short are all set to0(i.e. a centered image) neg_rotation will always be0. The randomness model used here favors small rotations around 0 degrees, but occasionally you’ll have the more extreme outcome. Because of this, I do recommend having the setting at something a little outrageous, such as4.
The settings are hard coded at the top of the script file and are written as Javascript variable declarations, like this:
var fancy = true;
It’s important to keep this format when you make changes. Make sure the = or the ; doesn’t accidentally get deleted when you change a value. All variables must be declared, so make sure you don’t accidentally delete any lines.
Note that the setting that takes text values (not numbers, true or false), such as movement_direction, filmburn and force_format, must be enclosed with quotation marks in the script file, like this:
var movement_direction = "random";
How Poserframes uses aspect ratios
As a default, Poserframes calculates the aspect ratio of your image and matches that to the closest of the standard formats 2x3, 4x3, 6x7, 4x5 or square. The shapes are drawn in those aspect ratios and the borders will look best if you keep your images close to those. However, Poserframes will stretch the shapes to accommodate whatever aspect ratio your image has. You can take advantage of this by bypassing the default format assignment (by adding the optional setting force_format, set to 2x3, 4x3, 4x5, 6x7 or square) and make Poserframes use the format you define. In this way, it’s possible to use a 6x7 scanner mask and negative style with a 4x3 image, for instance, or a 2x3 scanner mask for a 65x24 (Xpan) image. The actions supplied with the download (except the exploration actions) all have force_format active.
Styling rebates
Poserframes attempts to analyze the visual black point in your image and then lift the blacks of the negative rebate to match. For some aesthetics the model used might result in too dark or too light rebates, but by using the setting adjust_blackpoint you can systematically adjusts this, so you for instance can have a more underexposed look. Having the setting halation as true adds a halation effect to the rebate, adjacent to bright pixels. The setting rebate_grain lets you add a fine grain to the whole rebate (set to true), or just to before mentioned halation added to the rebate (set to halation). If your image already has grain, I recommend using the halation setting, but if you intend to add grain after Poserframes I suggest keeping this setting as false.
Film burns
This effect mimics the look of the first frame of a roll of film that has been partially exposed to light when loaded into the camera.
Two settings control the look of the burn: filmburn set to true switches on the effect and renders an orange and red burn, or a yellow and green burn. Then, ragged_filmburn set to true will render a burn similar to torn paper, while false renders a smoother, more light leak-like burn.
The settings filmburn_min_reach and filmburn_max_reach, both given in percentages, sets the range of coverage the burn may have.
EXAMPLE ONE: filmburn set to true, ragged_filmburn set to false, filmburn_min_reach set to 10 and filmburn_max_reach set to 50 will render a burn with torn paper effect, that randomly covers between 10 and 50 percent of the frame.
EXAMPLE TWO: filmburn set to true, ragged_filmburn set to true, filmburn_min_reach set to 30 and filmburn_max_reach set to 30 will render a smooth burn, that always covers between 30 percent of the frame.
EXAMPLE THREE: filmburn set to false, ragged_filmburn set to true, filmburn_min_reach set to 10 and filmburn_max_reach set to 50 won’t render any film burn. When filmburn is set to false the rest of the settings have no effect.
The settings above are merely starting values from which the effect builds. There is so much randomness involved in constructing these burns that each script run is like pulling the arm on a slot machine. You are guaranteed to get a unique burn each time, and you may need to run Poserframes many times on an image before you get something you like.
How Poserframes uses movement
Poserframes always starts with your image centered in the frame and all movements are relative to this origin position. The extreme position is the furthest the image can move from that position (left, right, up and down) and this is hard coded in the script. Available movement is the difference between the extreme position and the origin position and how the script uses this is something you can control with script settings.
The settings movement_min_long and movement_max_long defines how much of the available movement that may be used on the axis perpendicular to the long side of the image, while the settings movement_min_short and movement_max_short defines how much of that available movement that may be used on the axis perpendicular to the short side of the image. The setting movement_direction controls if the image should be moved towards the bottom right, the top left or at random. In this way, you define a range of movement and a direction of movement.
All four movement settings are effectively percentages of the available movement. You define them pair-wise: movement_min_long and movement_max_long together, movement_min_short and movement_max_short together. By setting a pair to the same value, the image will always move to that percentage of the available movement. More useful is to set a pair to a floor and a ceiling value, so the script can move the image to a random percentage between the two.
EXAMPLE ONE: movement_min_long = 50; movement_max_long = 50. The script will always move the image 50% of the available movement along the axis perpendicular to the long side.
EXAMPLE TWO: movement_min_long = 10; movement_max_long = 80. The script will randomly move the image from 10% to 80% of the available movement along the axis perpendicular to the long side.
EXAMPLE THREE: movement_min_long = 0; movement_max_long = 0. The image will never move (and thus stays centered) along the axis perpendicular to the long side.
EXAMPLE FOUR: movement_min_long = 100; movement_max_long = 100. The image will always move to the extreme position along the axis perpendicular to the long side.
Using Poserframes without recipes (legacy mode)
Using legacy mode means the script won’t ask for a recipe when you run it. Instead it uses the settings in the script file itself. Originally, this was the only way to use the script and I’ve kept it for use in some automation workflows.
To begin using the script without recipes you need to change the setting legacy to this:
var legacy = true;
If you want the script to save the images after it’s run change the setting save to this:
var save = true;
Troubleshooting and general tips
- When you update Photoshop to a new version, you get a new script folder, but script files are left behind in the old one. You need to repeat the installation instructions above to make sure PoserFrames.jsx in the new /Applications/Photoshop 202x/Presets/Scripts folder.
- The error message The command Play is not currently available means the Poserframes script file (Poserframes.jsx) isn’t in the correct script folder when Photoshop tries to run Poserframes from an action, droplet or other means of automation. Make sure you’ve followed the installation instructions above. Also, if you have several versions of Photoshop installed, make sure your droplet launches the correct version (the one with Poserframes installed). A workaround is to manually launch the correct version of Photoshop before you run your droplet.
- The speed of the script is primarily dependent on the dimensions of your image. However, the script is written in a modular manner, which means it will run att different speeds depending on your settings. It will be fastest in crop mode with no added matte and slowest in fancy mode with all of halation, rebate grain, burn negative edges, scanner artifacts and film burn turned on.
- Use the settings feather_factor_35mm, feather_factor_645, feather_factor_67_square and feather_factor_45 to control how fuzzy the mask edges and rebate edges appear for each aspect ratio. For most tastes, these settings should be left with their preset values.
- Use the setting blending_factor to controll the “crispness” of the rebate edge. The higher the value, the fuzzier the film rebate and the more it bleeds into the darker areas of your image.
- If you set transparent_matte to
true, you need to work with TIFF files for them to save with preserved transparency.
Style gallery
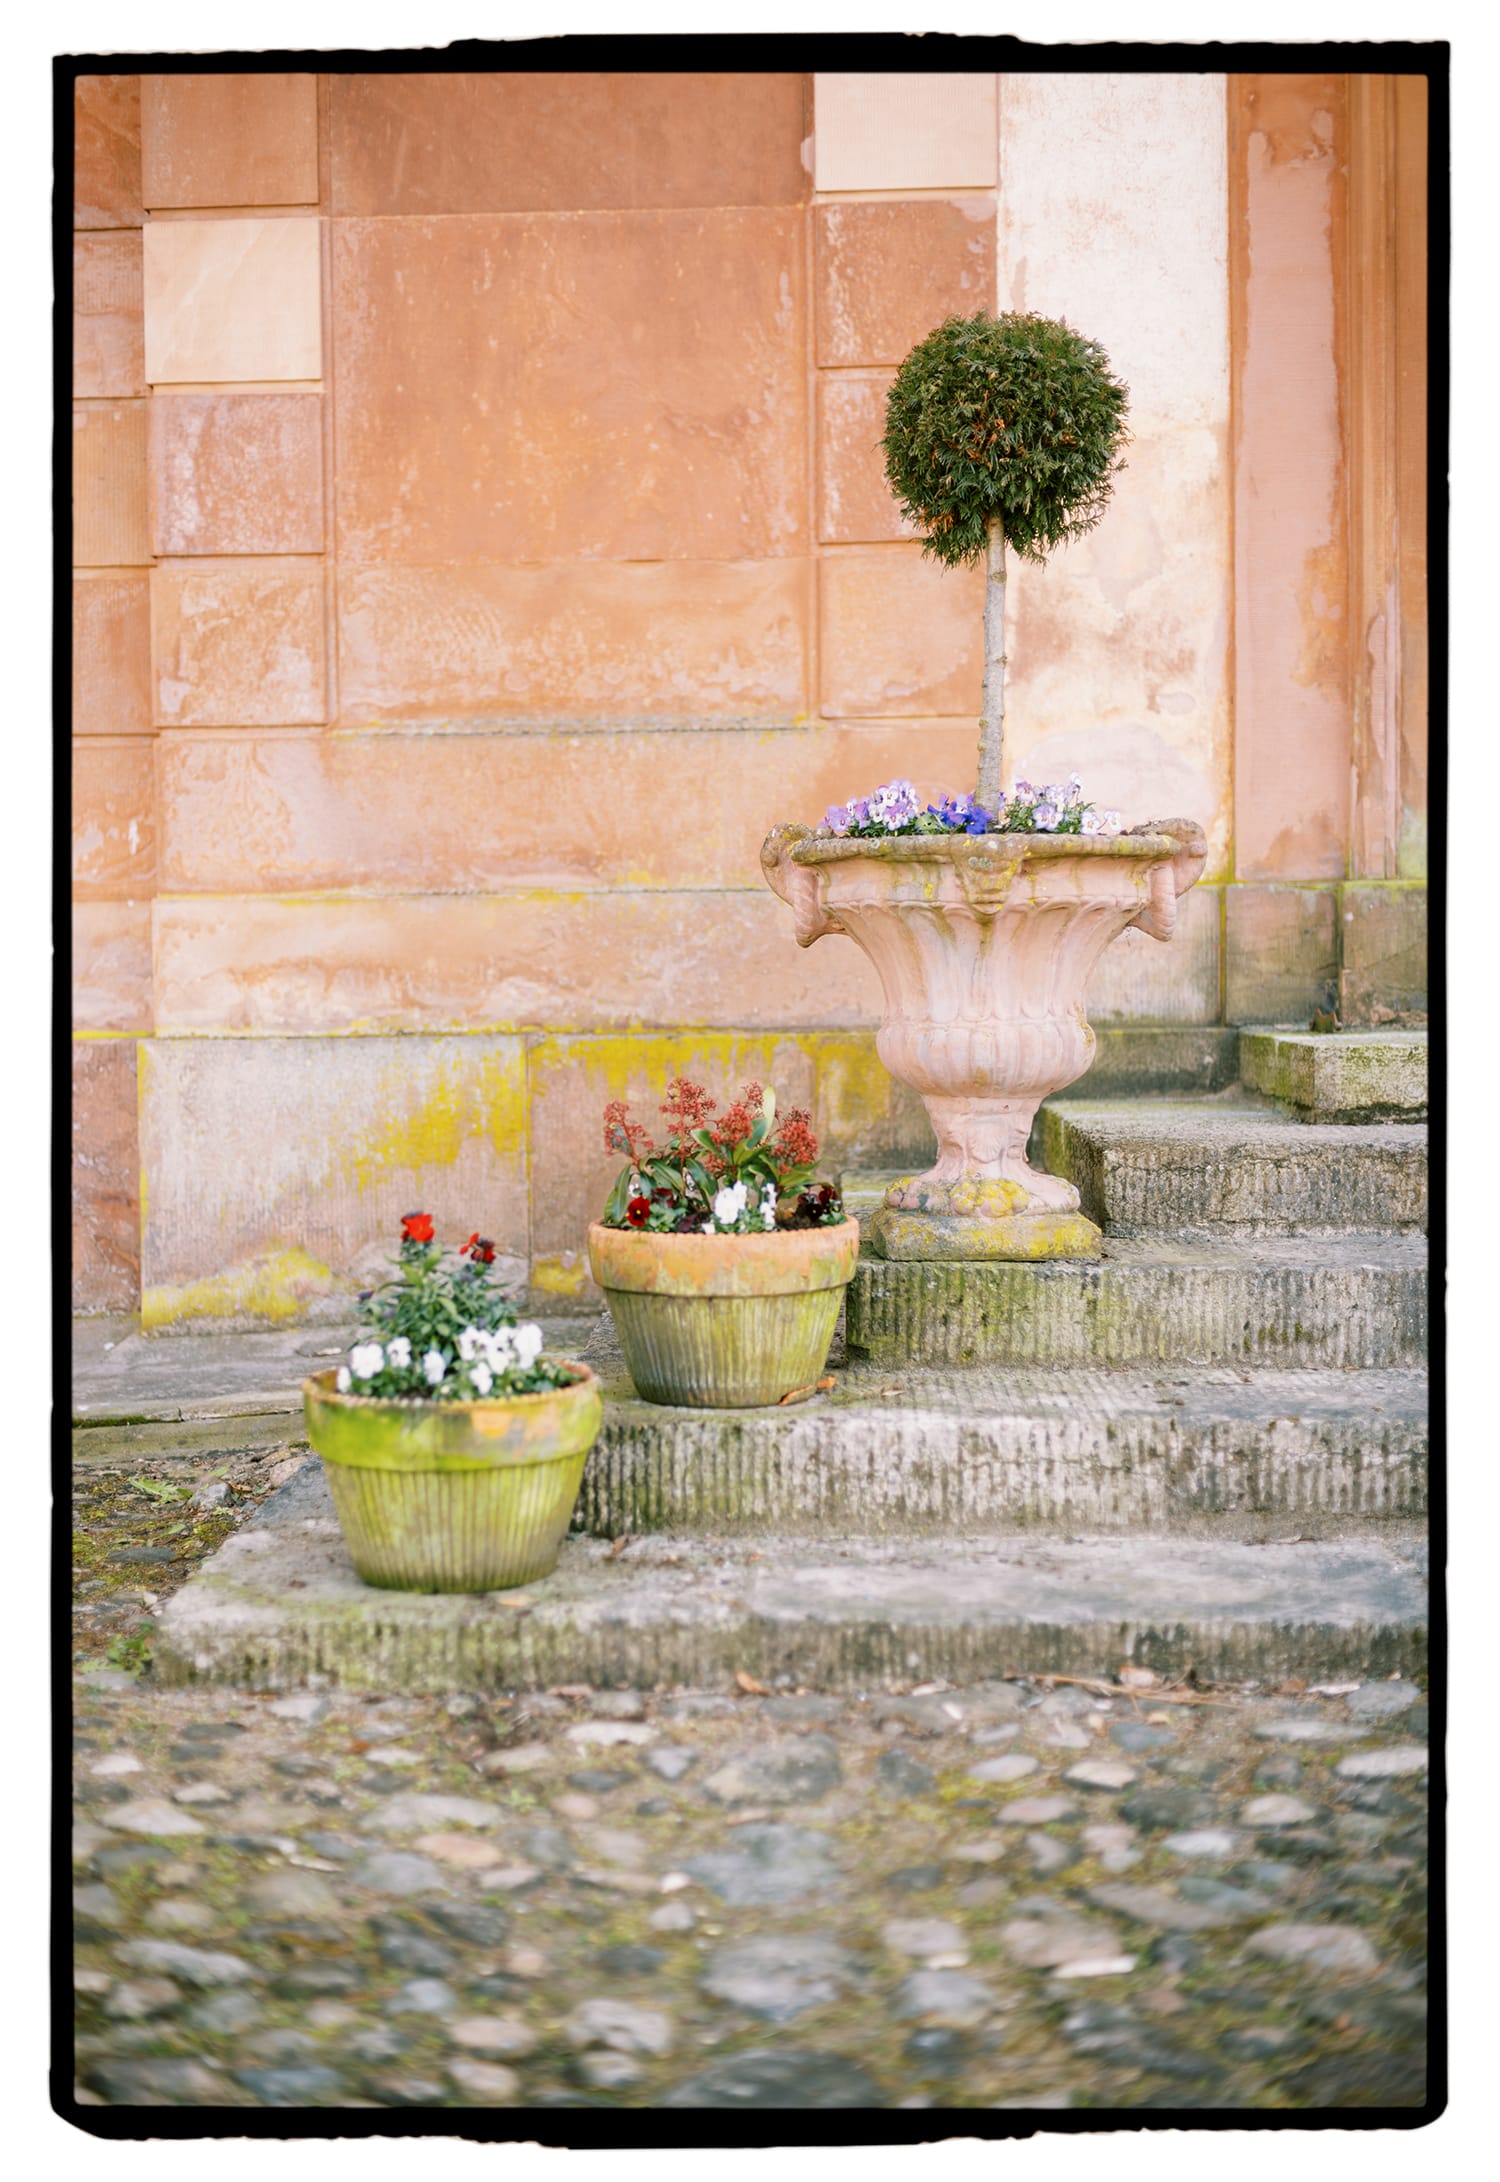
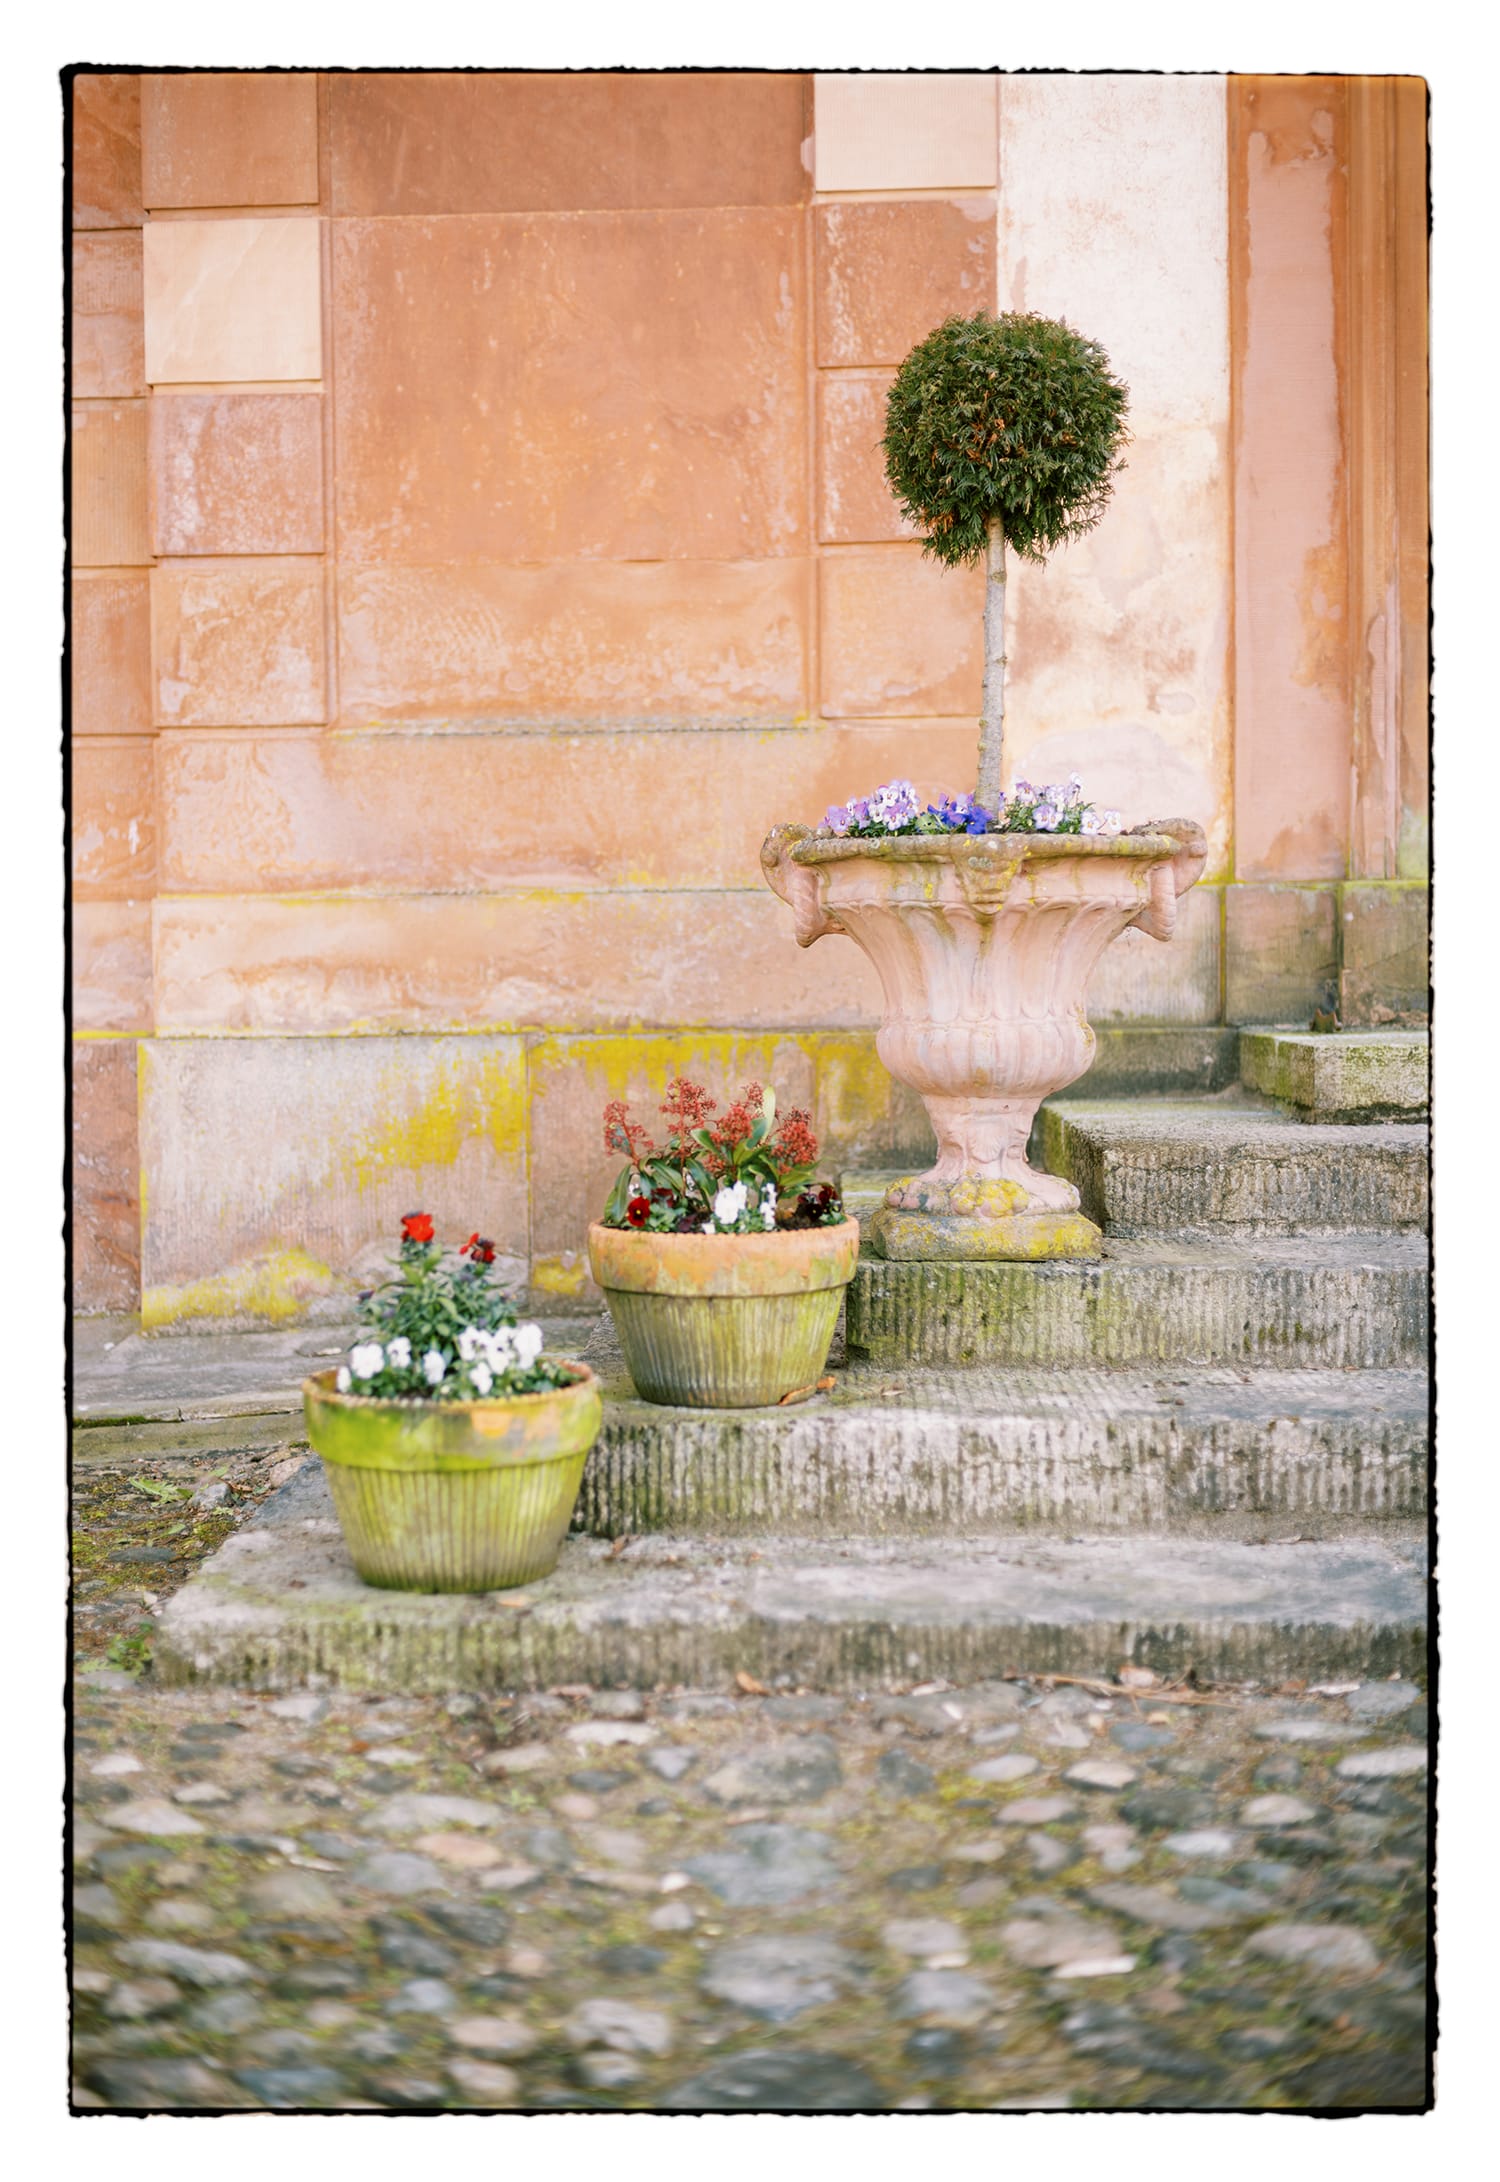
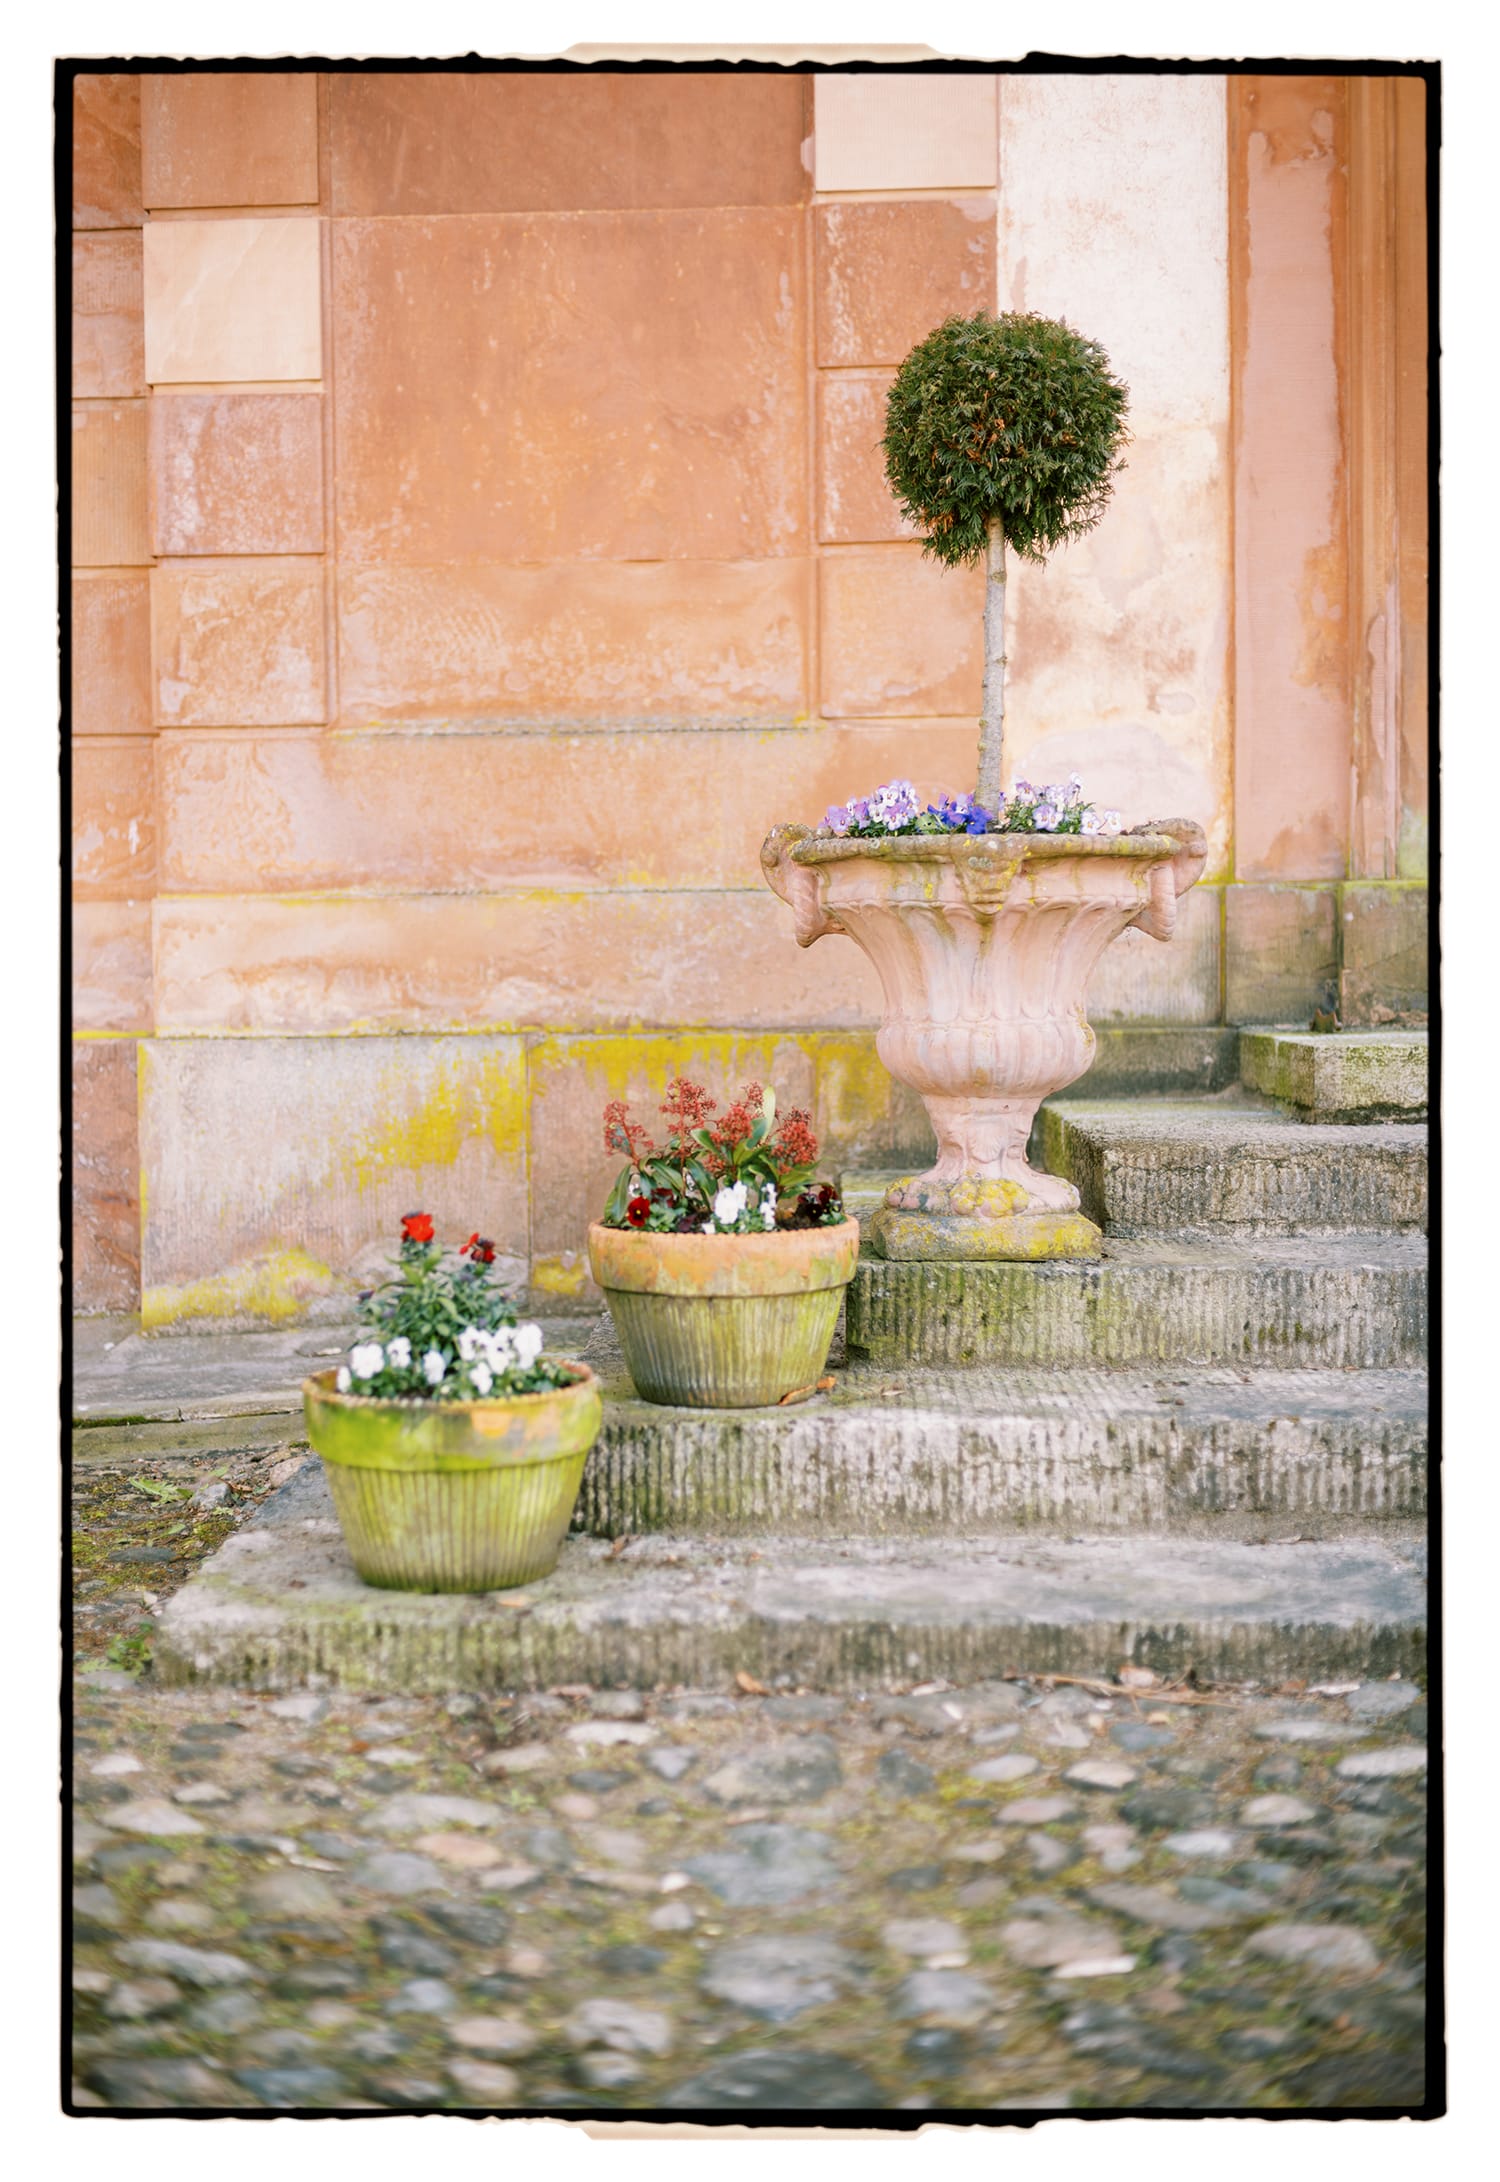
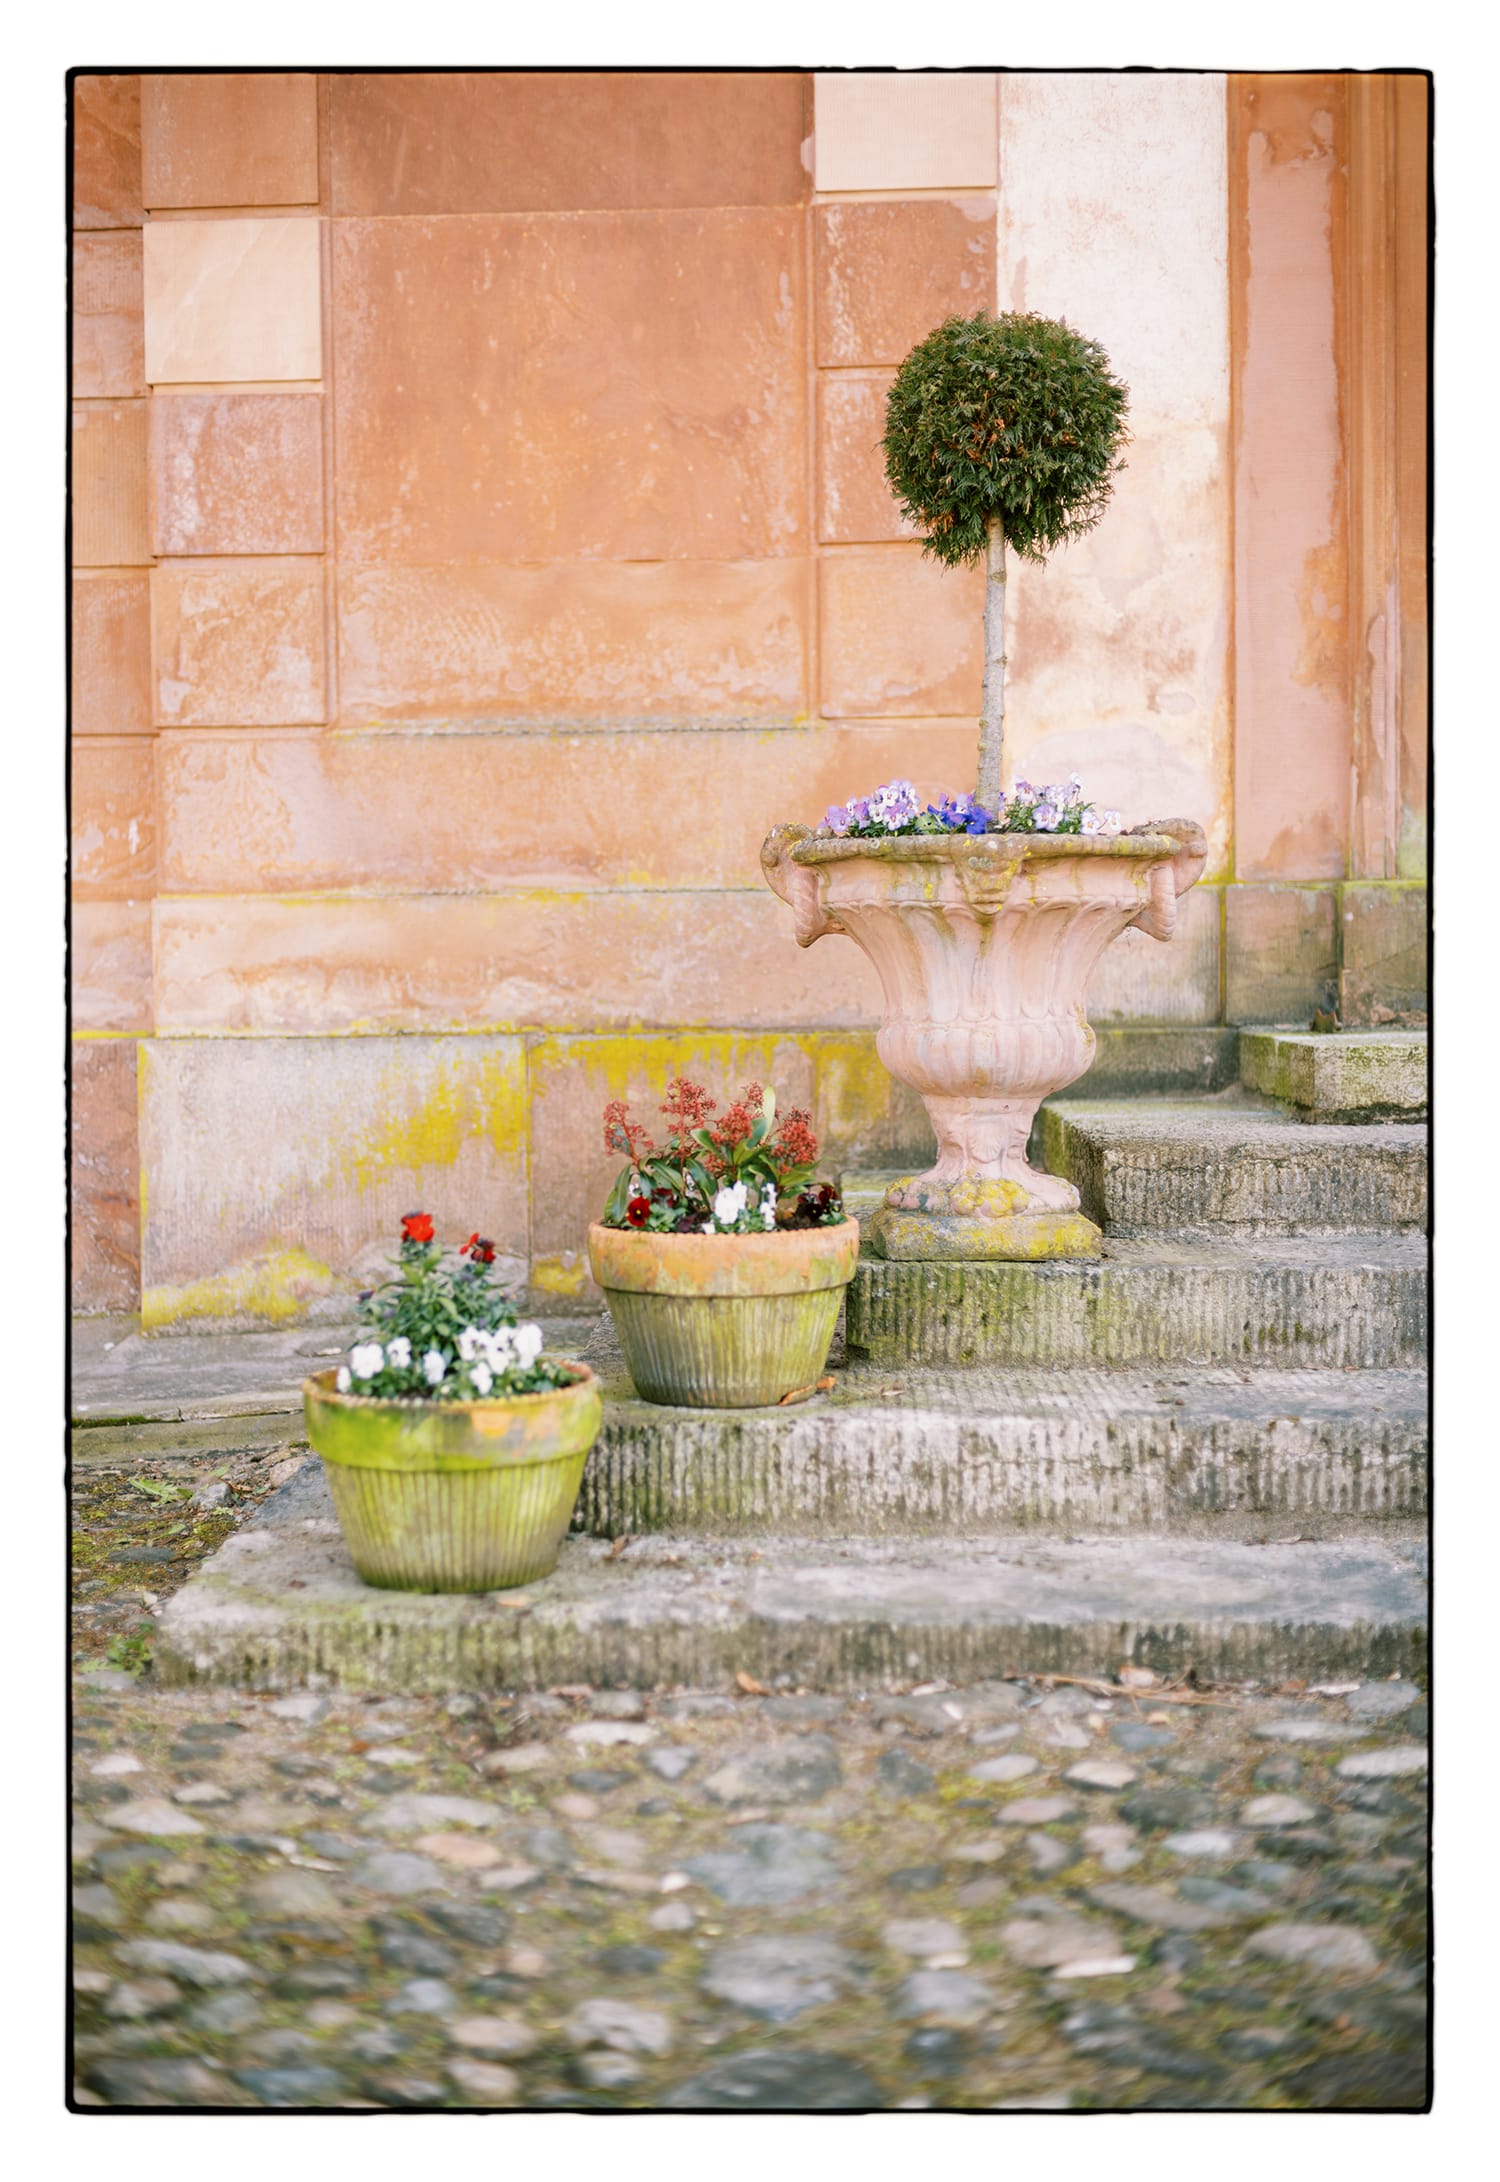
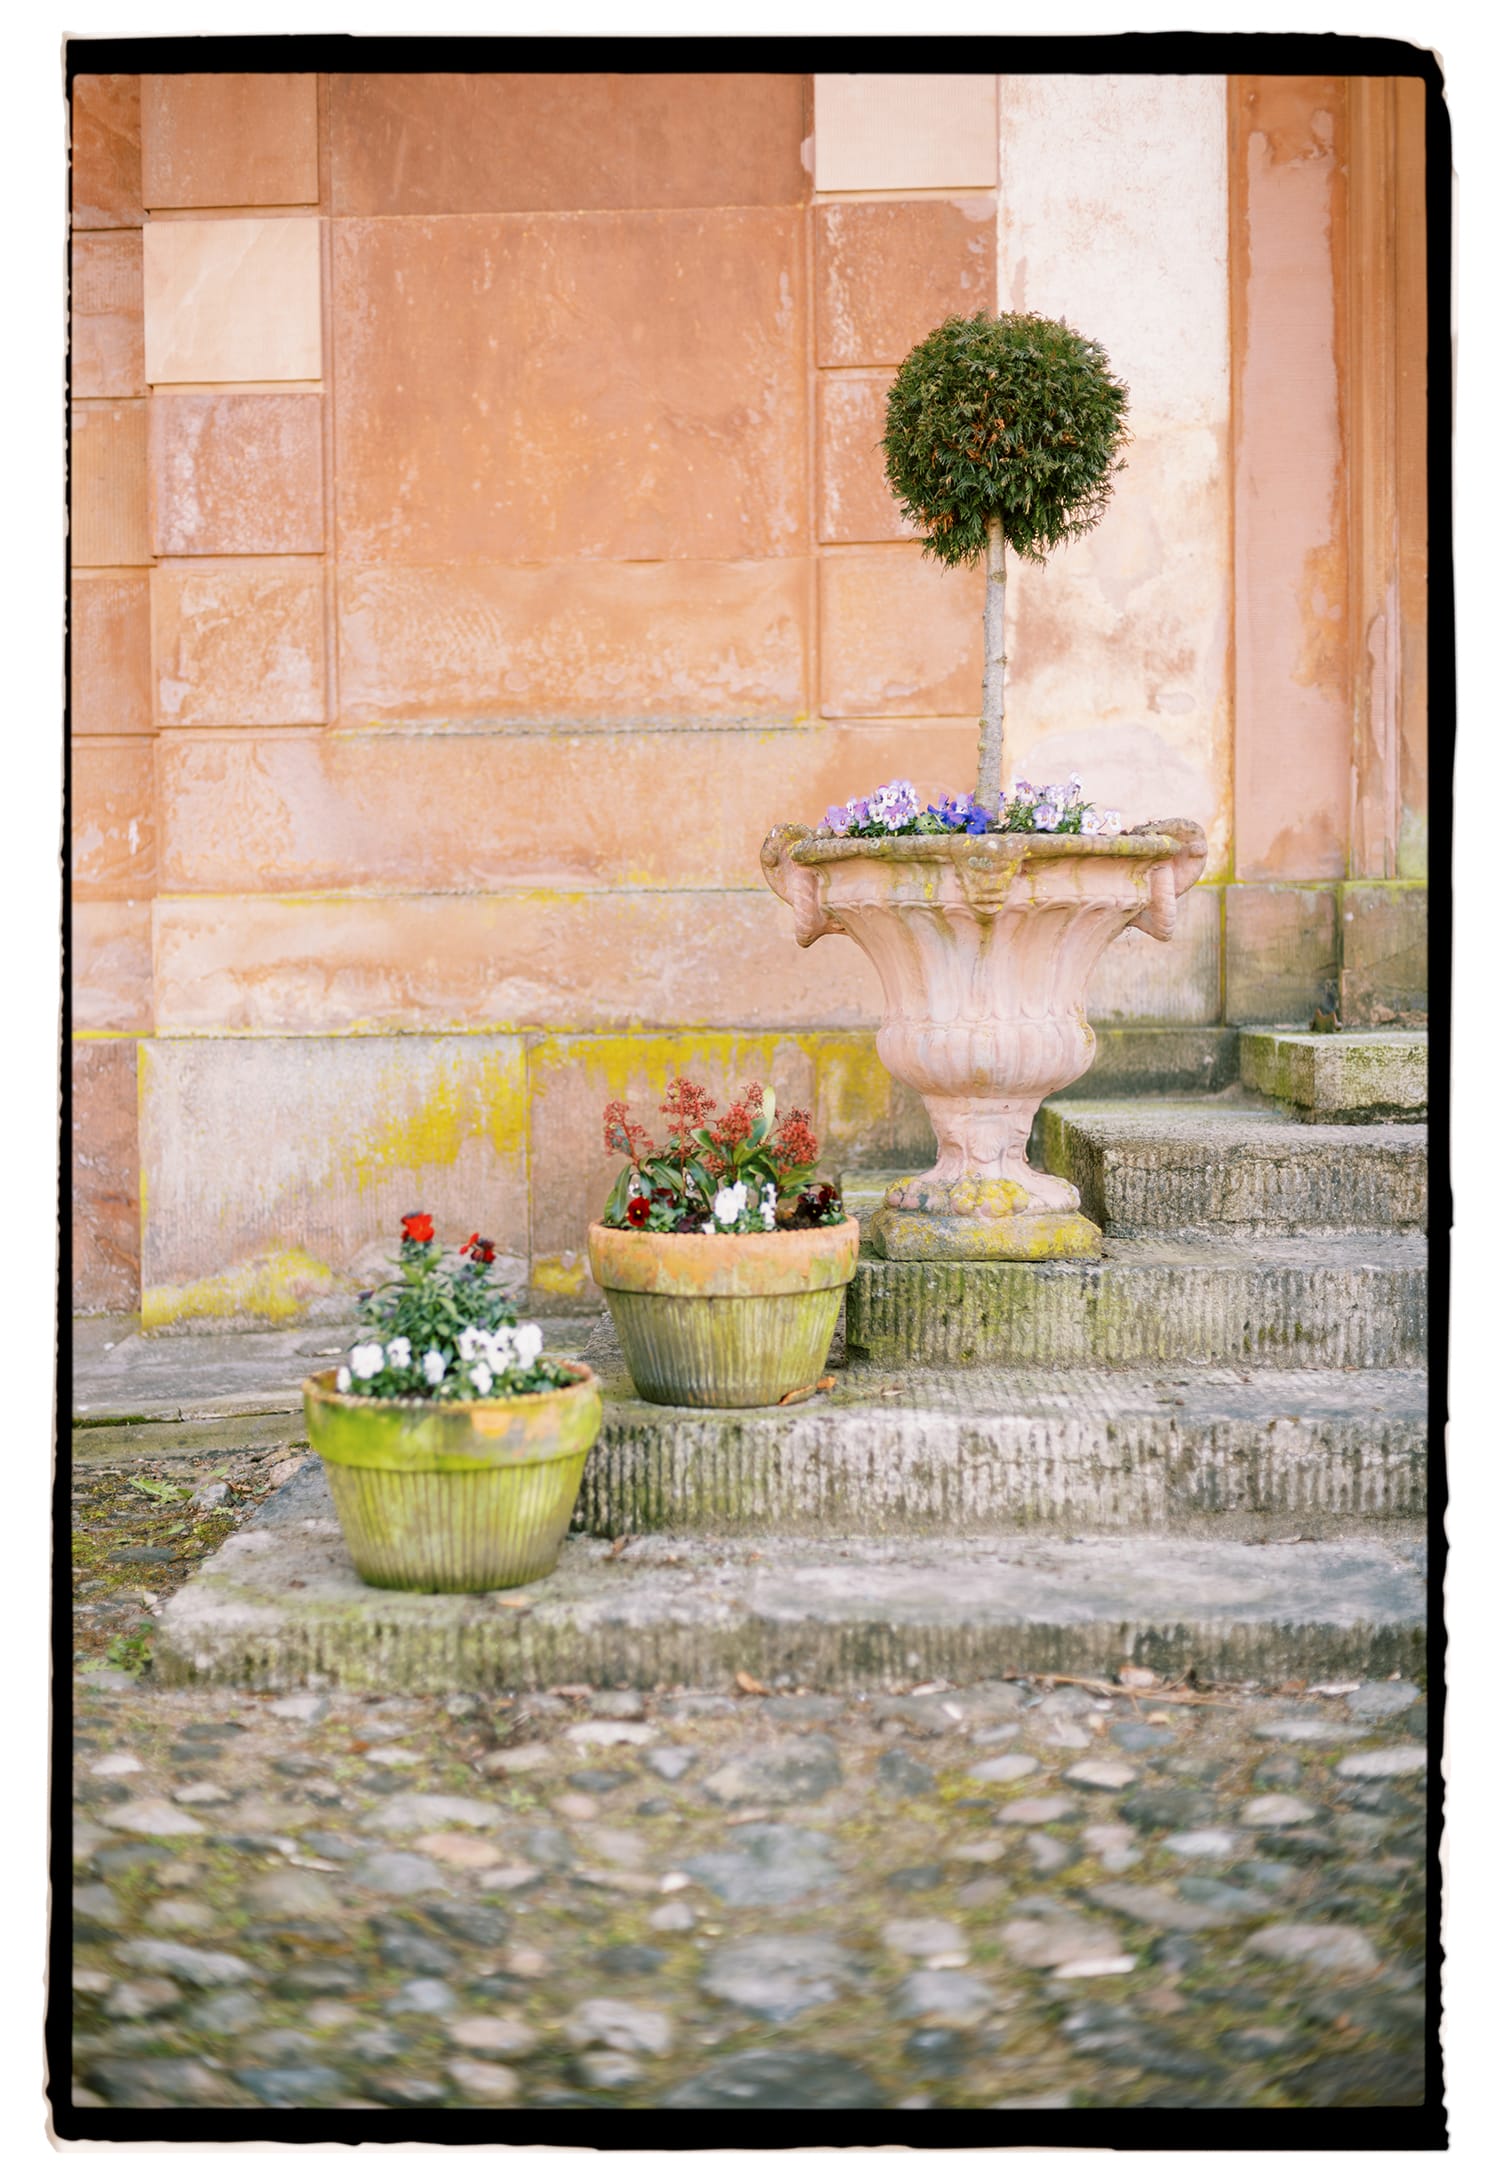
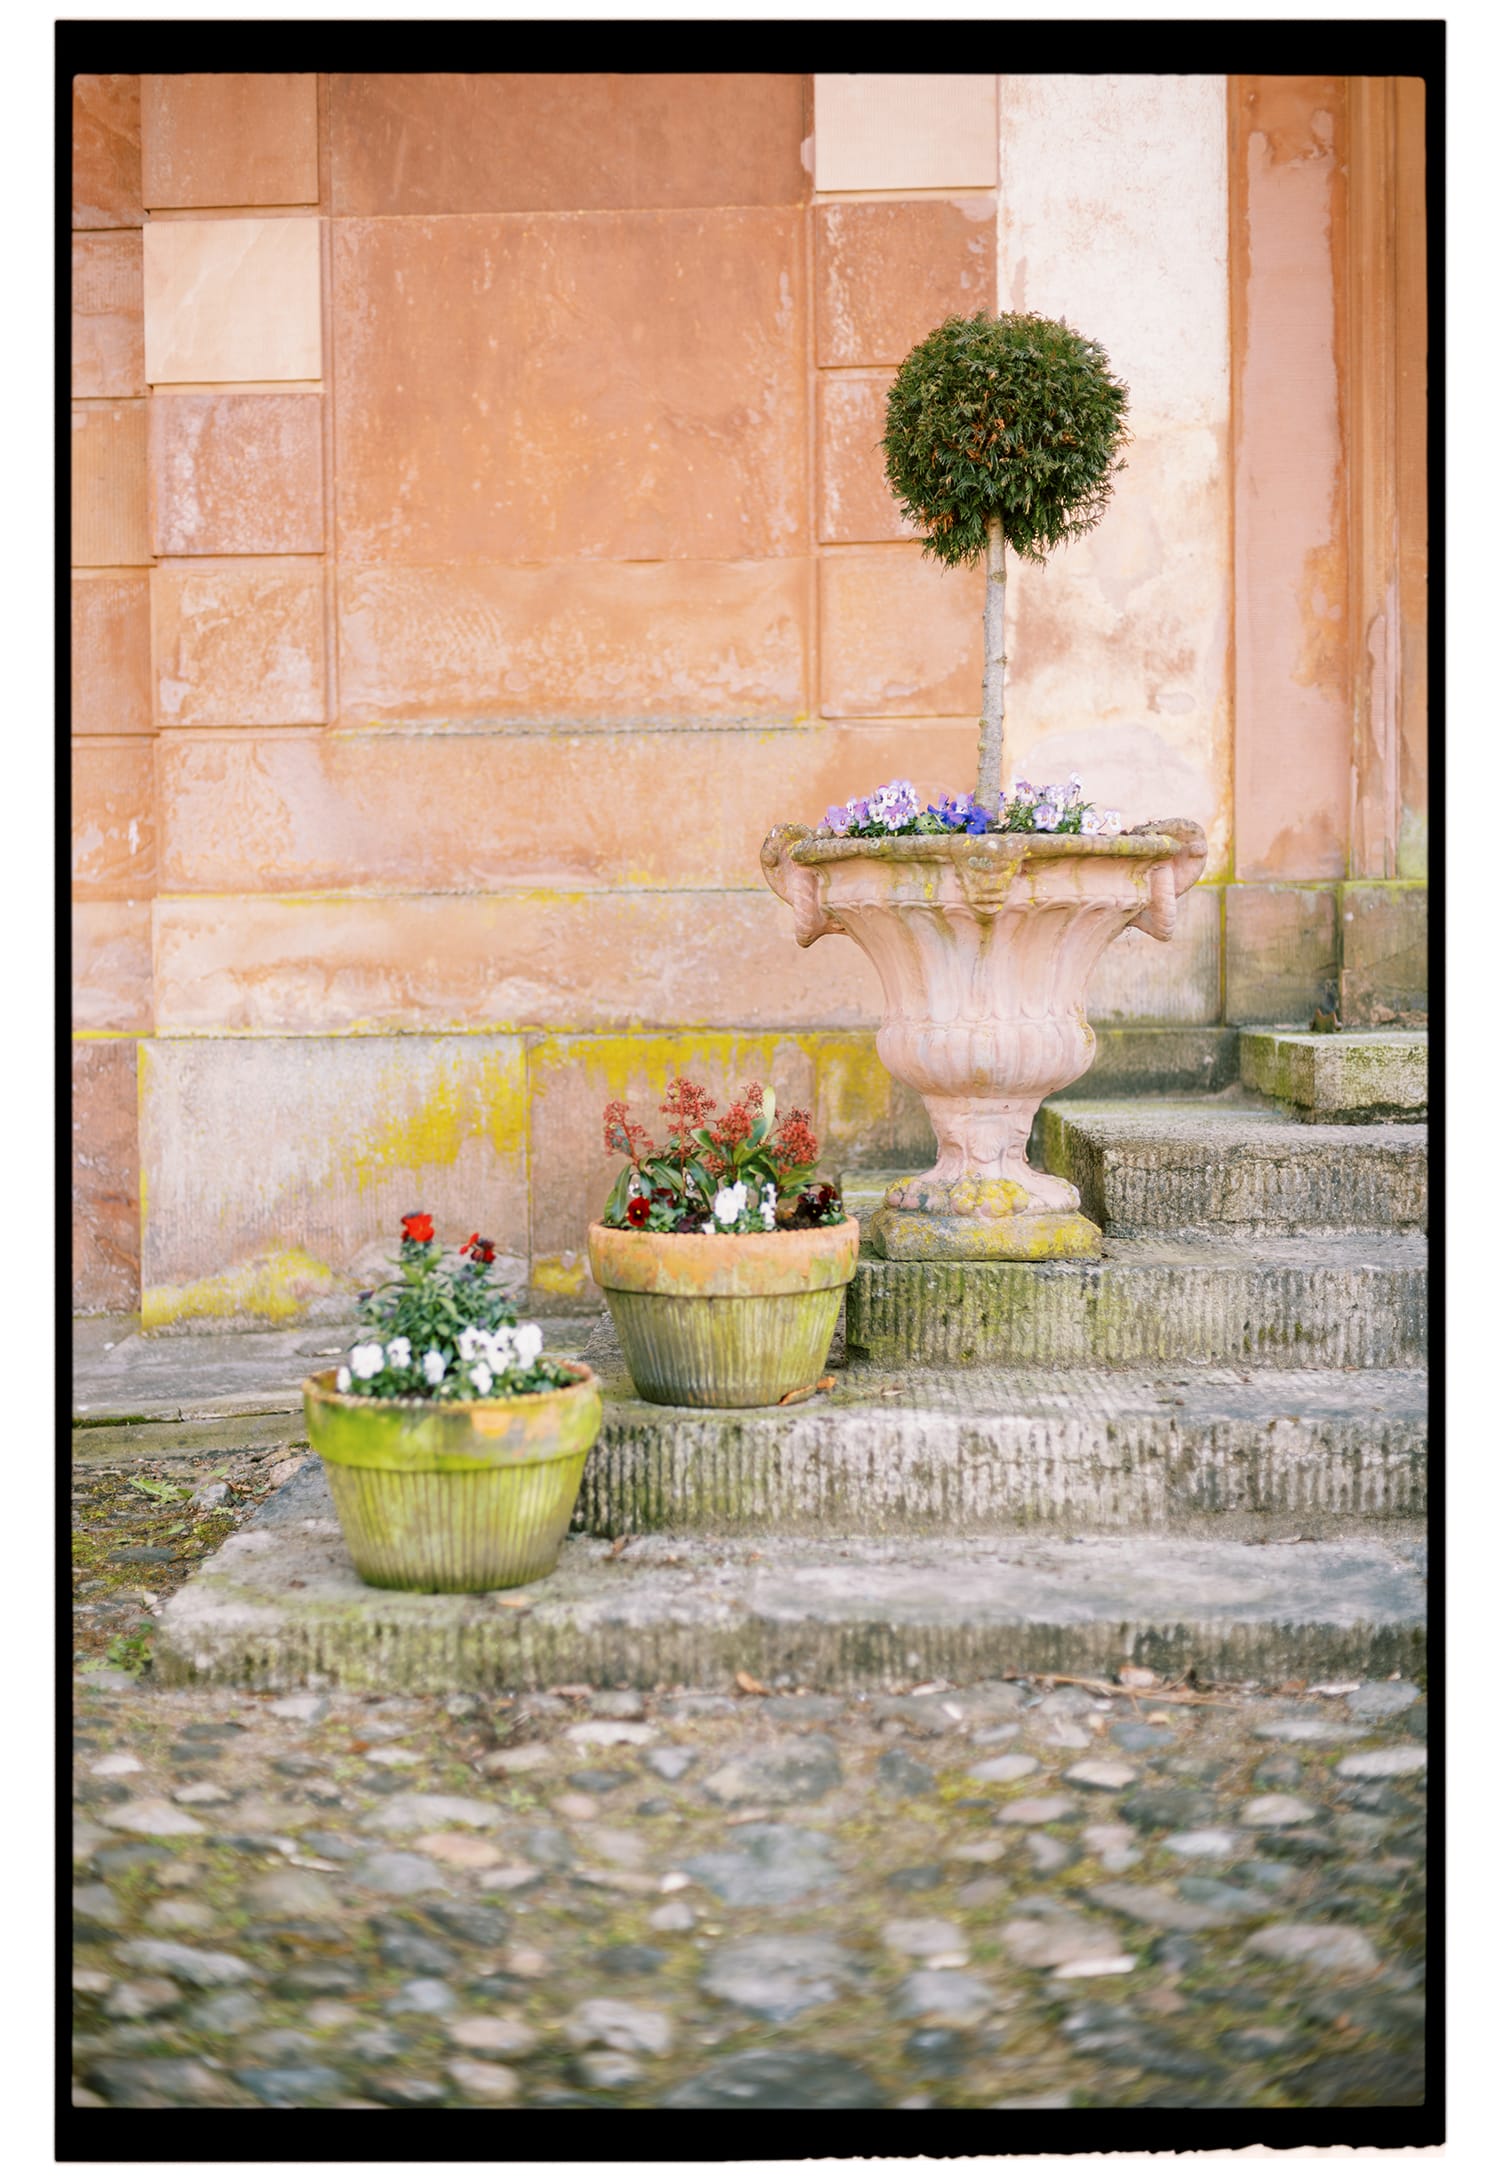
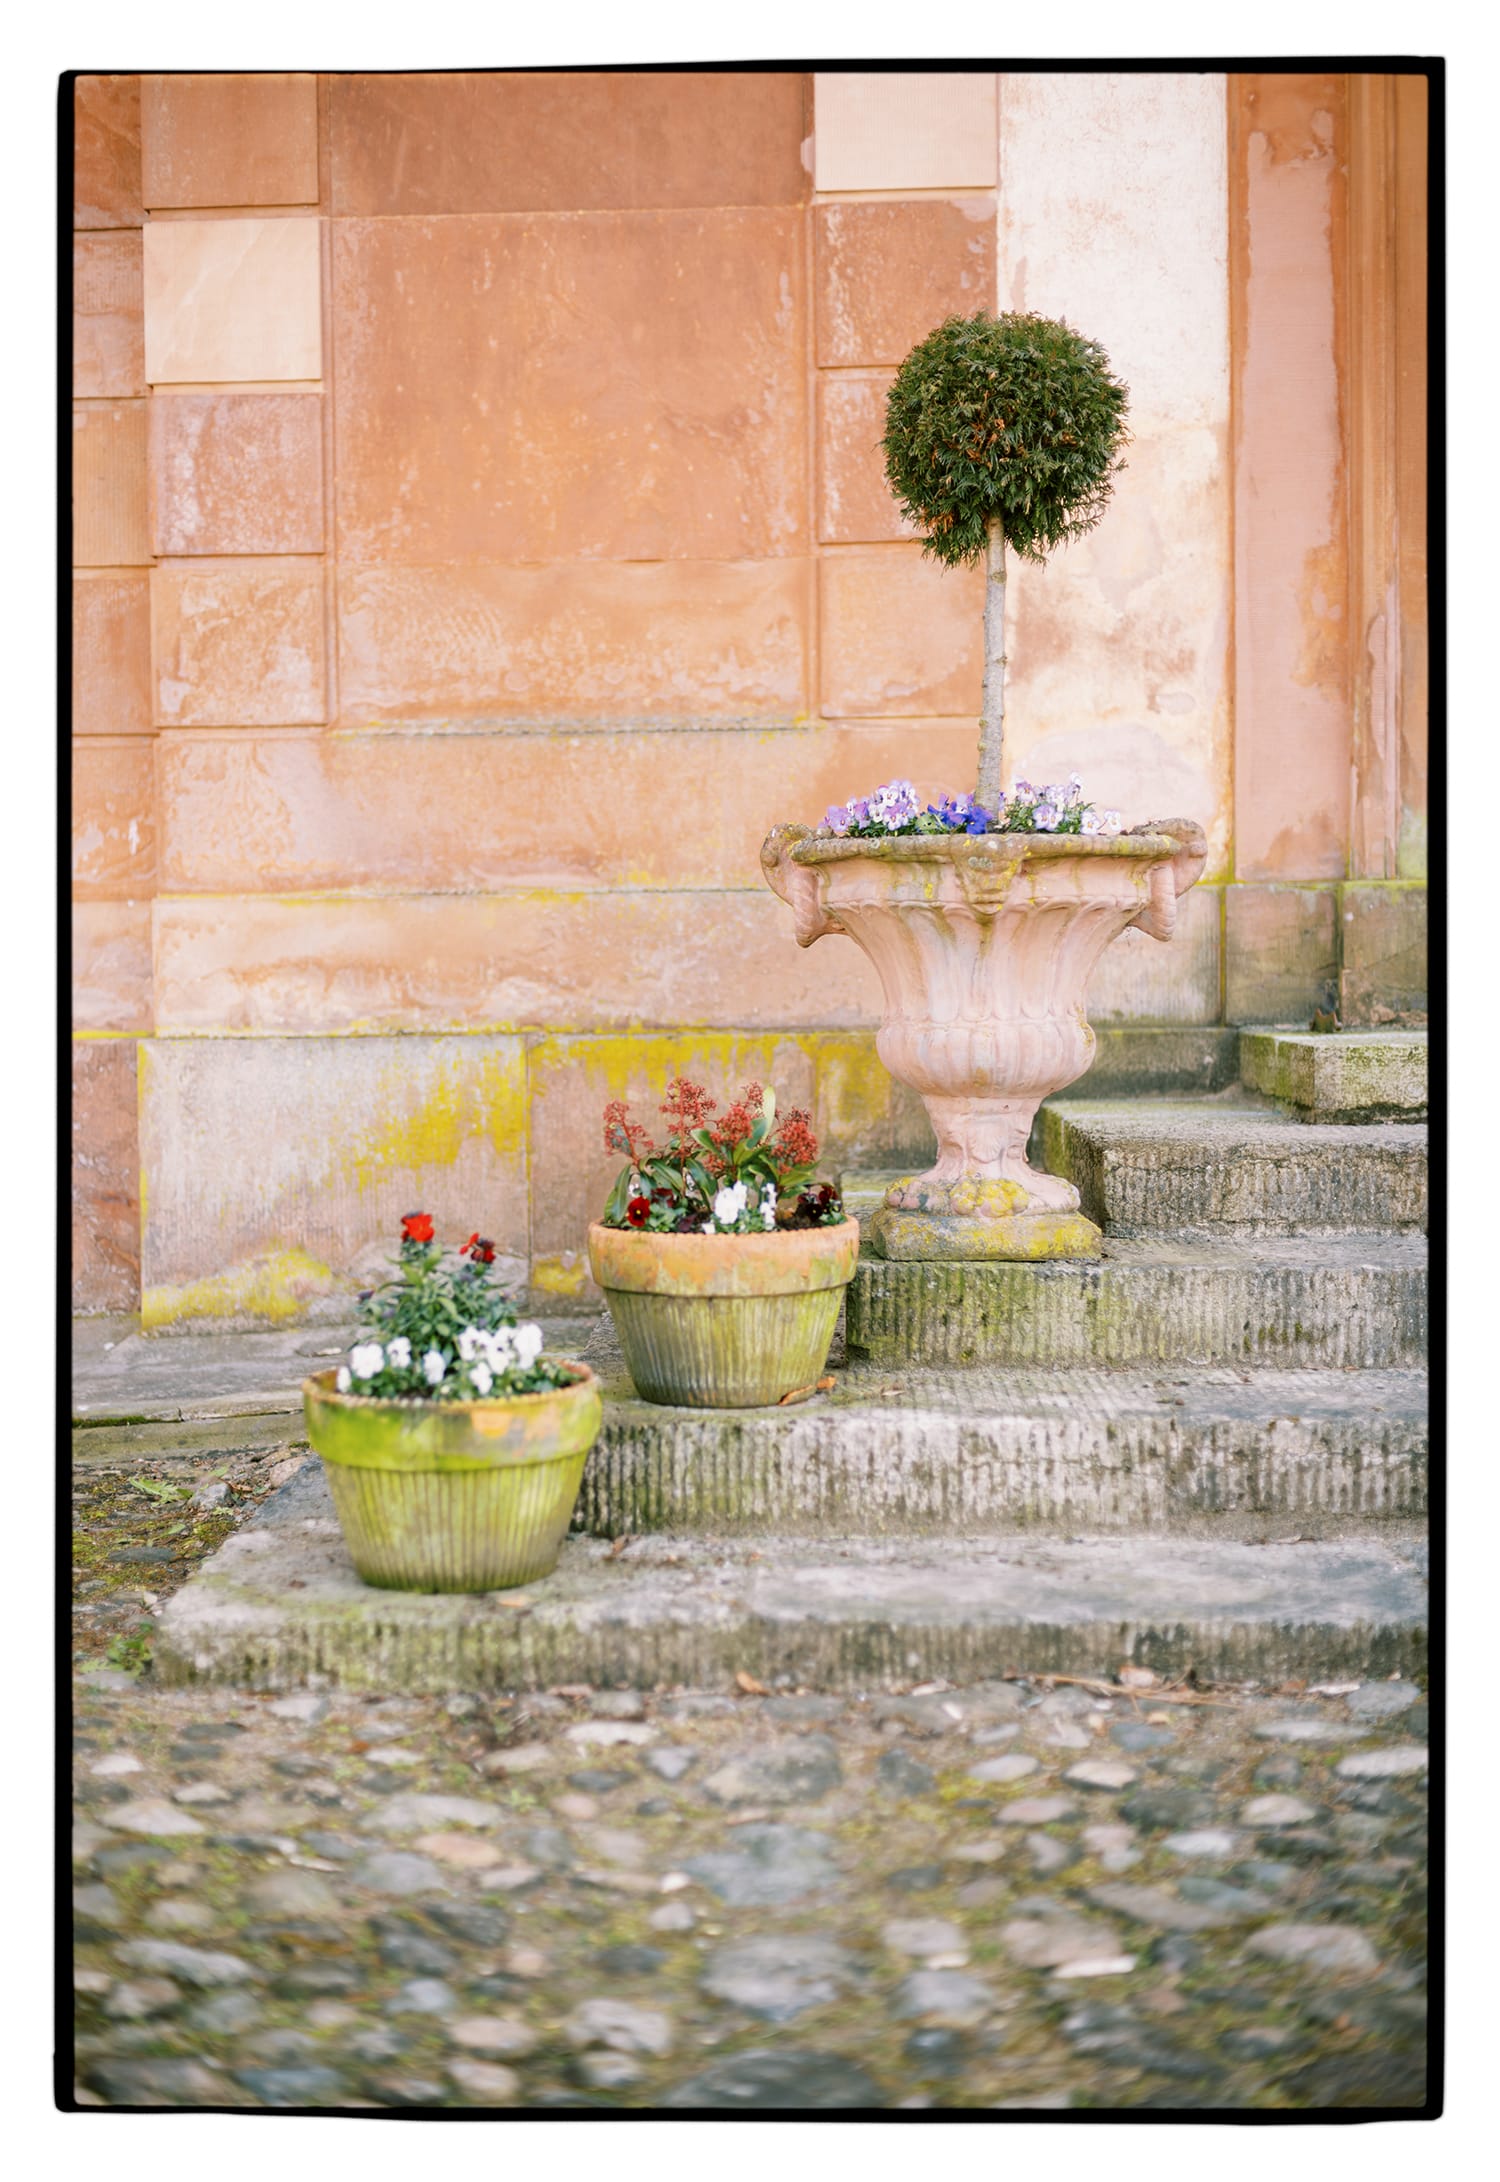
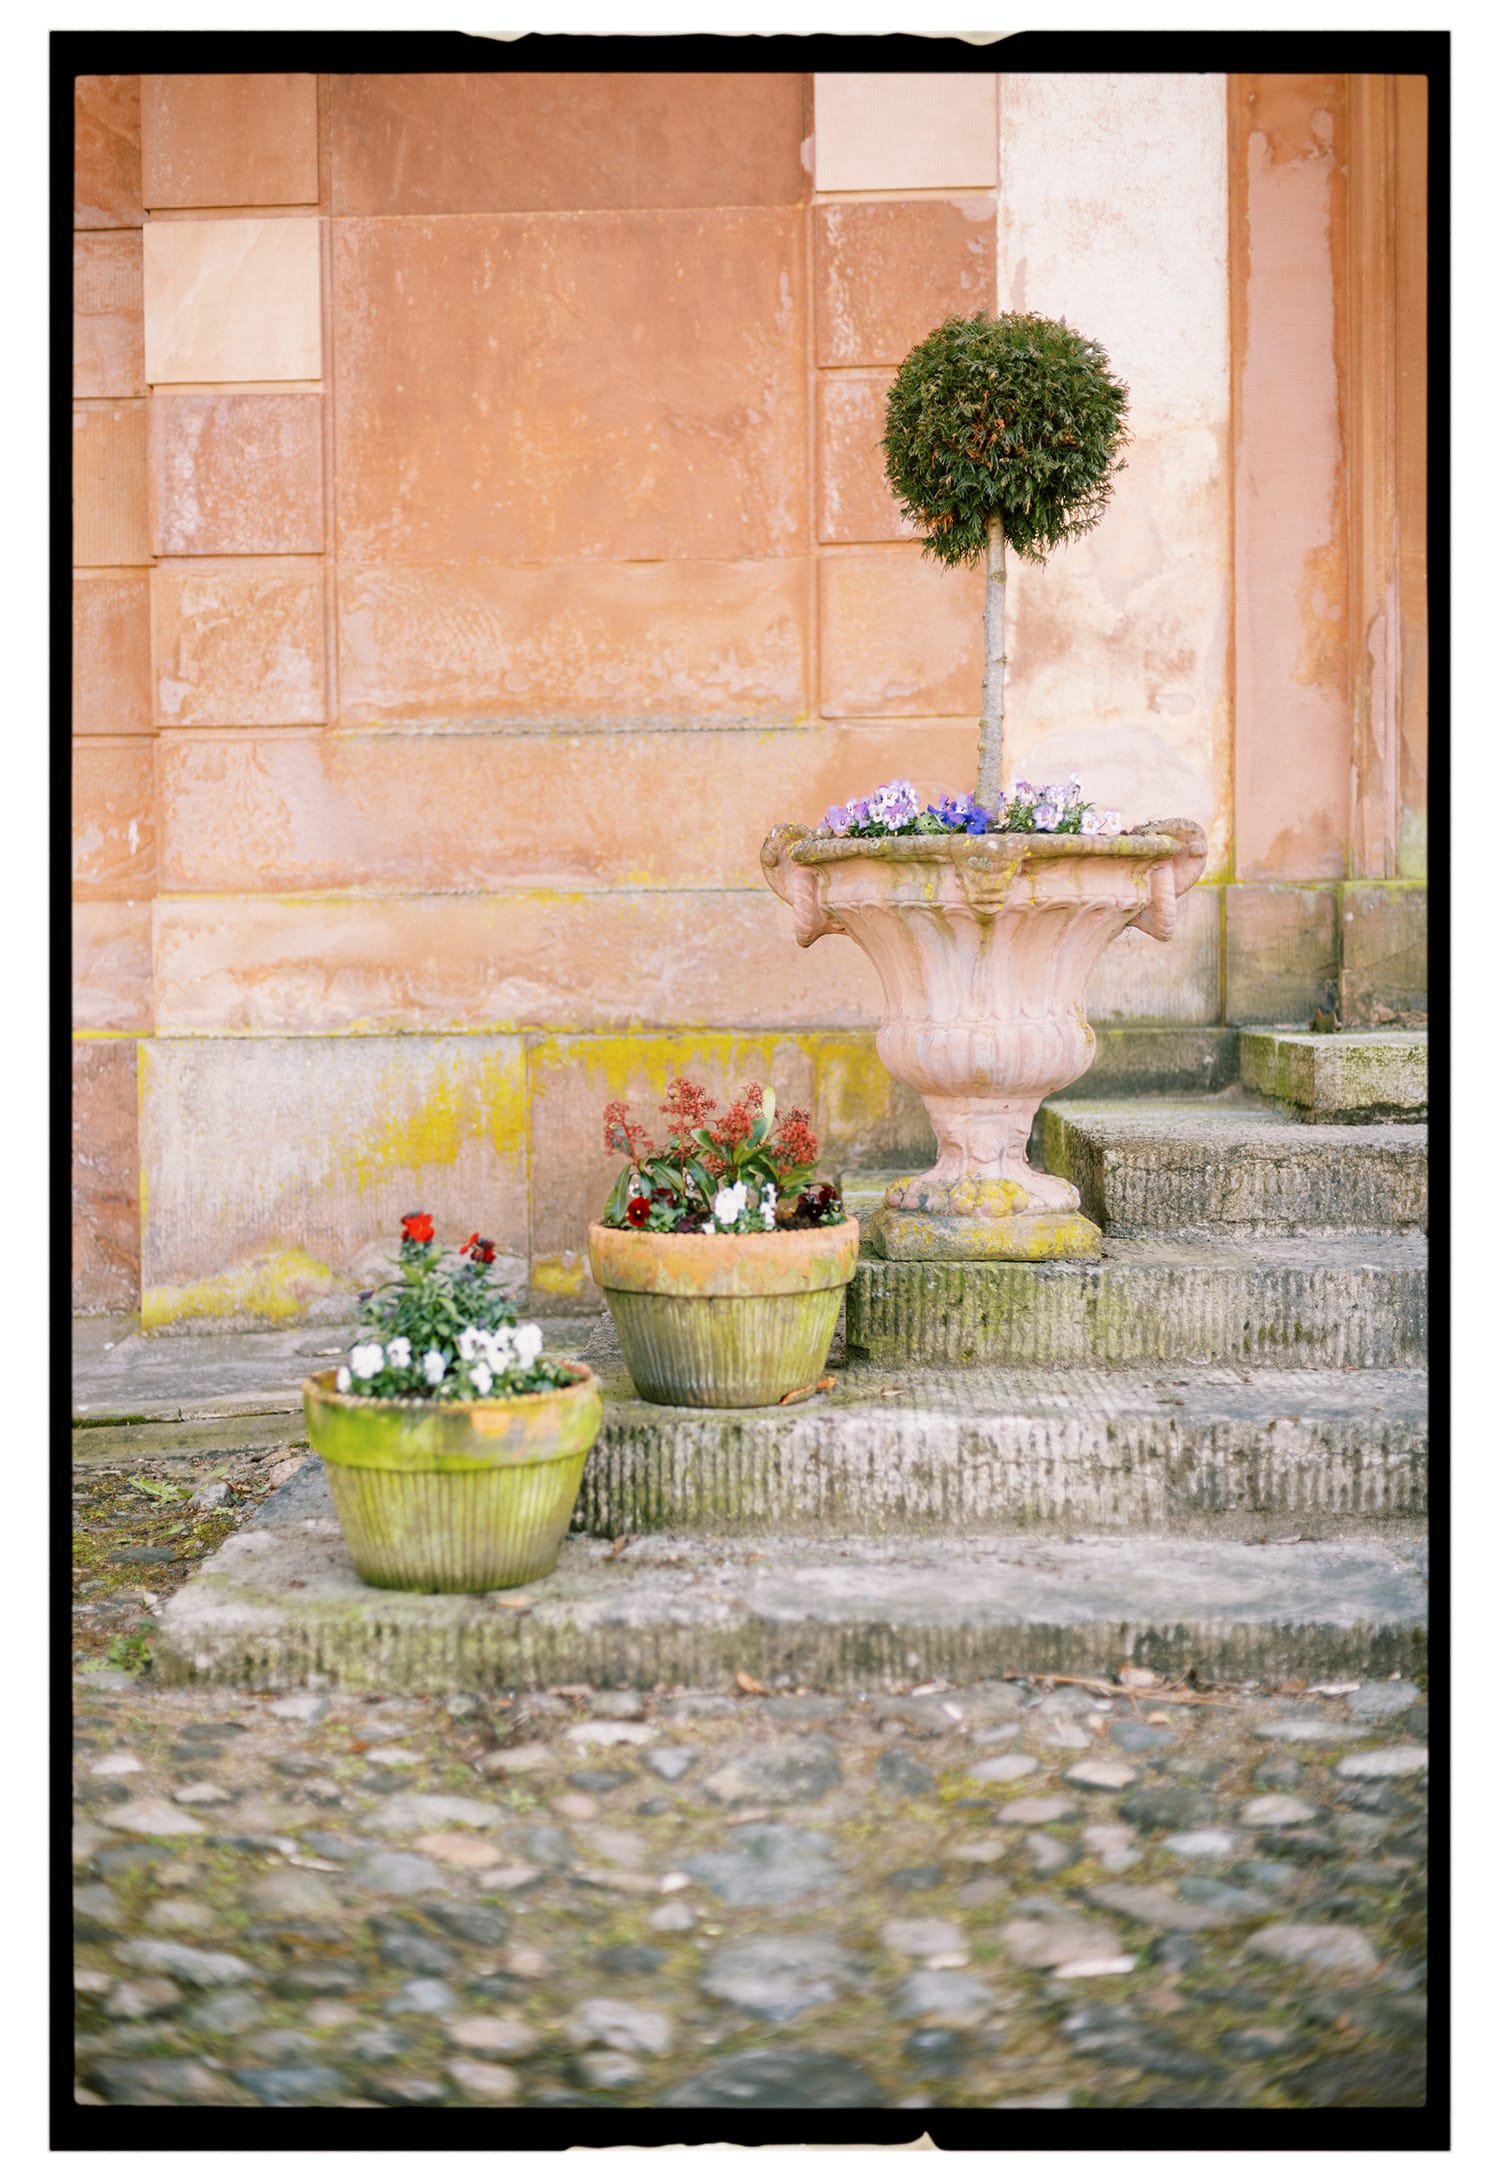
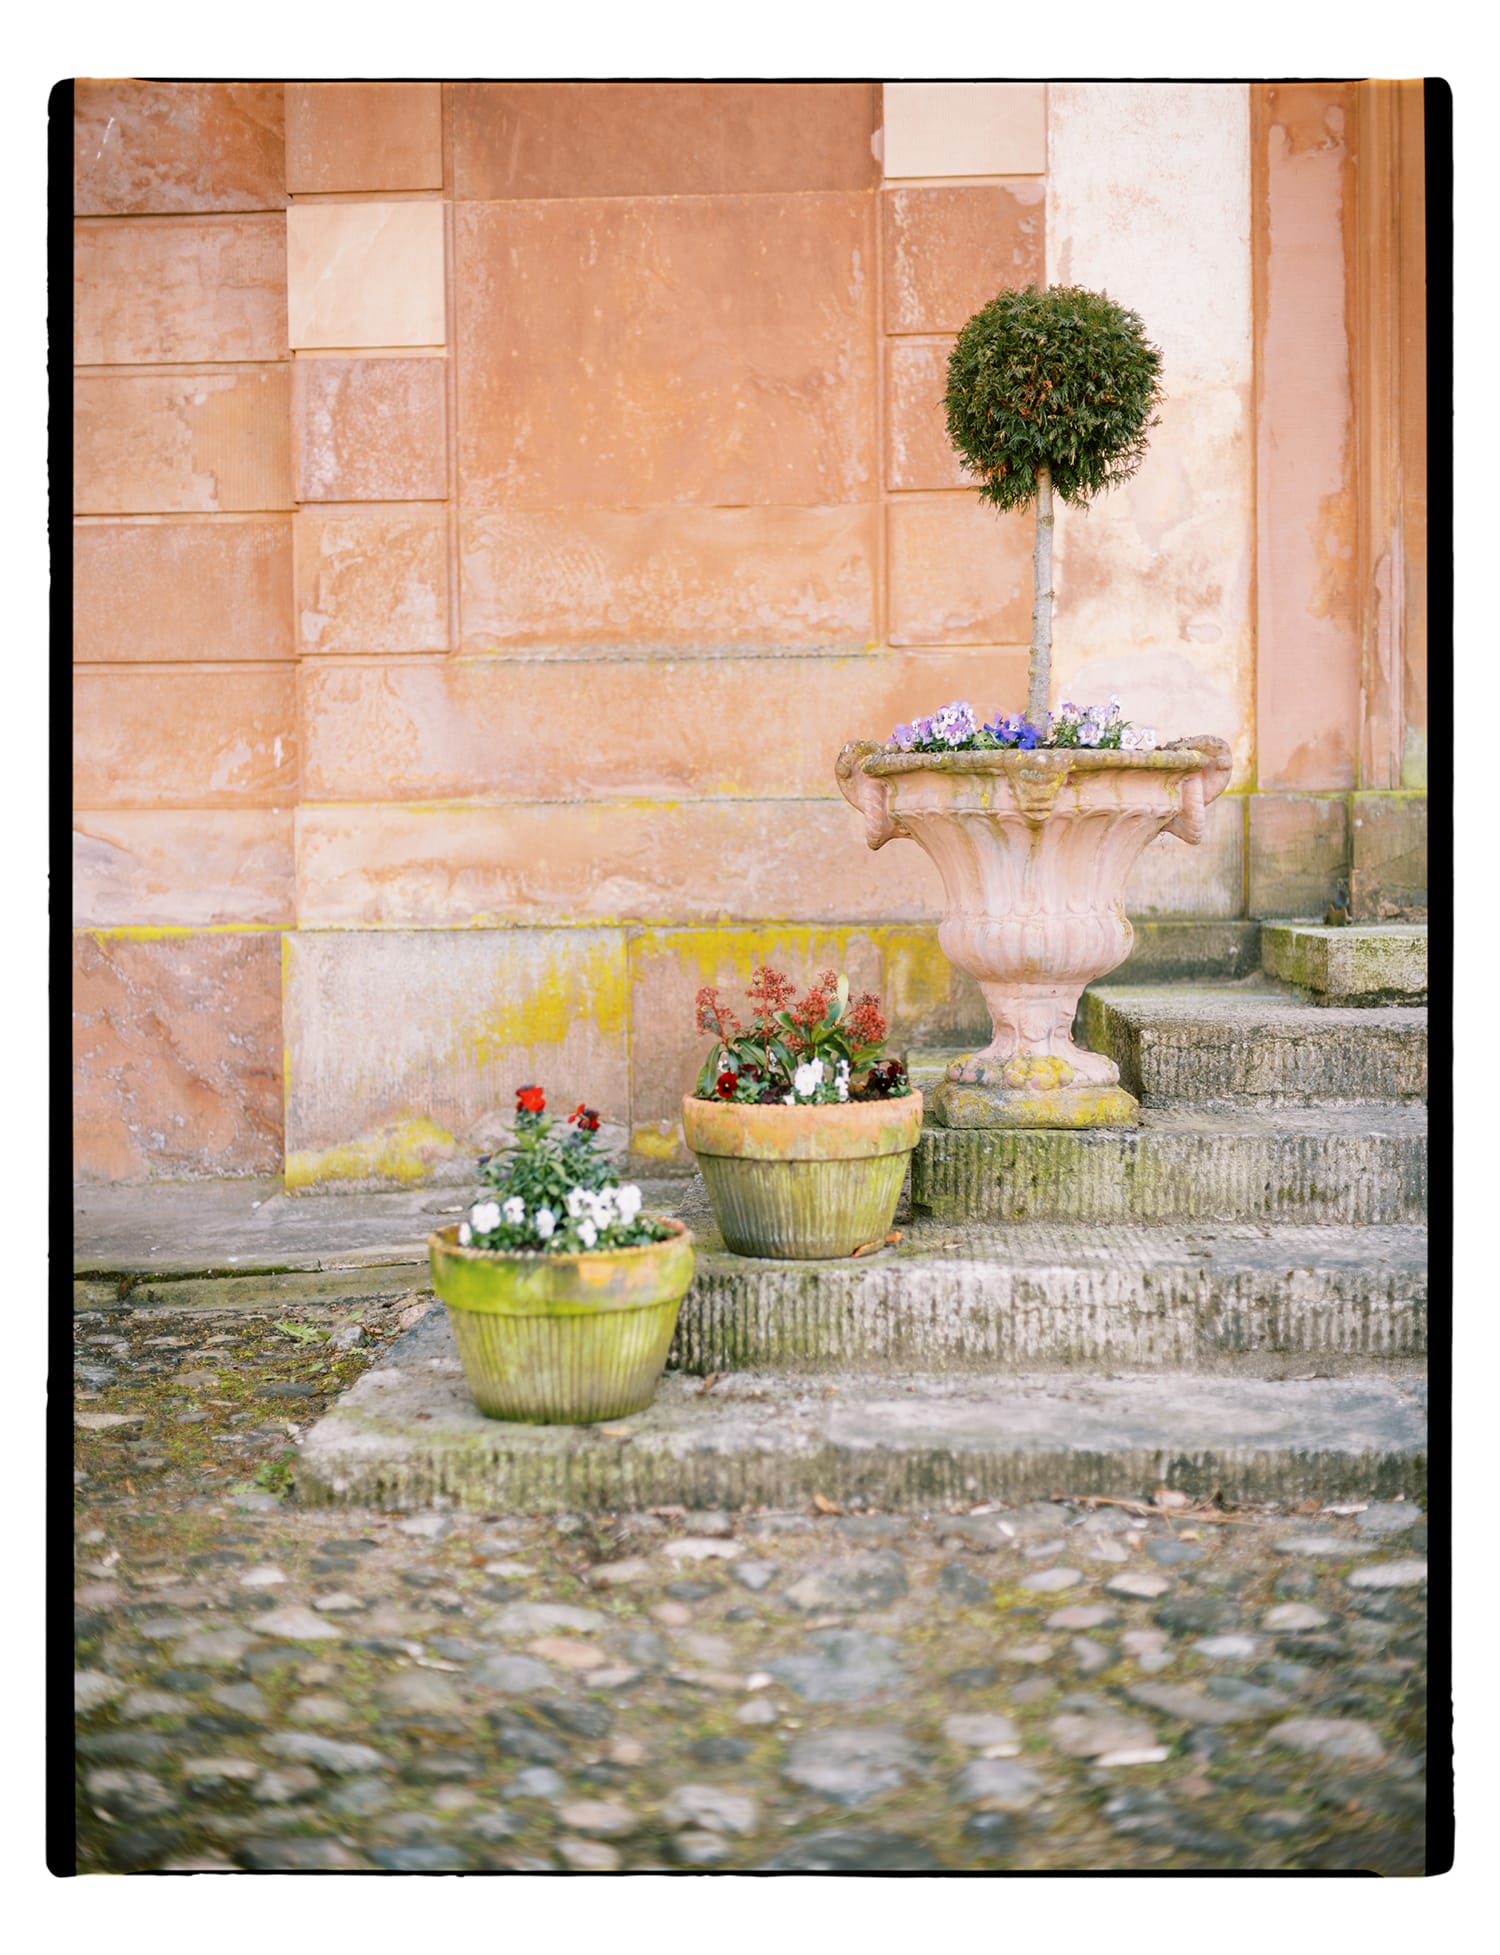
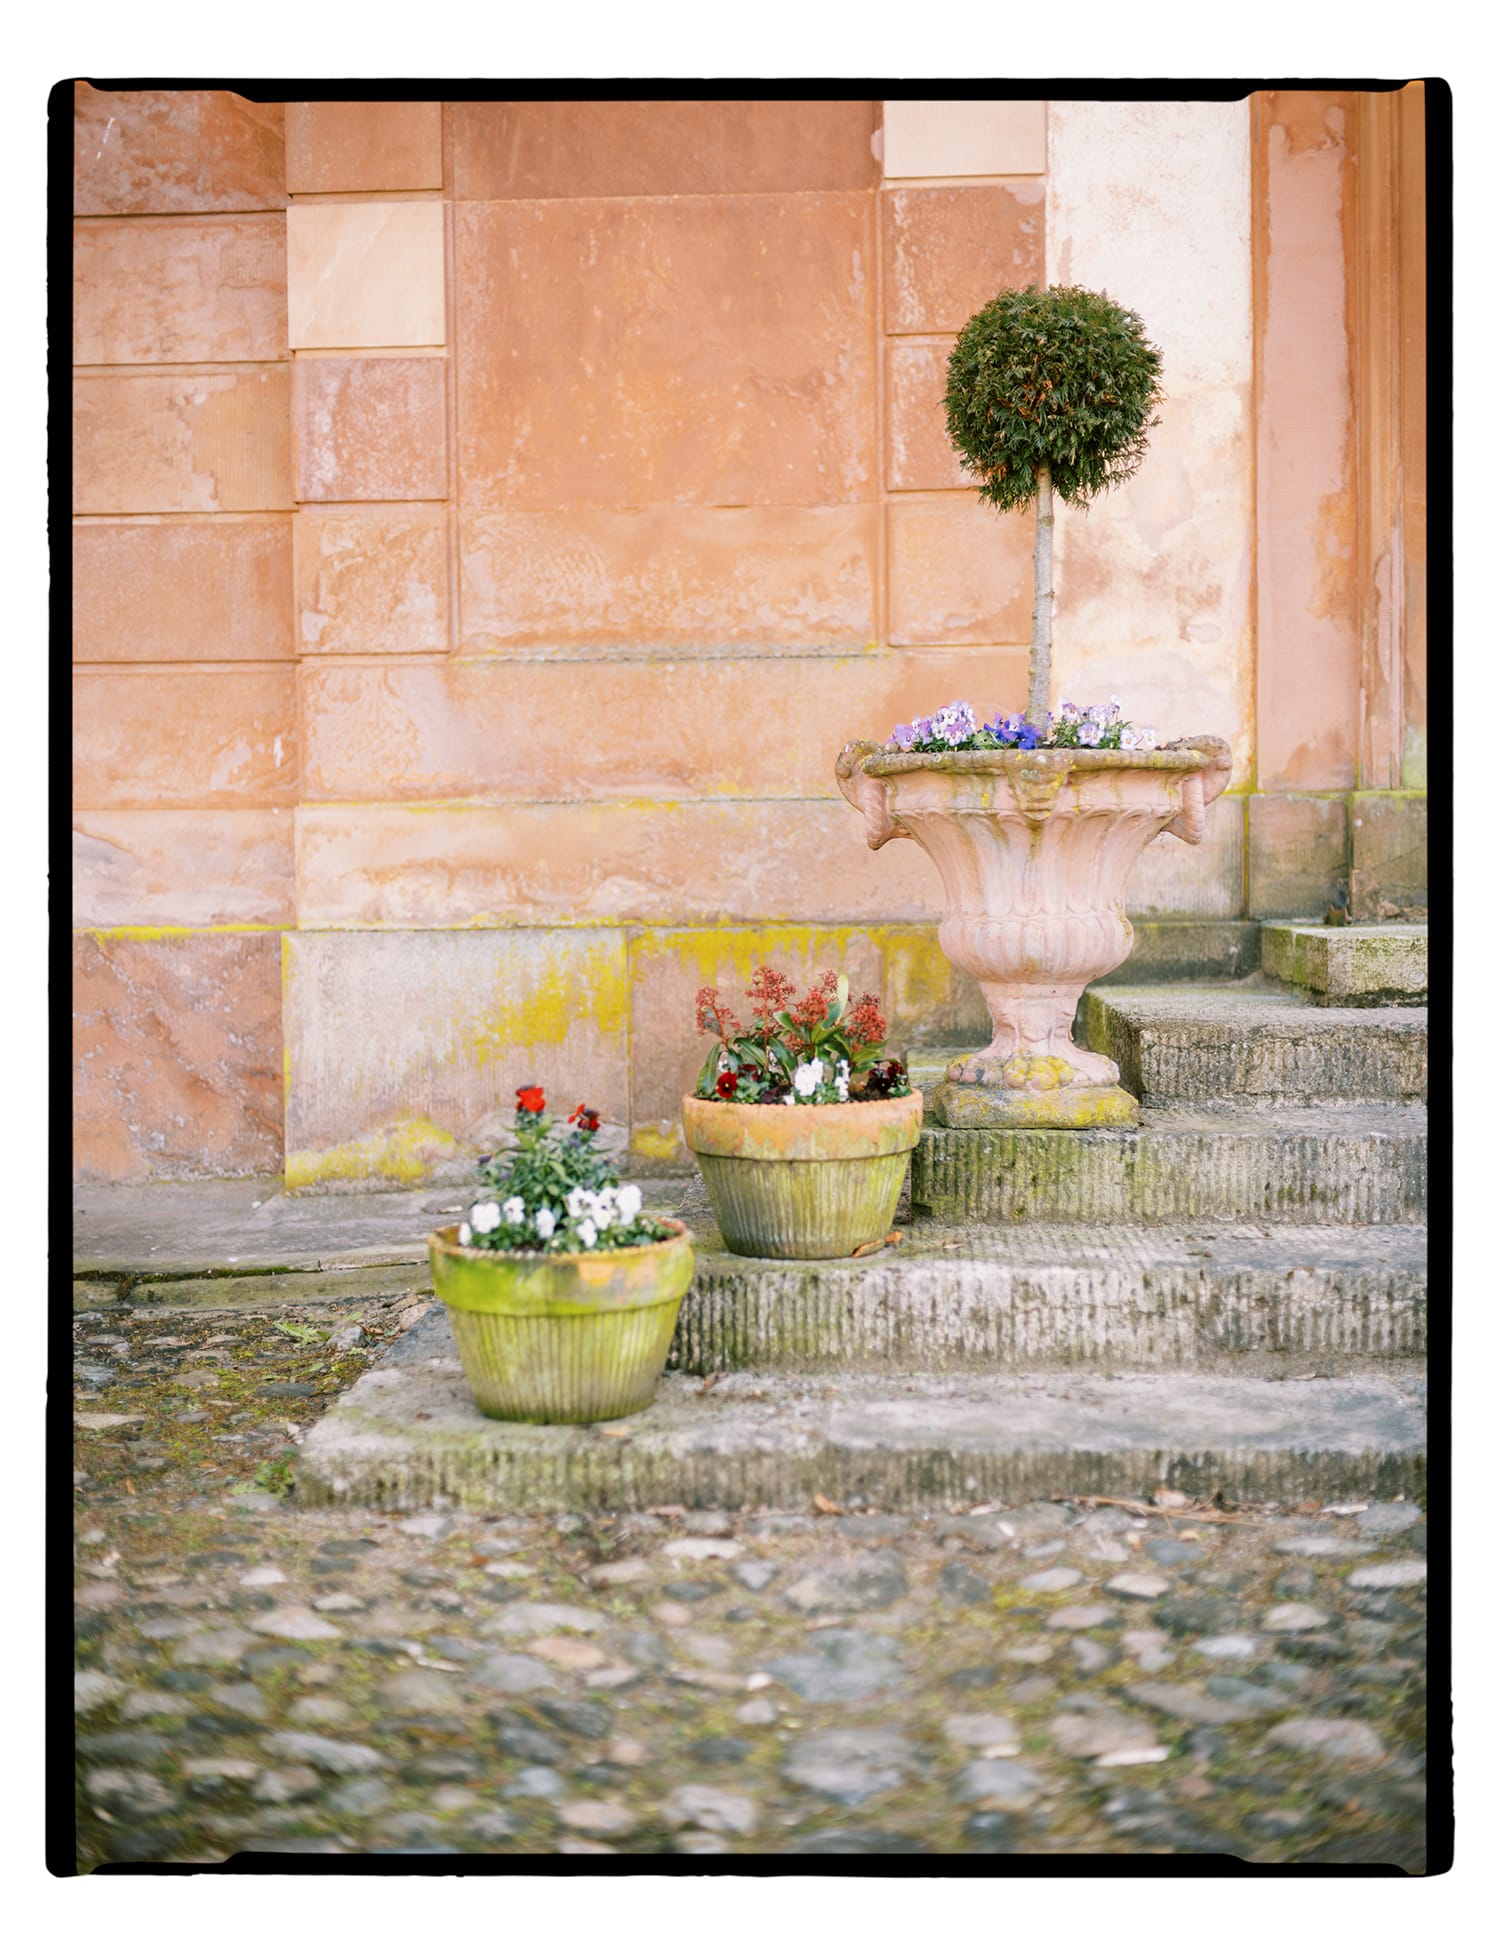
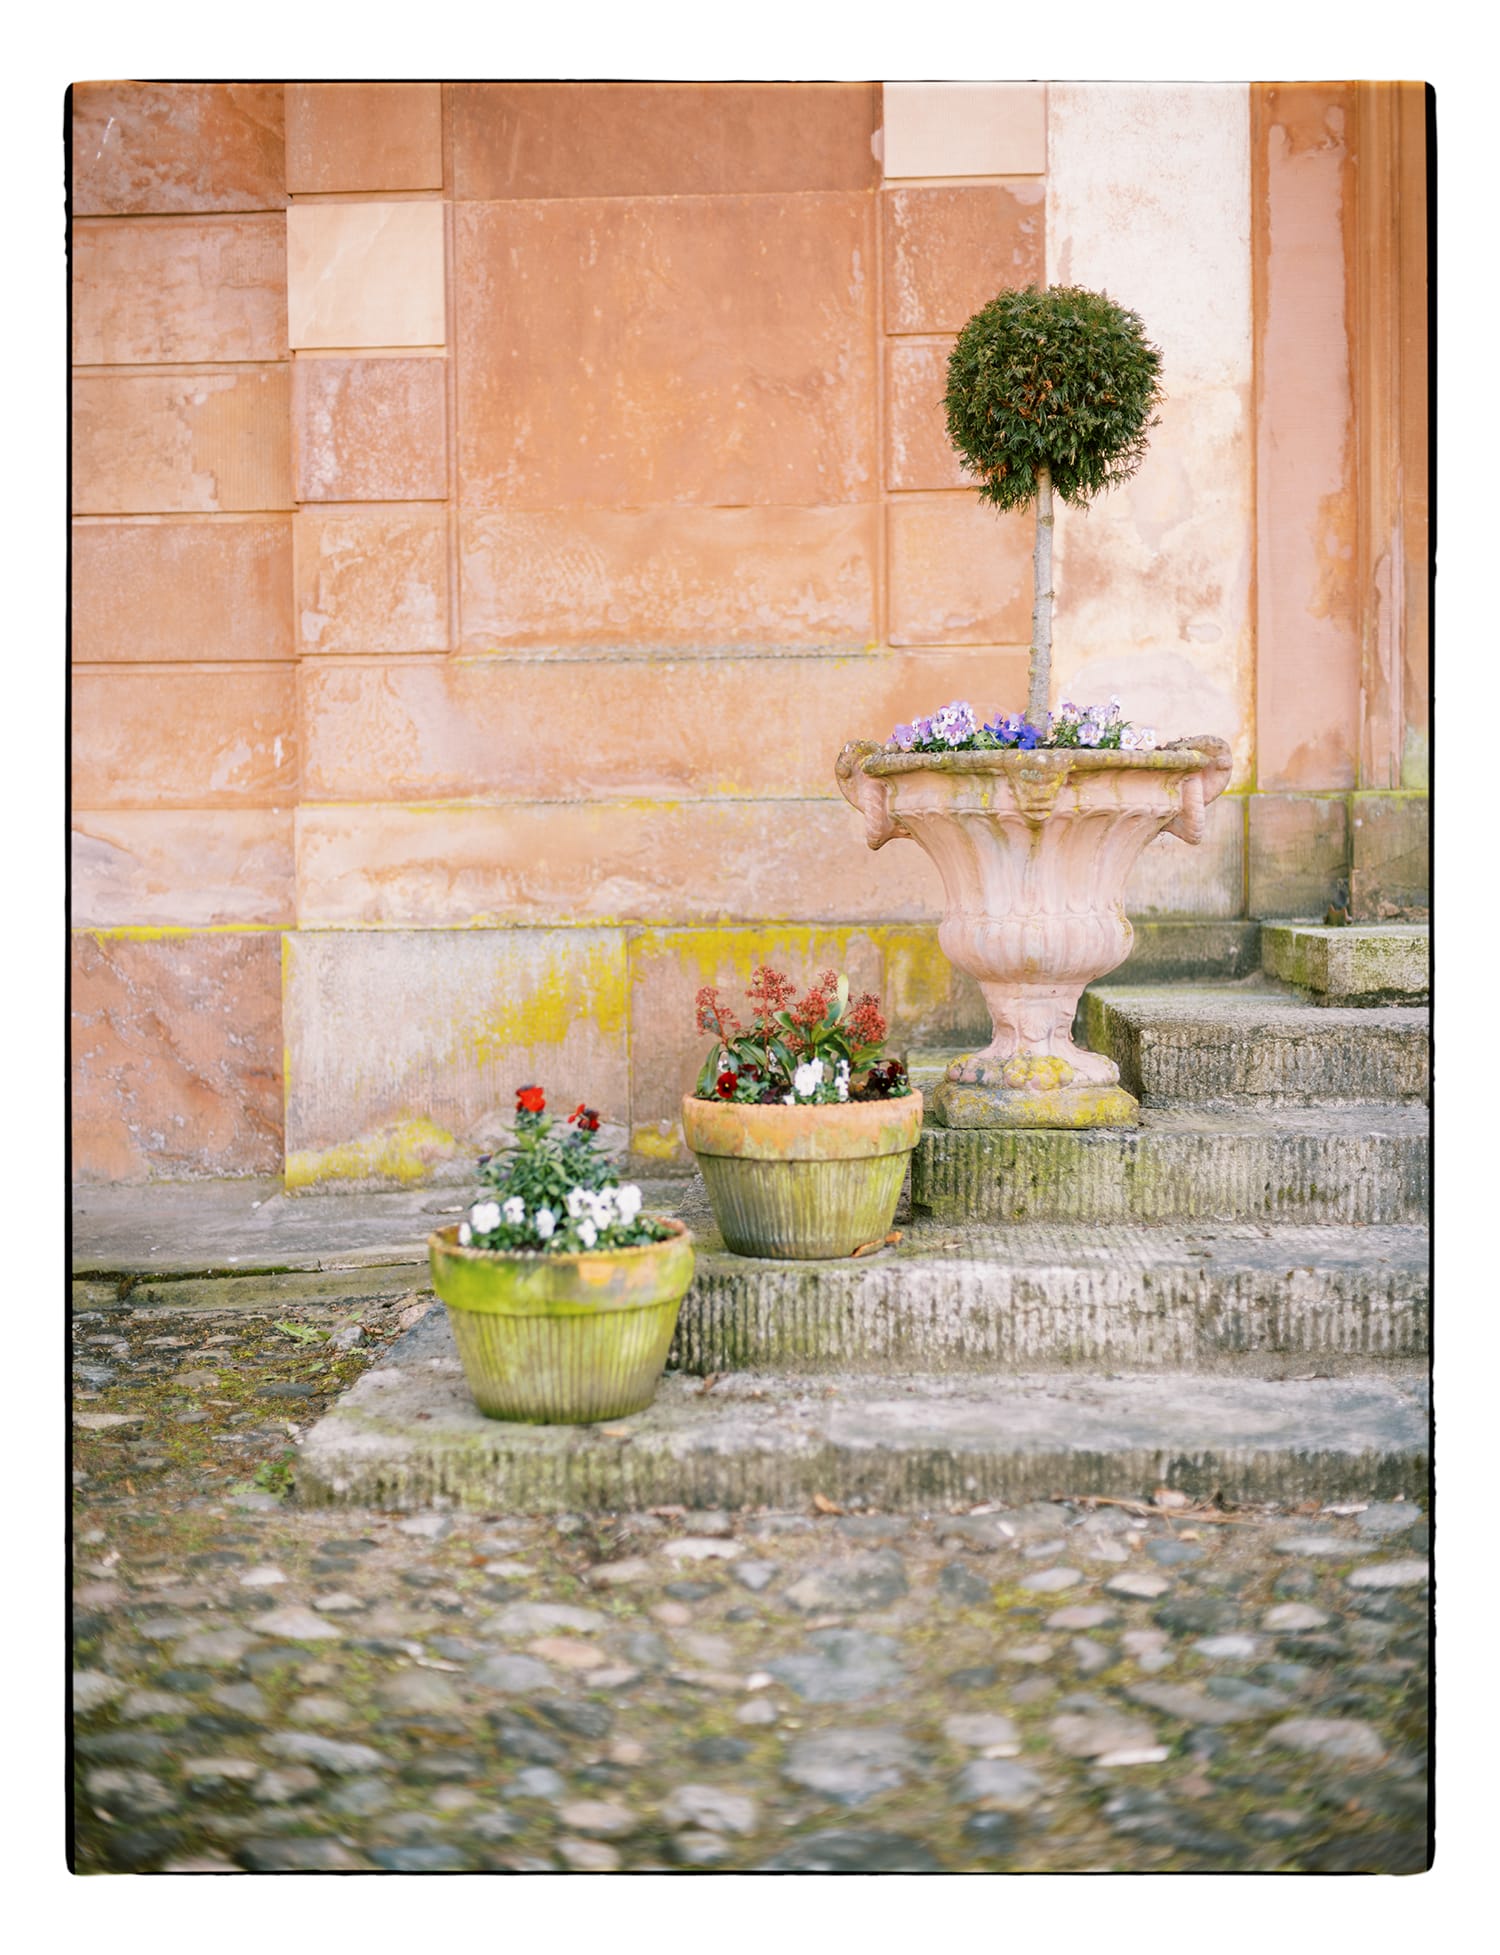
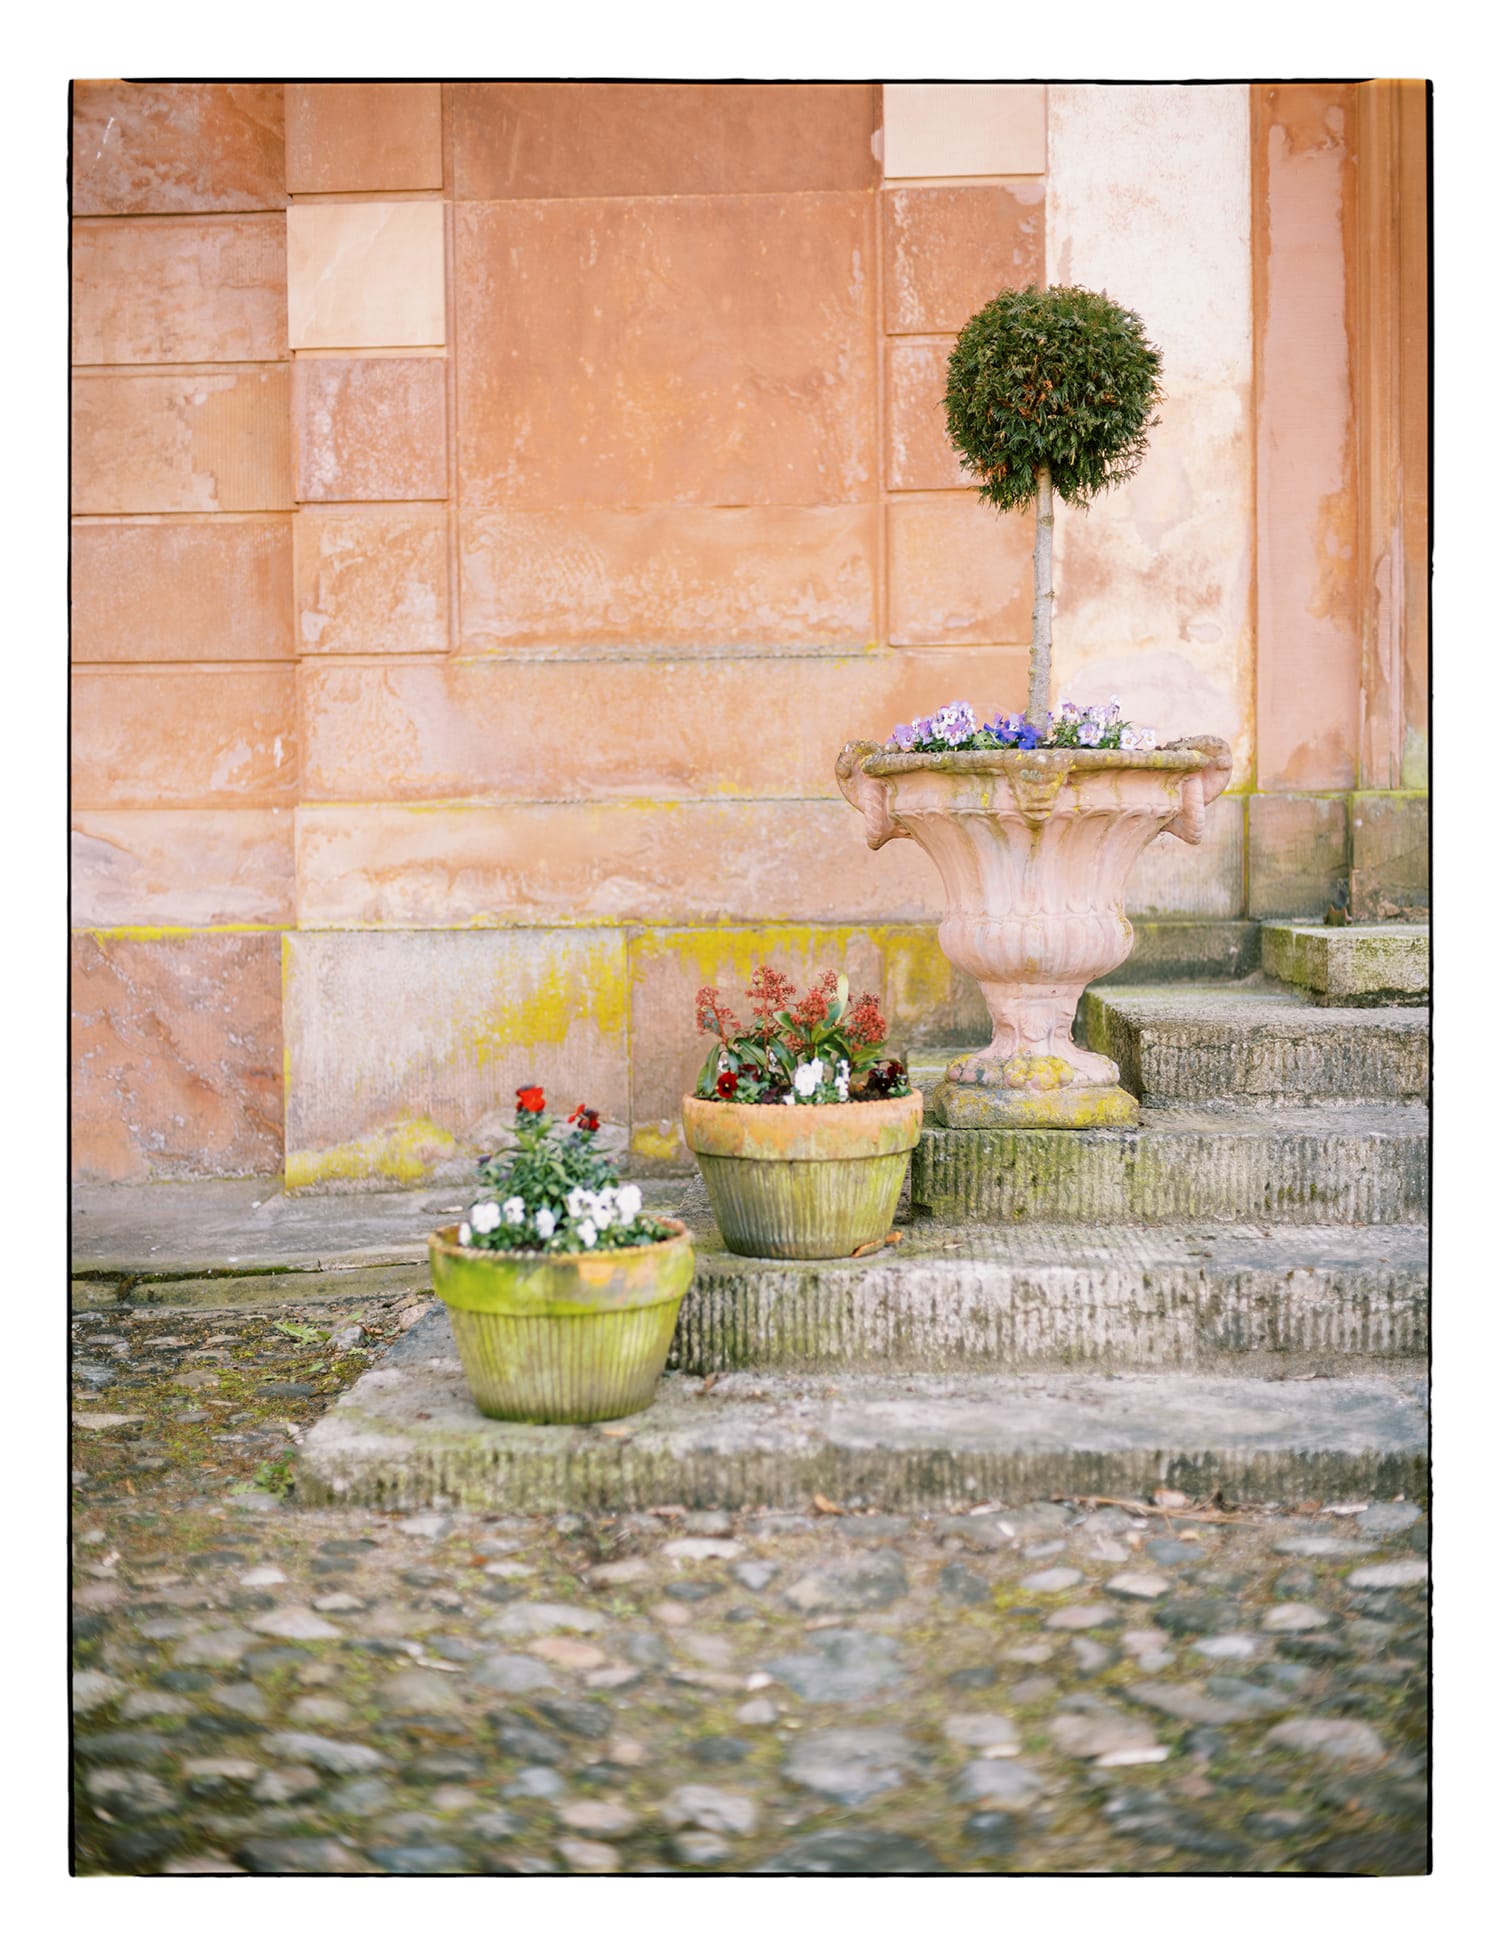
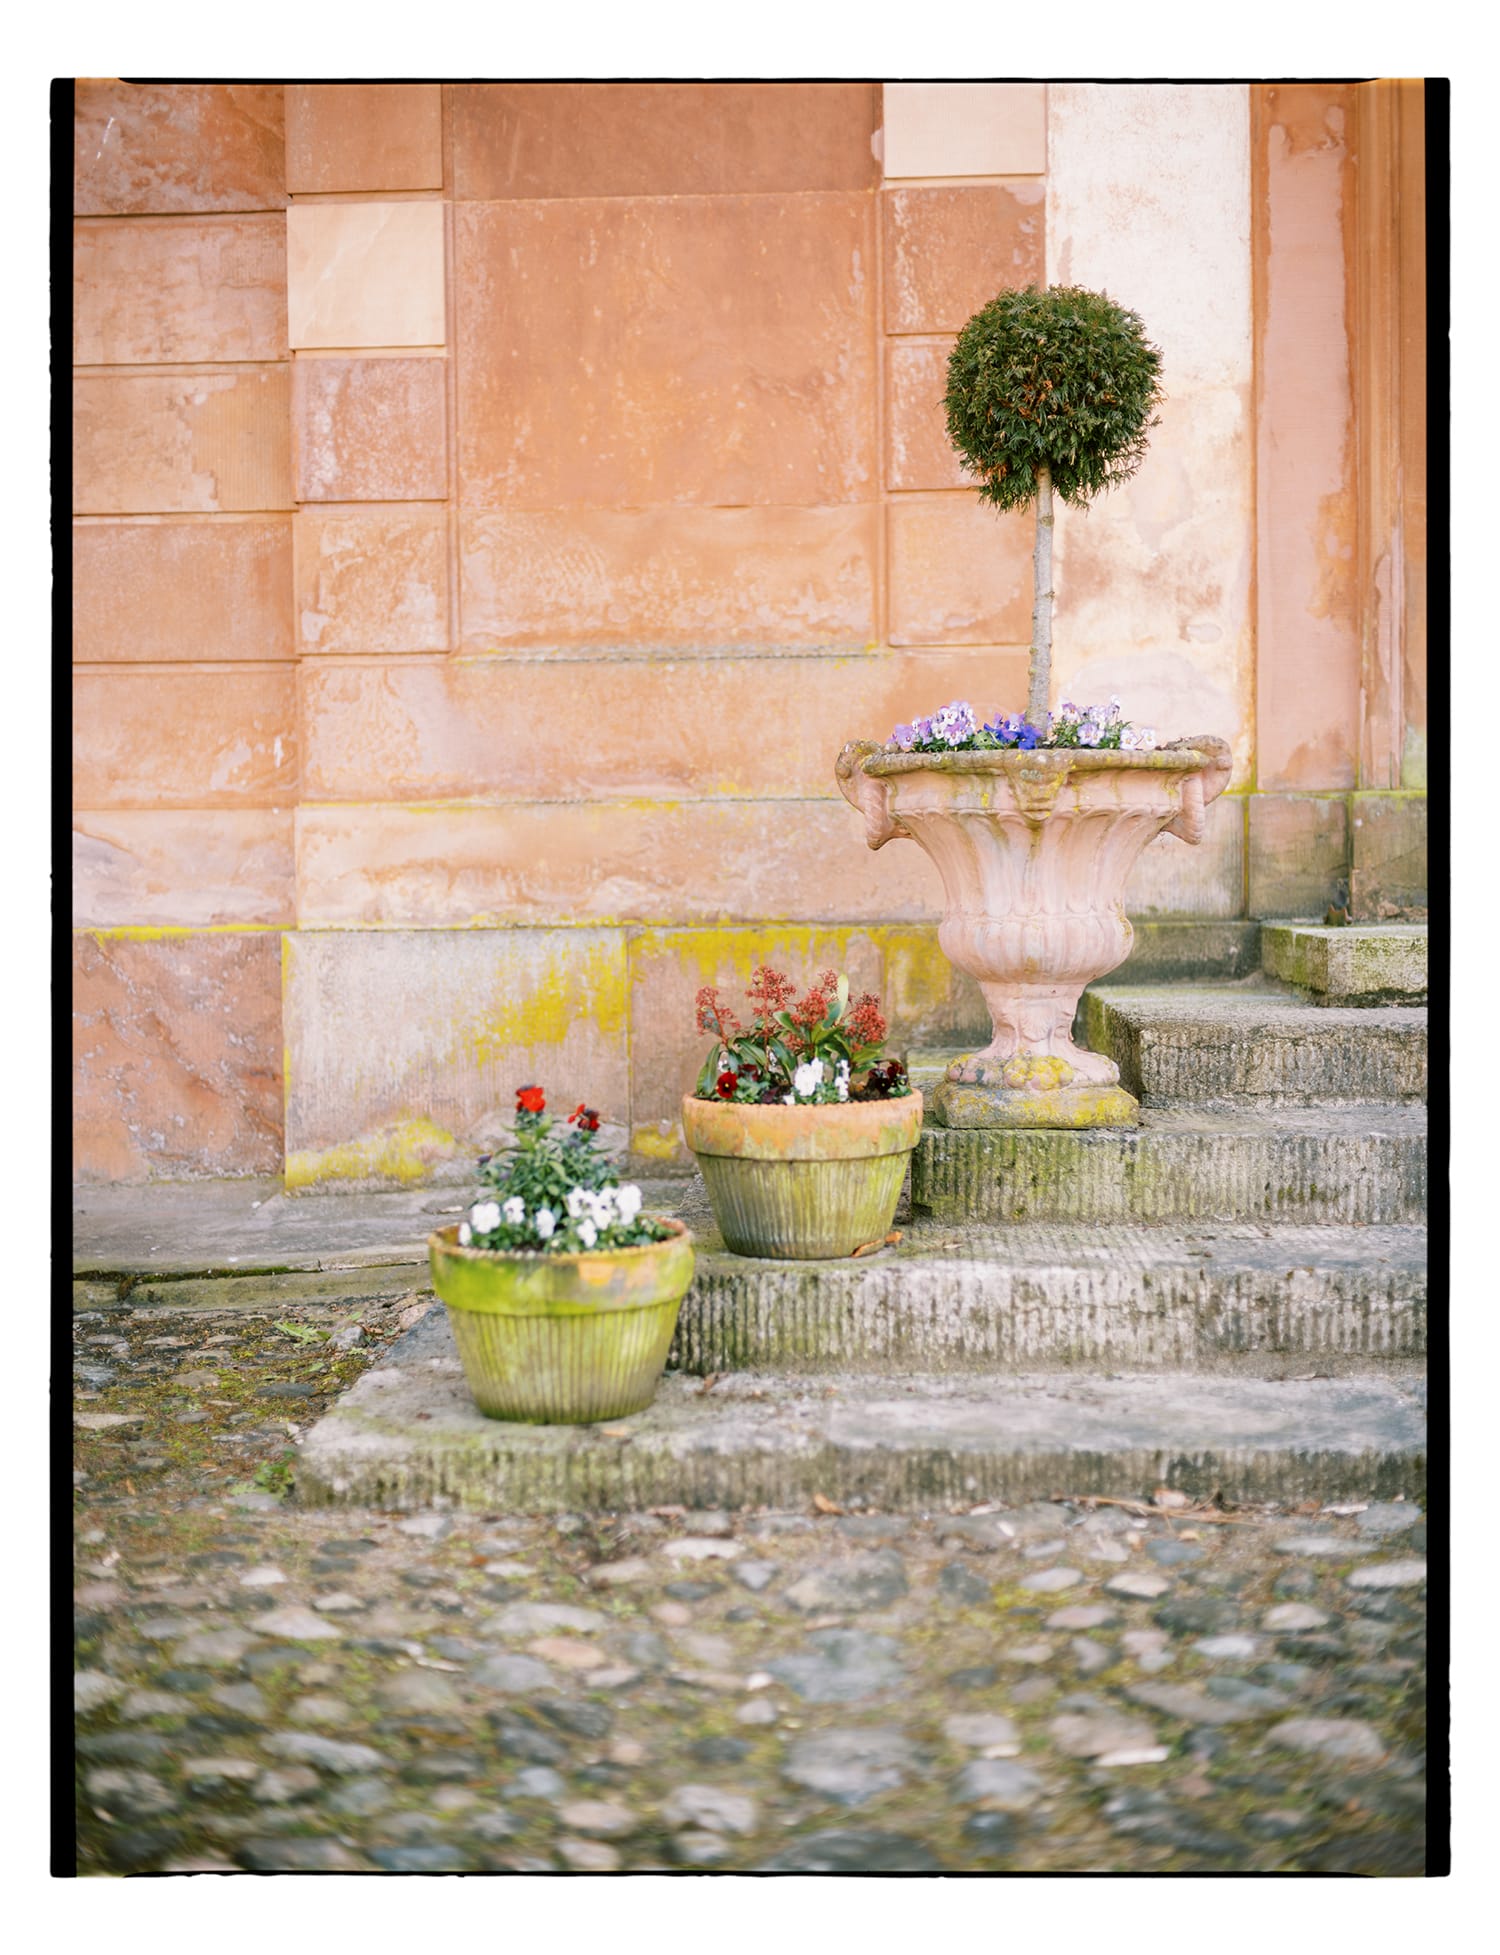
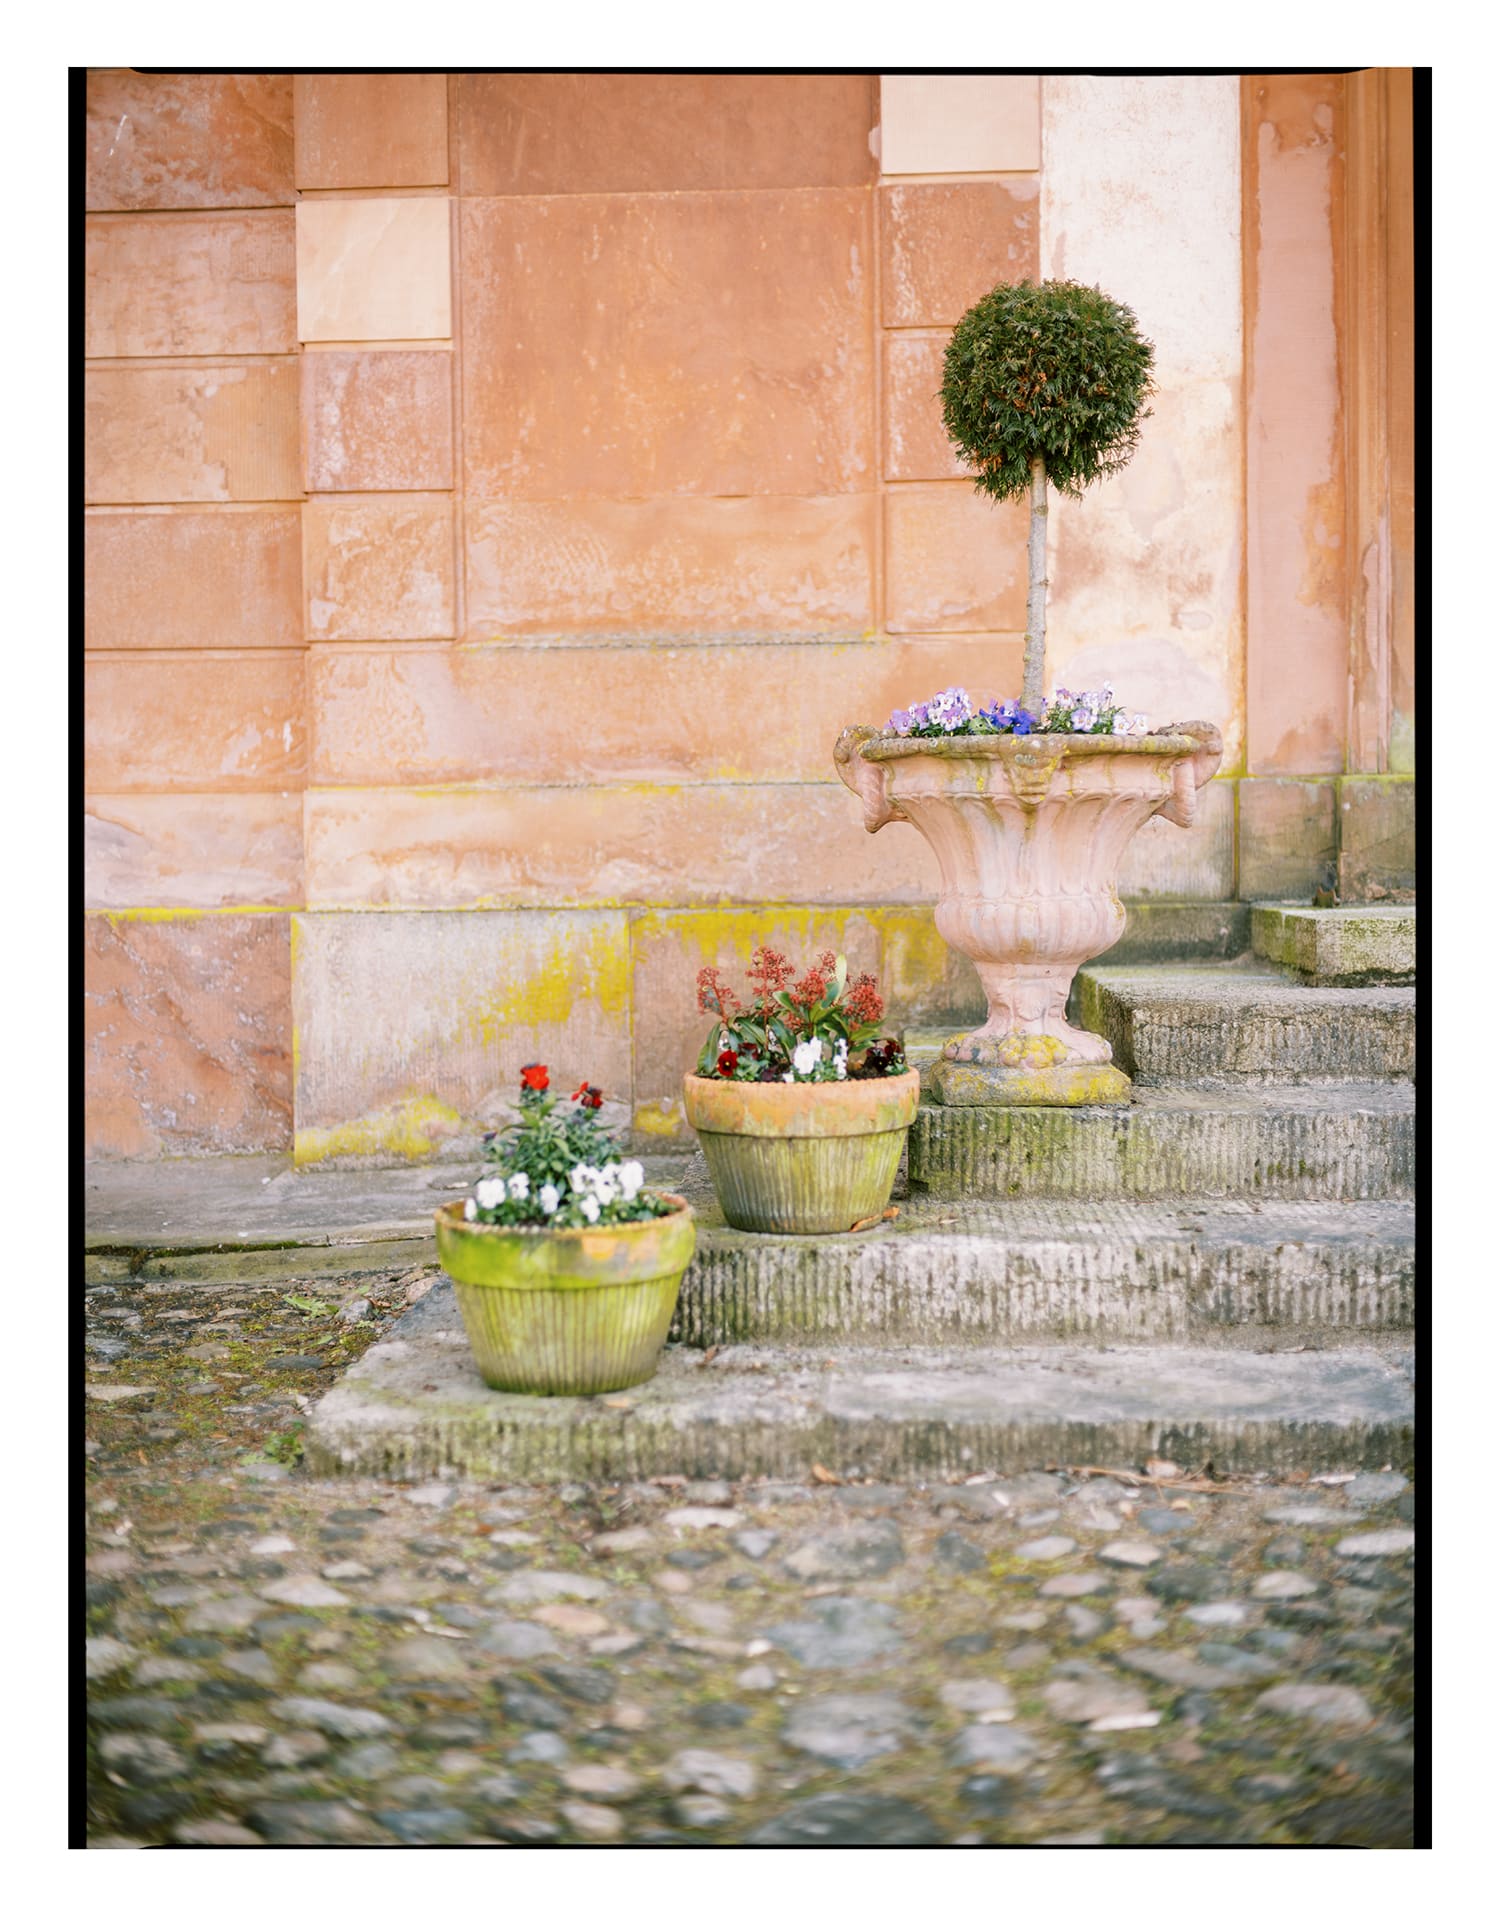
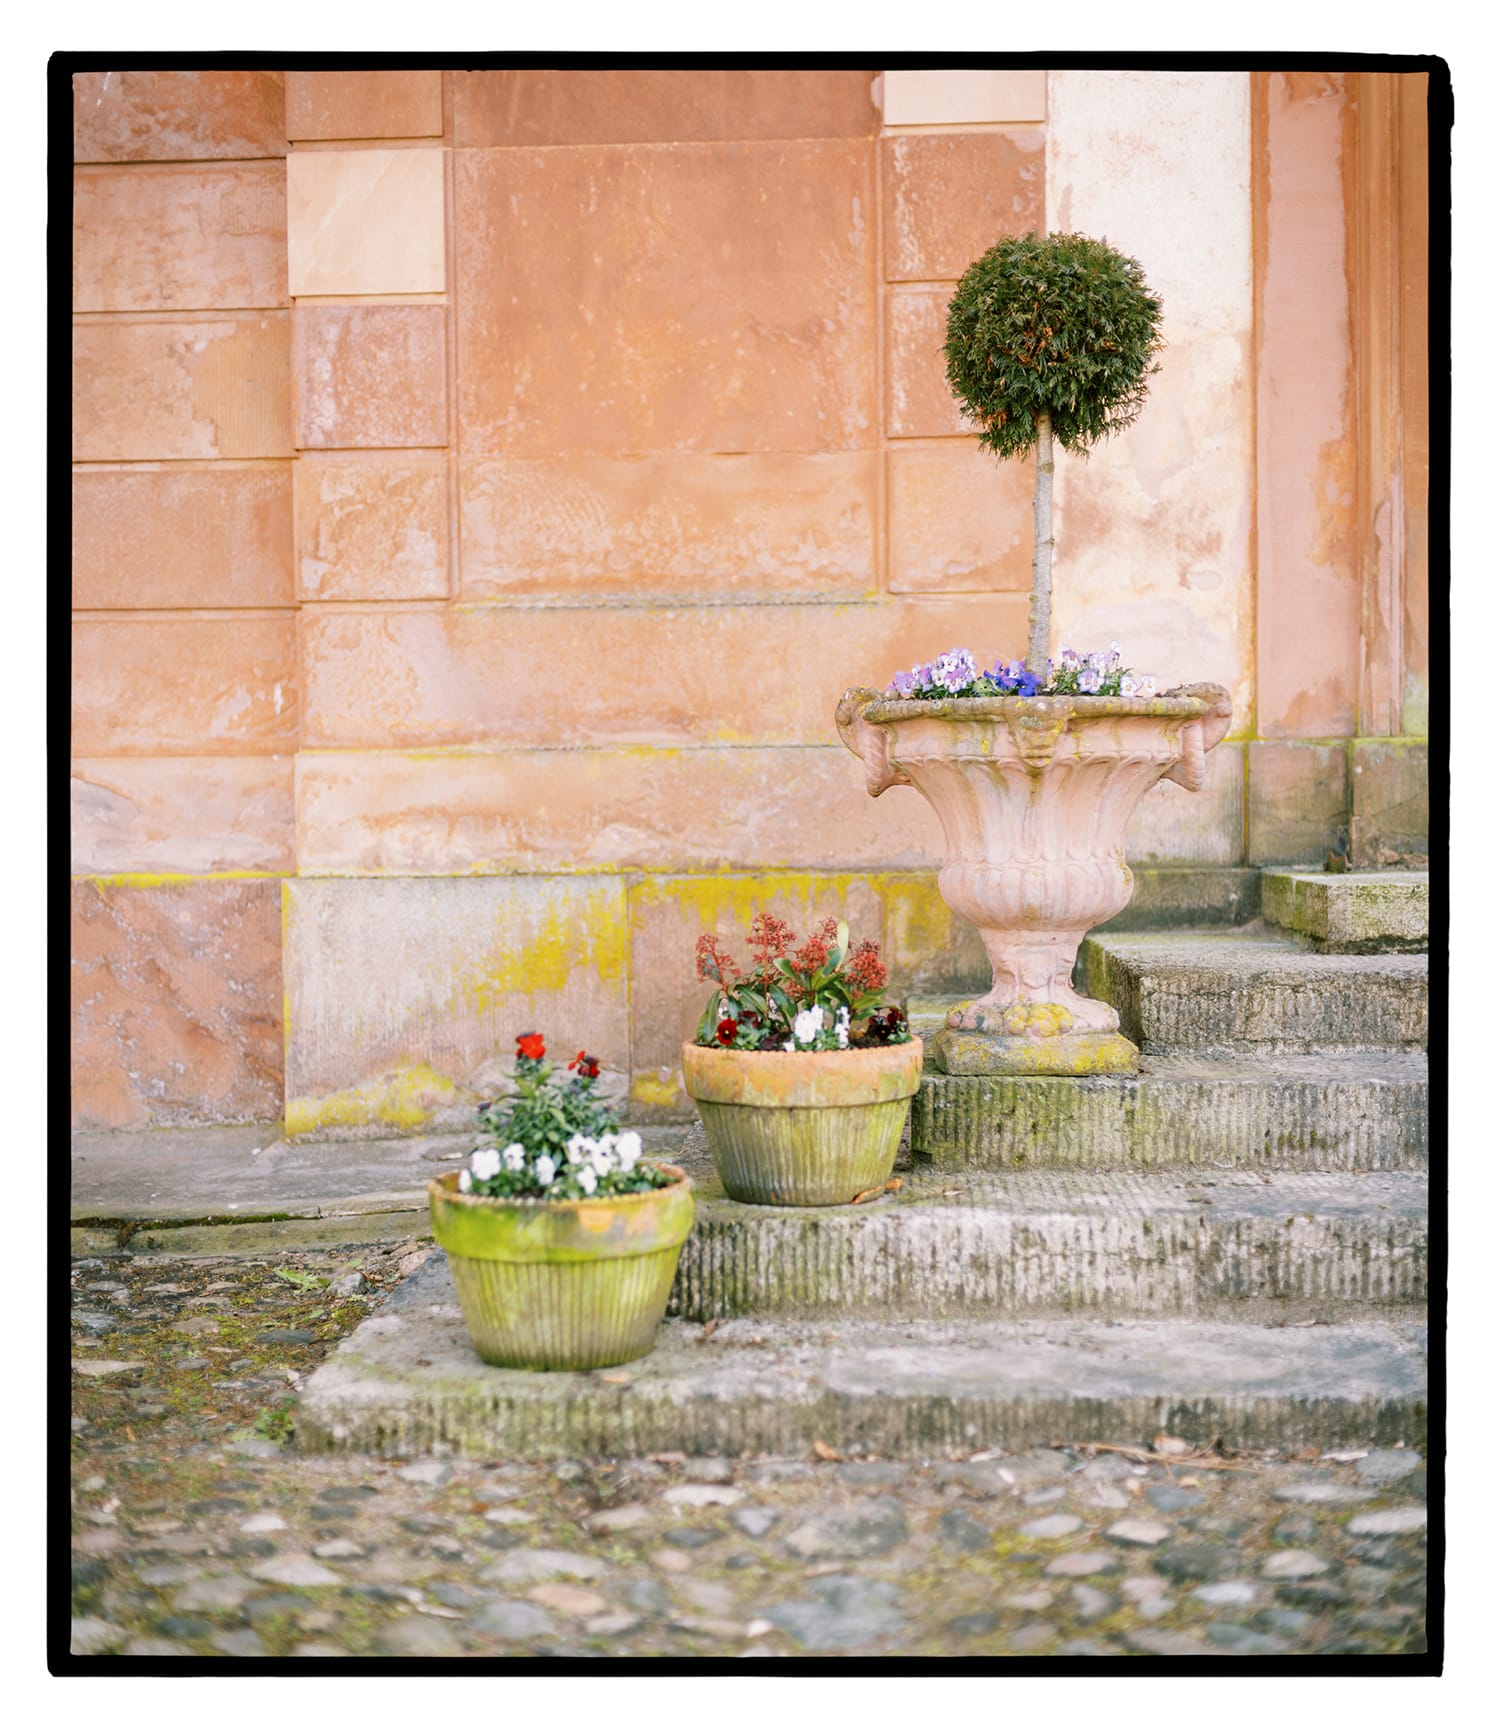
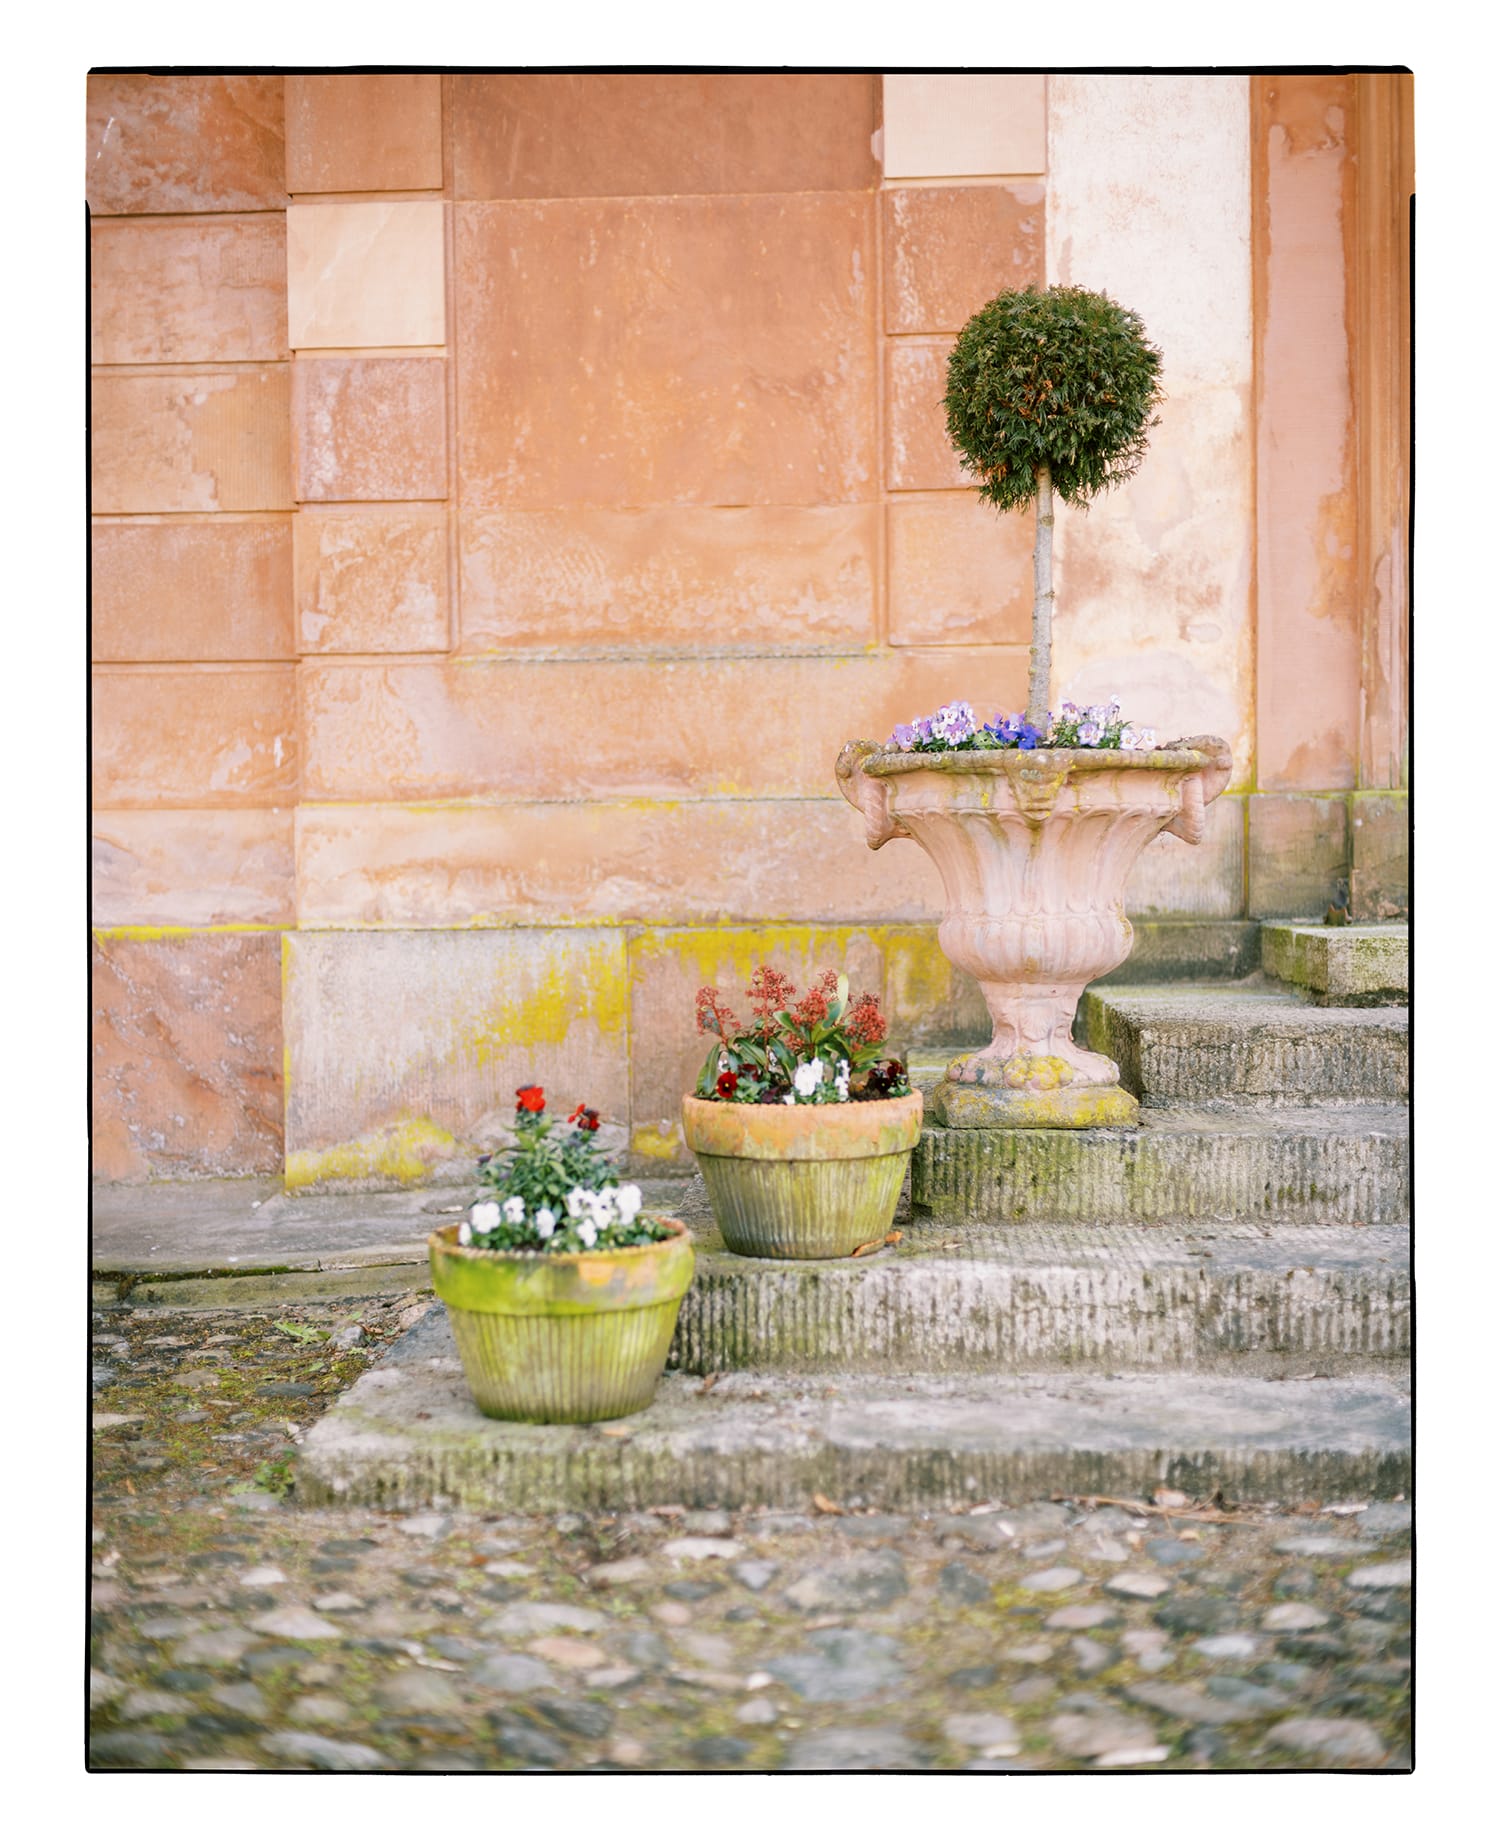
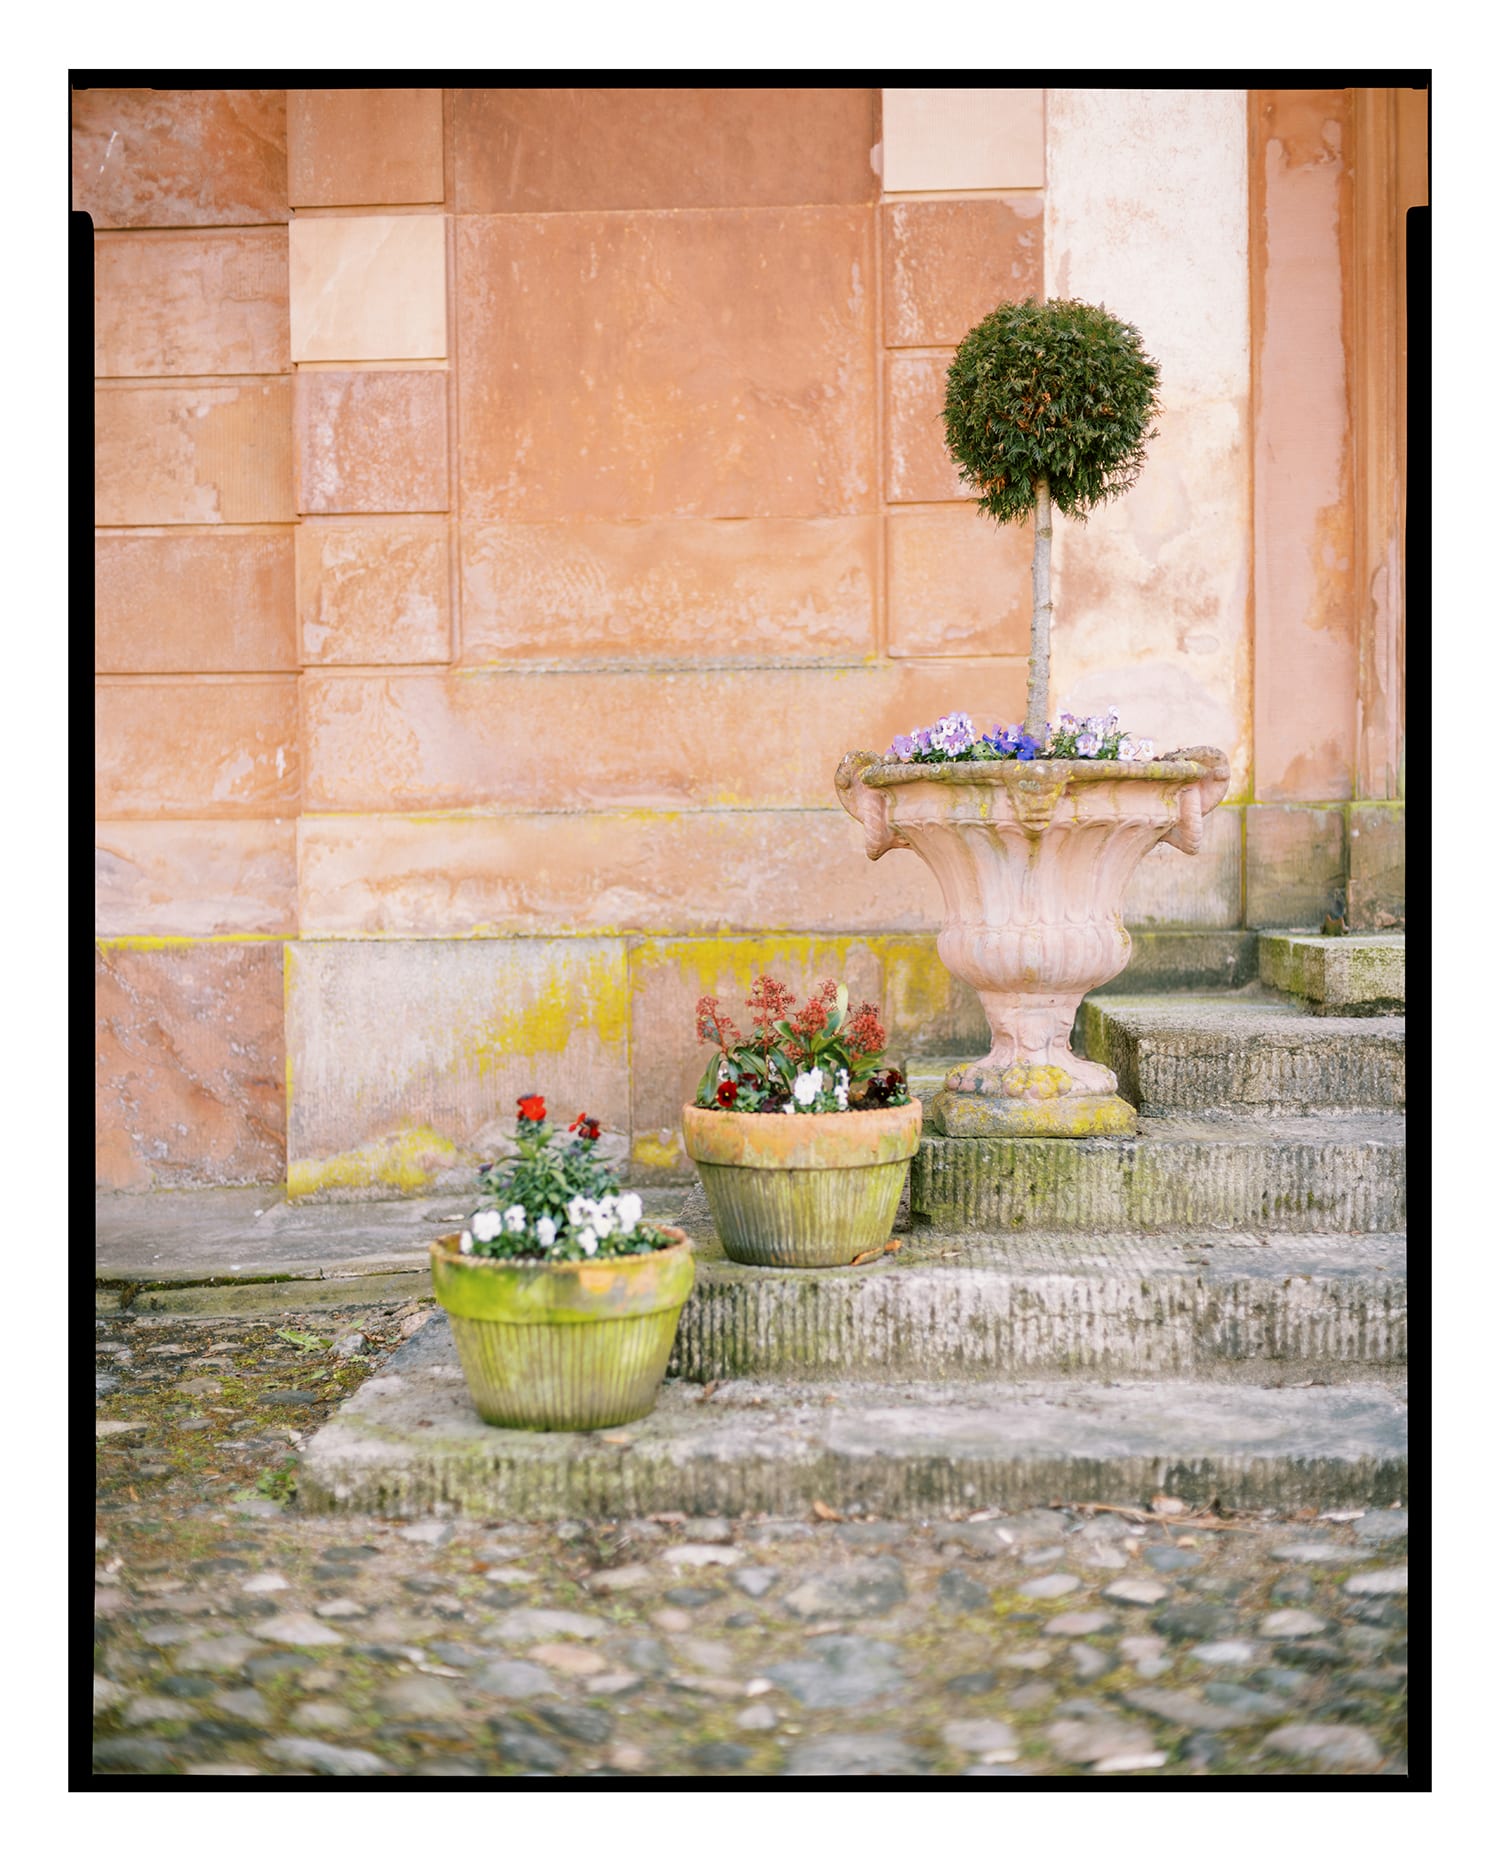
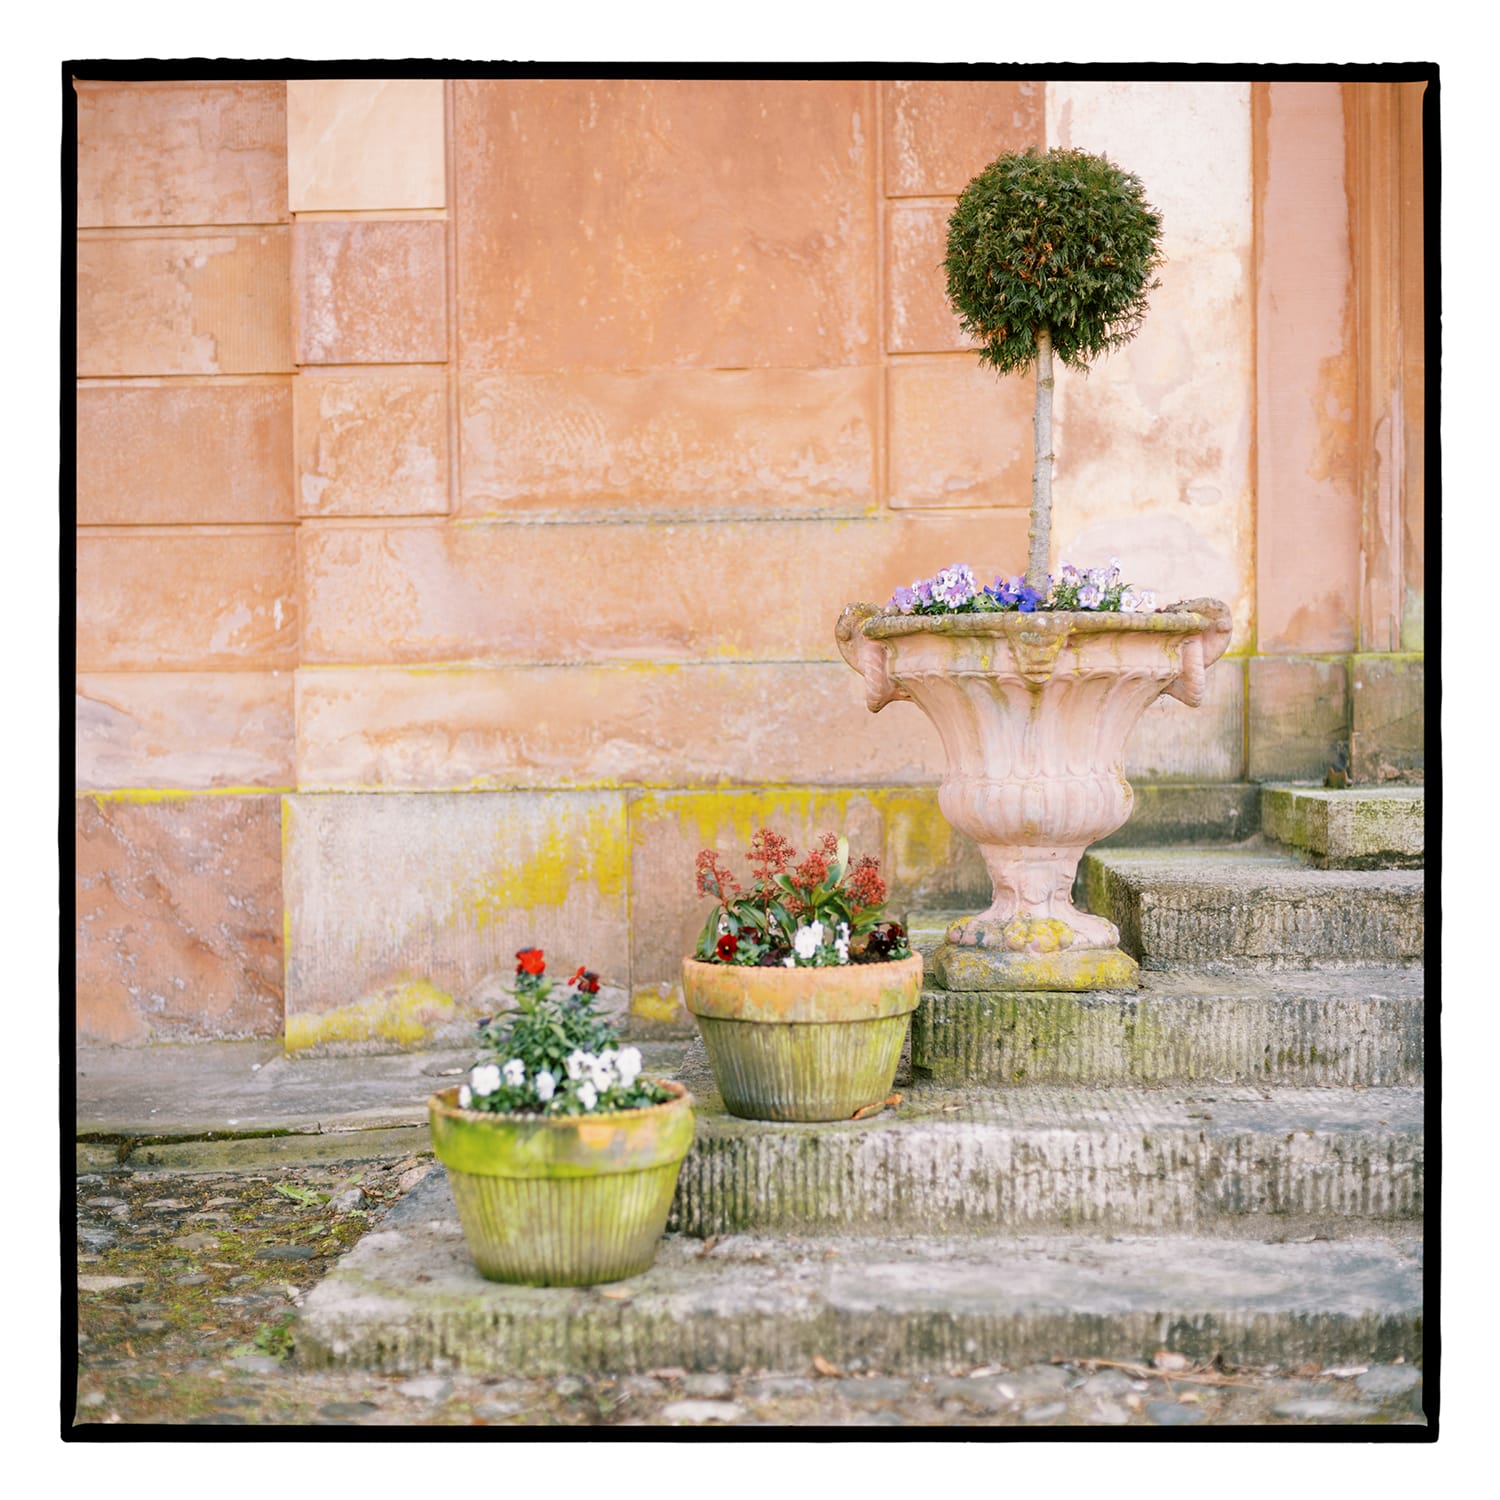
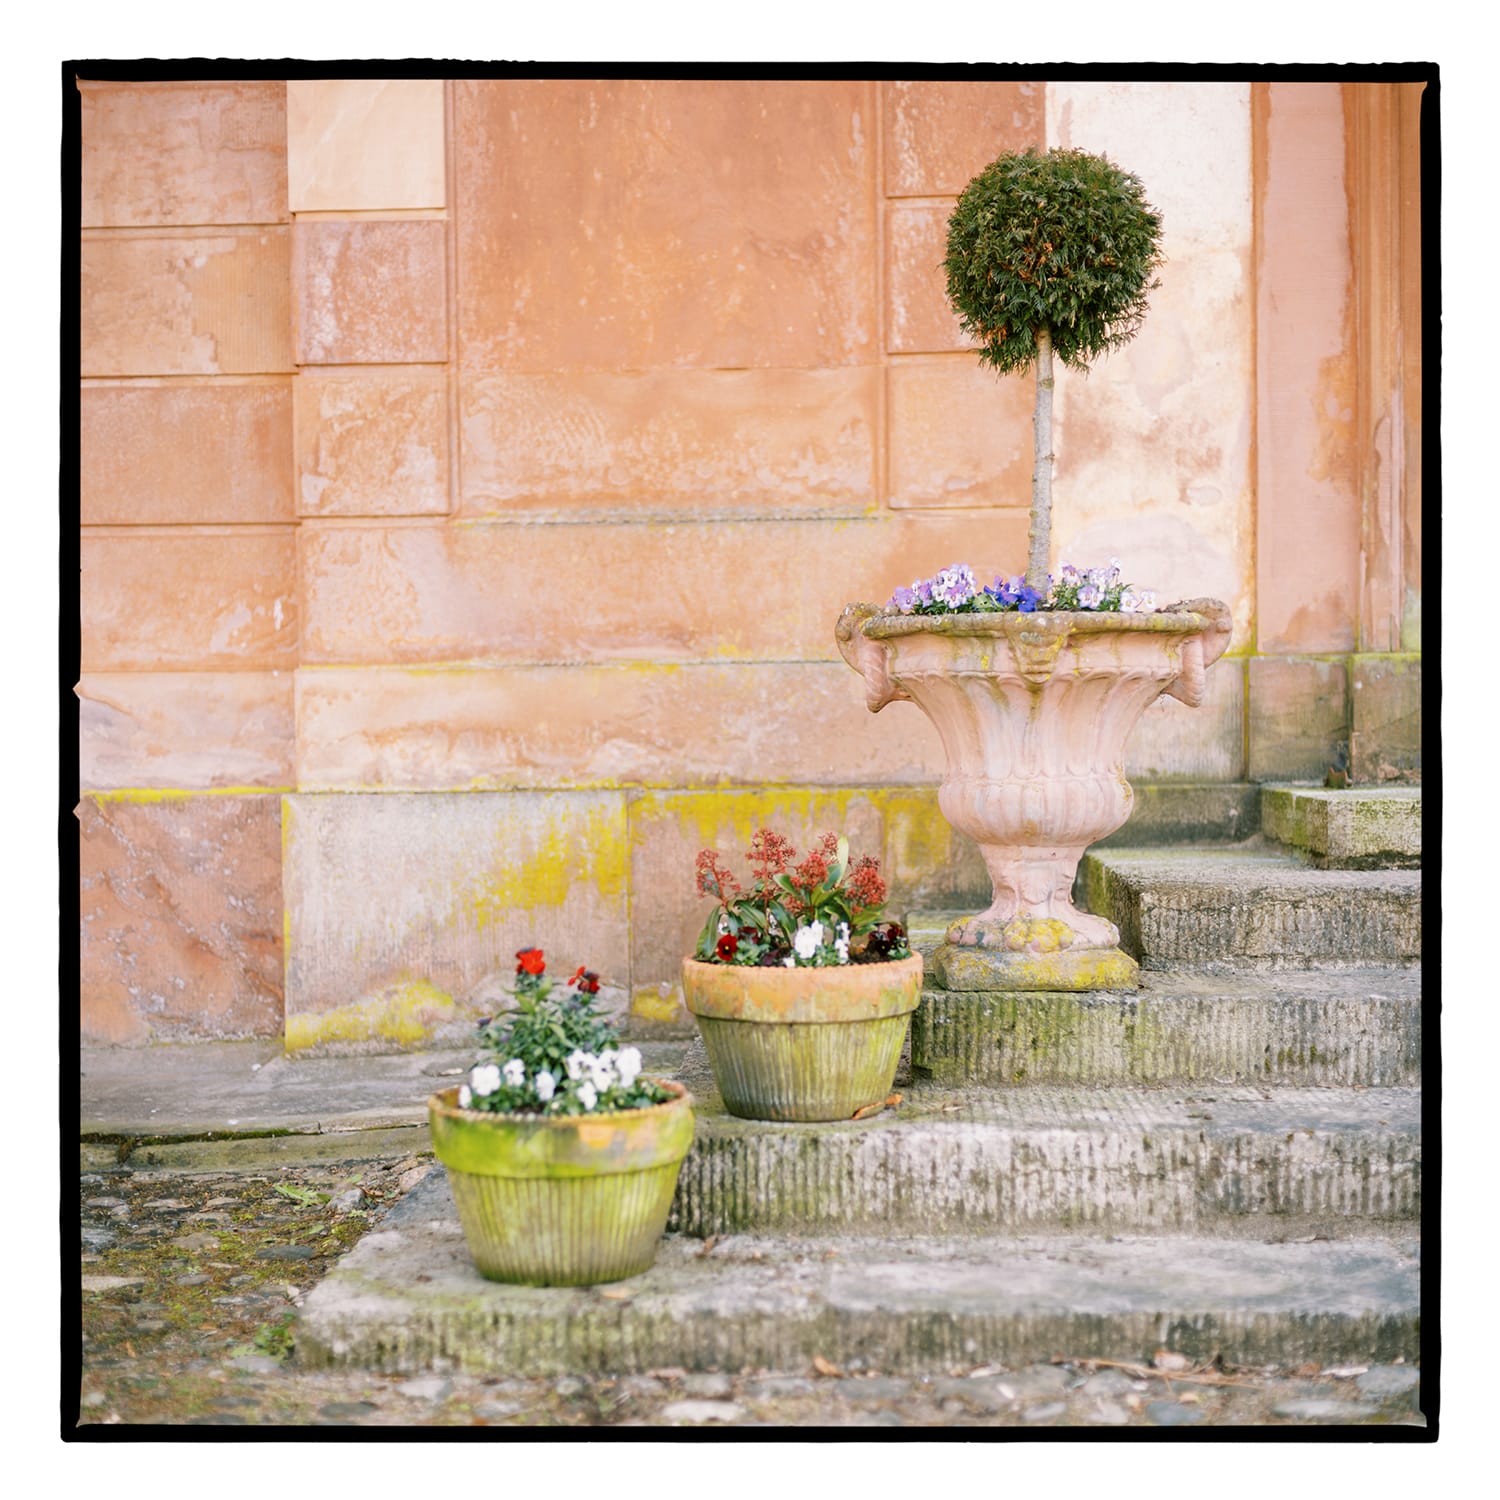
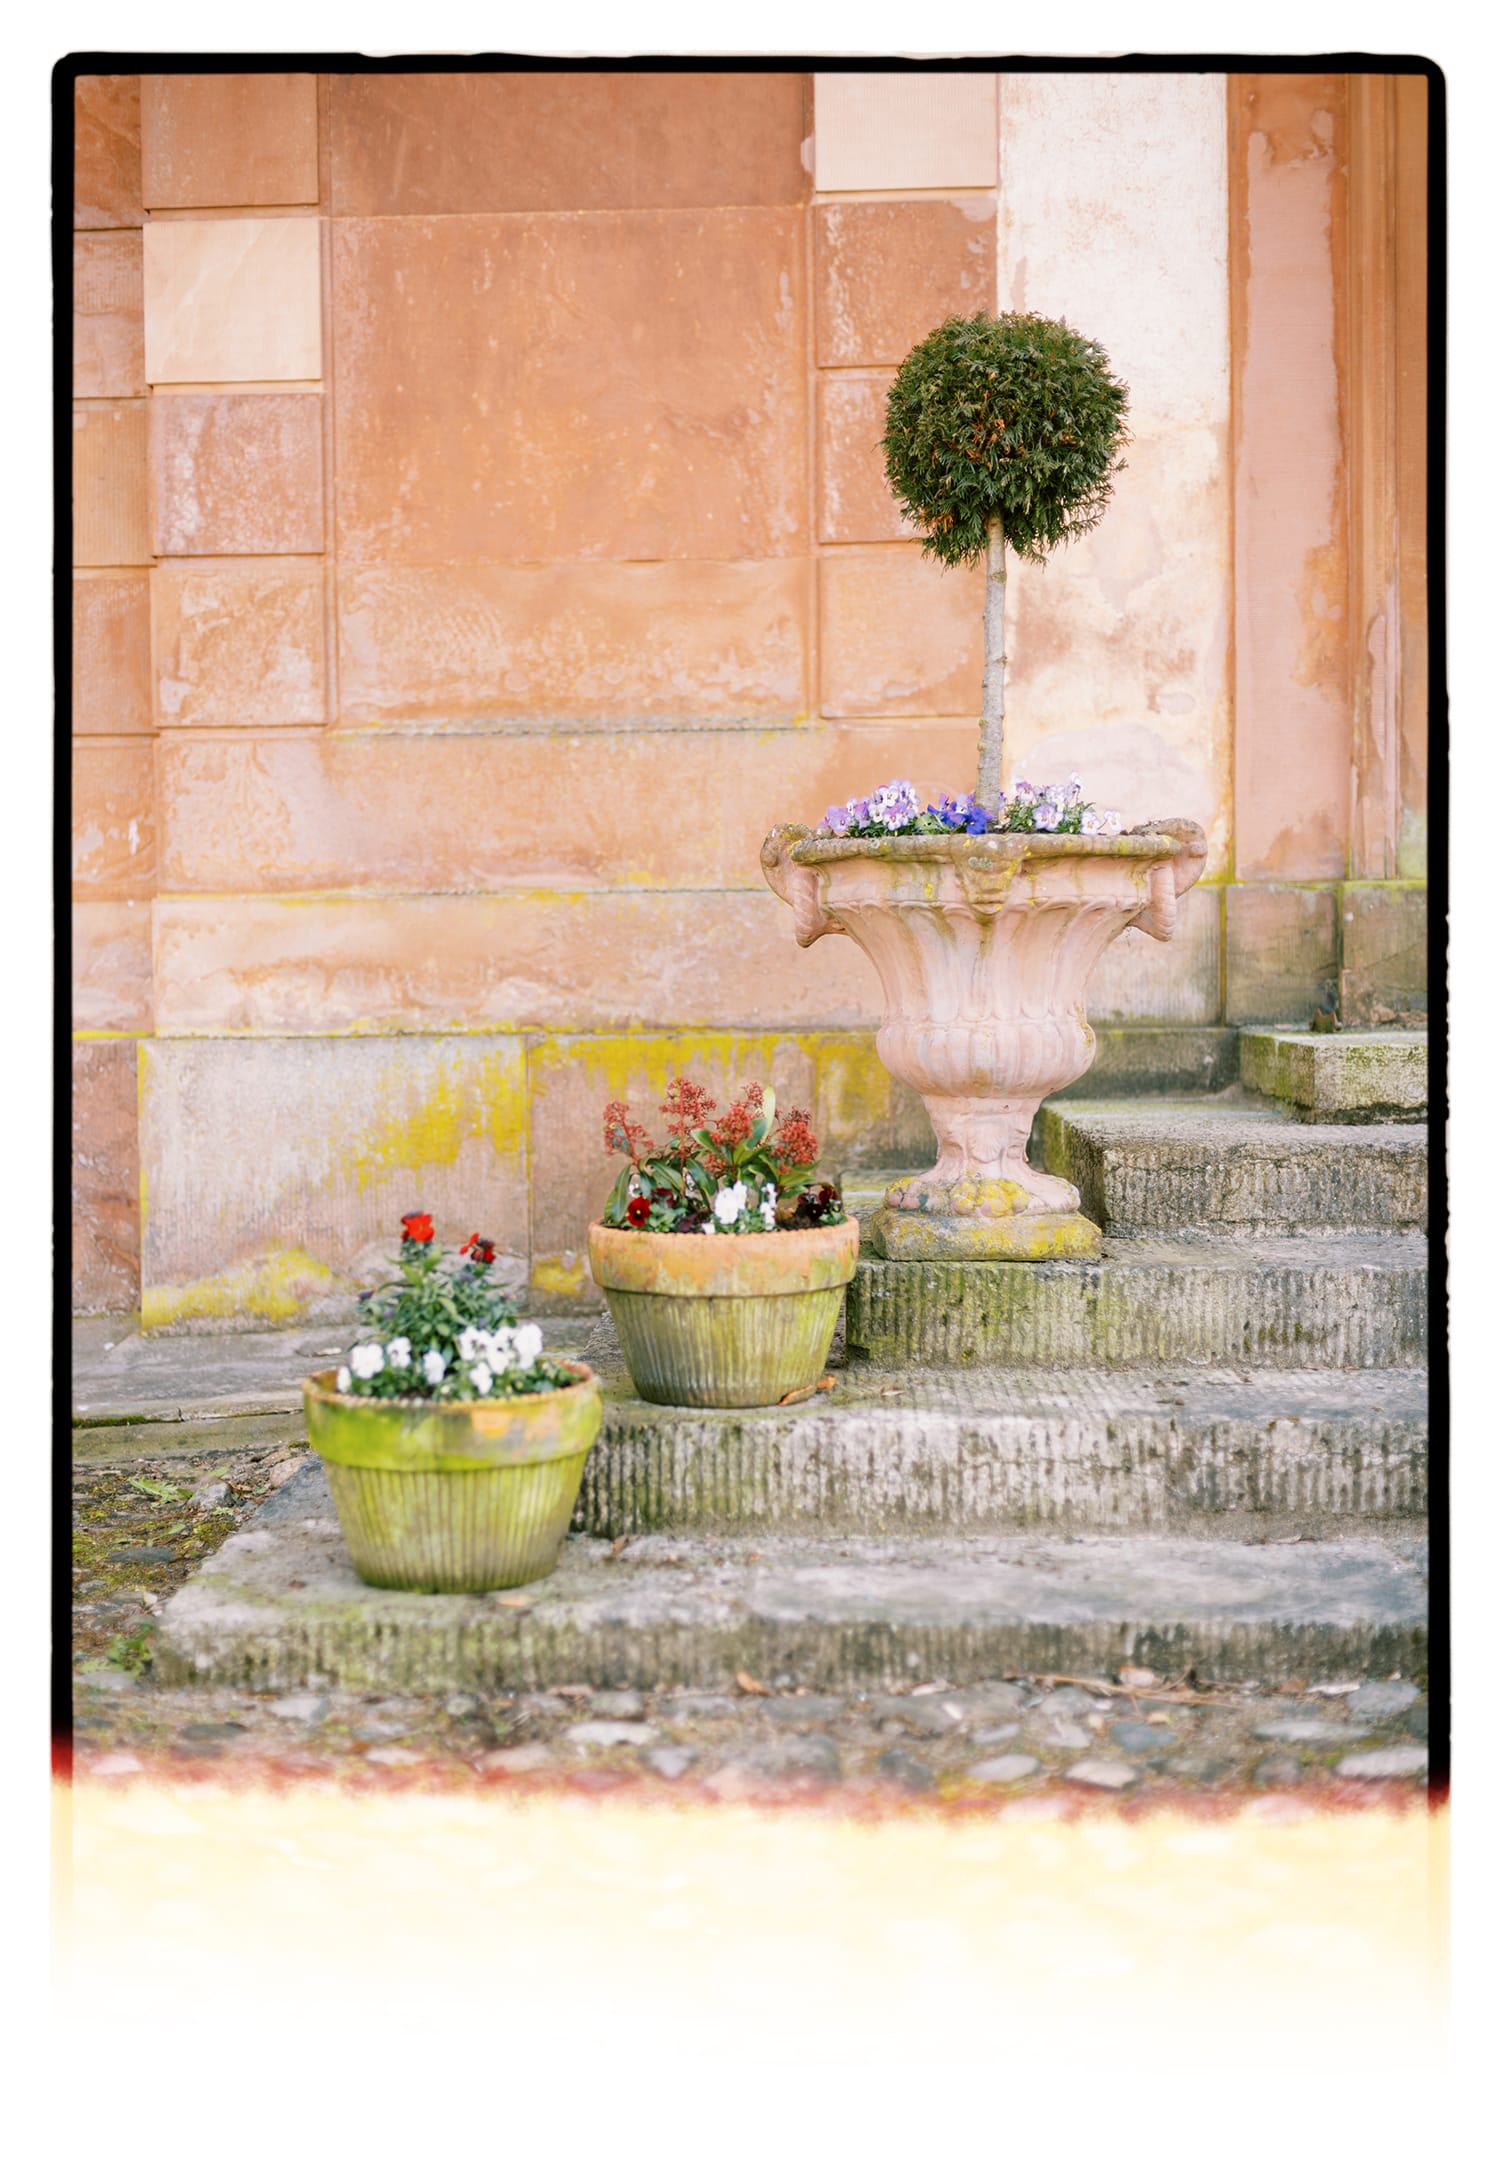
These are rendered frames in all the different aspect ratios, both in crop mode and fancy mode, with all the available scanner mask styles. For 4:3 and 1:1, all frames are rendered with the standard negative style, but additional negative styles are shown with one of the mask styles. By playing with border thickness (when fancy = false) and movement you can create a wide range of looks.

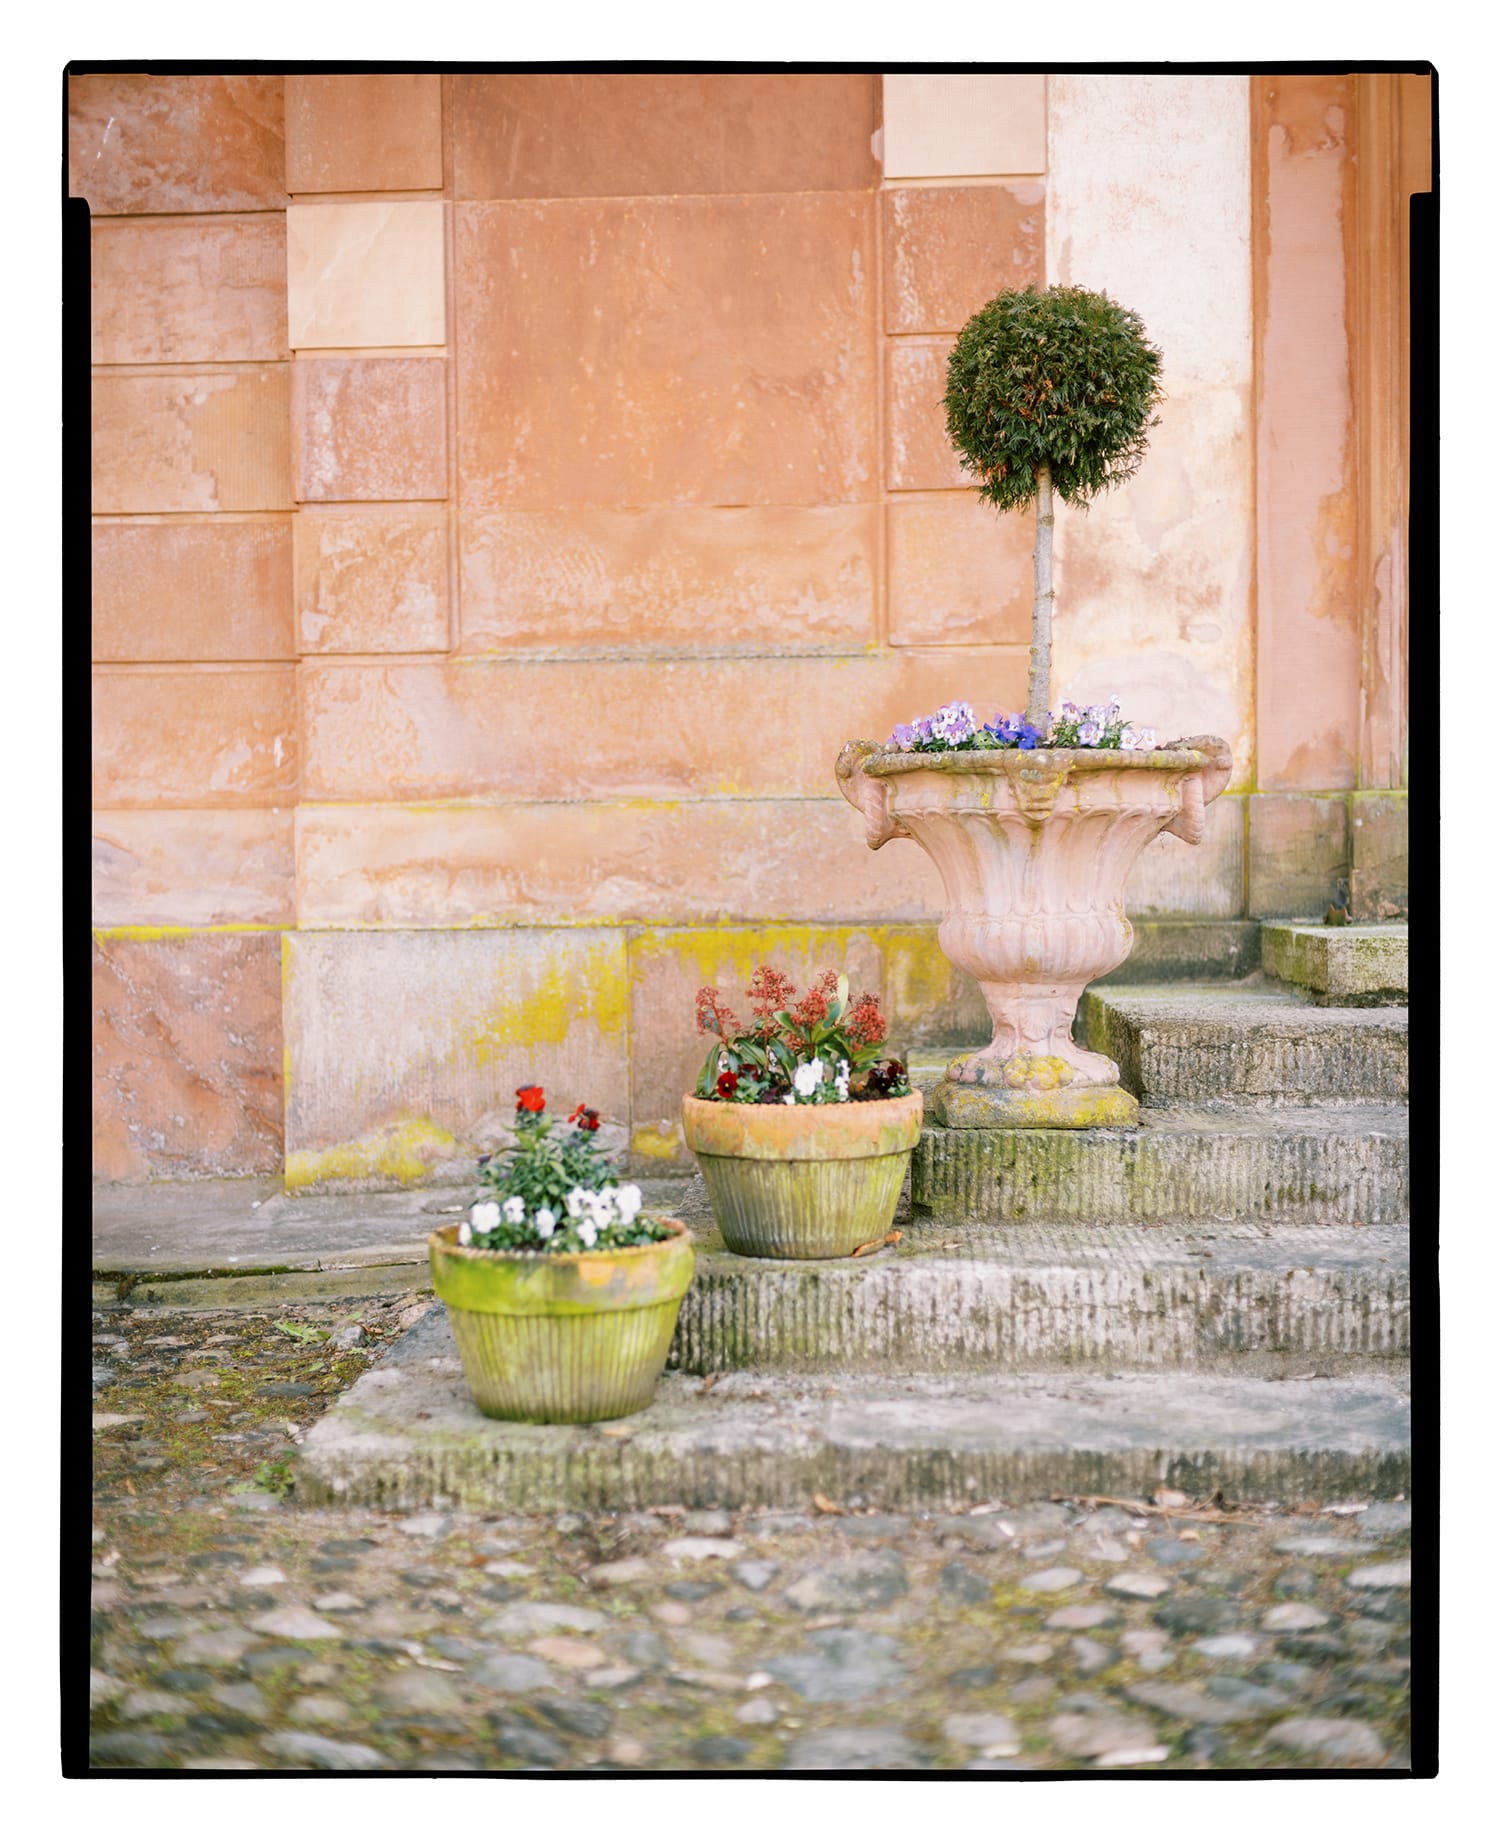
A 2:3 frame with fancy = true and mask_variant_2x3 = 1.

A 2:3 frame with fancy = true and mask_variant_2x3 = 2.
A 2:3 frame with fancy = true and mask_variant_2x3 = 3.
A 2:3 frame with fancy = true and mask_variant_2x3 = 4.
A 2:3 frame with fancy = true and mask_variant_2x3 = 5.
A 2:3 frame with fancy = true and mask_variant_2x3 = 6.
A 2:3 frame with fancy = true and mask_variant_2x3 = 7.
A 2:3 frame with fancy = true and mask_variant_2x3 = 8.
A 2:3 frame with fancy = true and mask_variant_2x3 = 9.
A 2:3 frame with fancy = true and mask_variant_2x3 = 10.
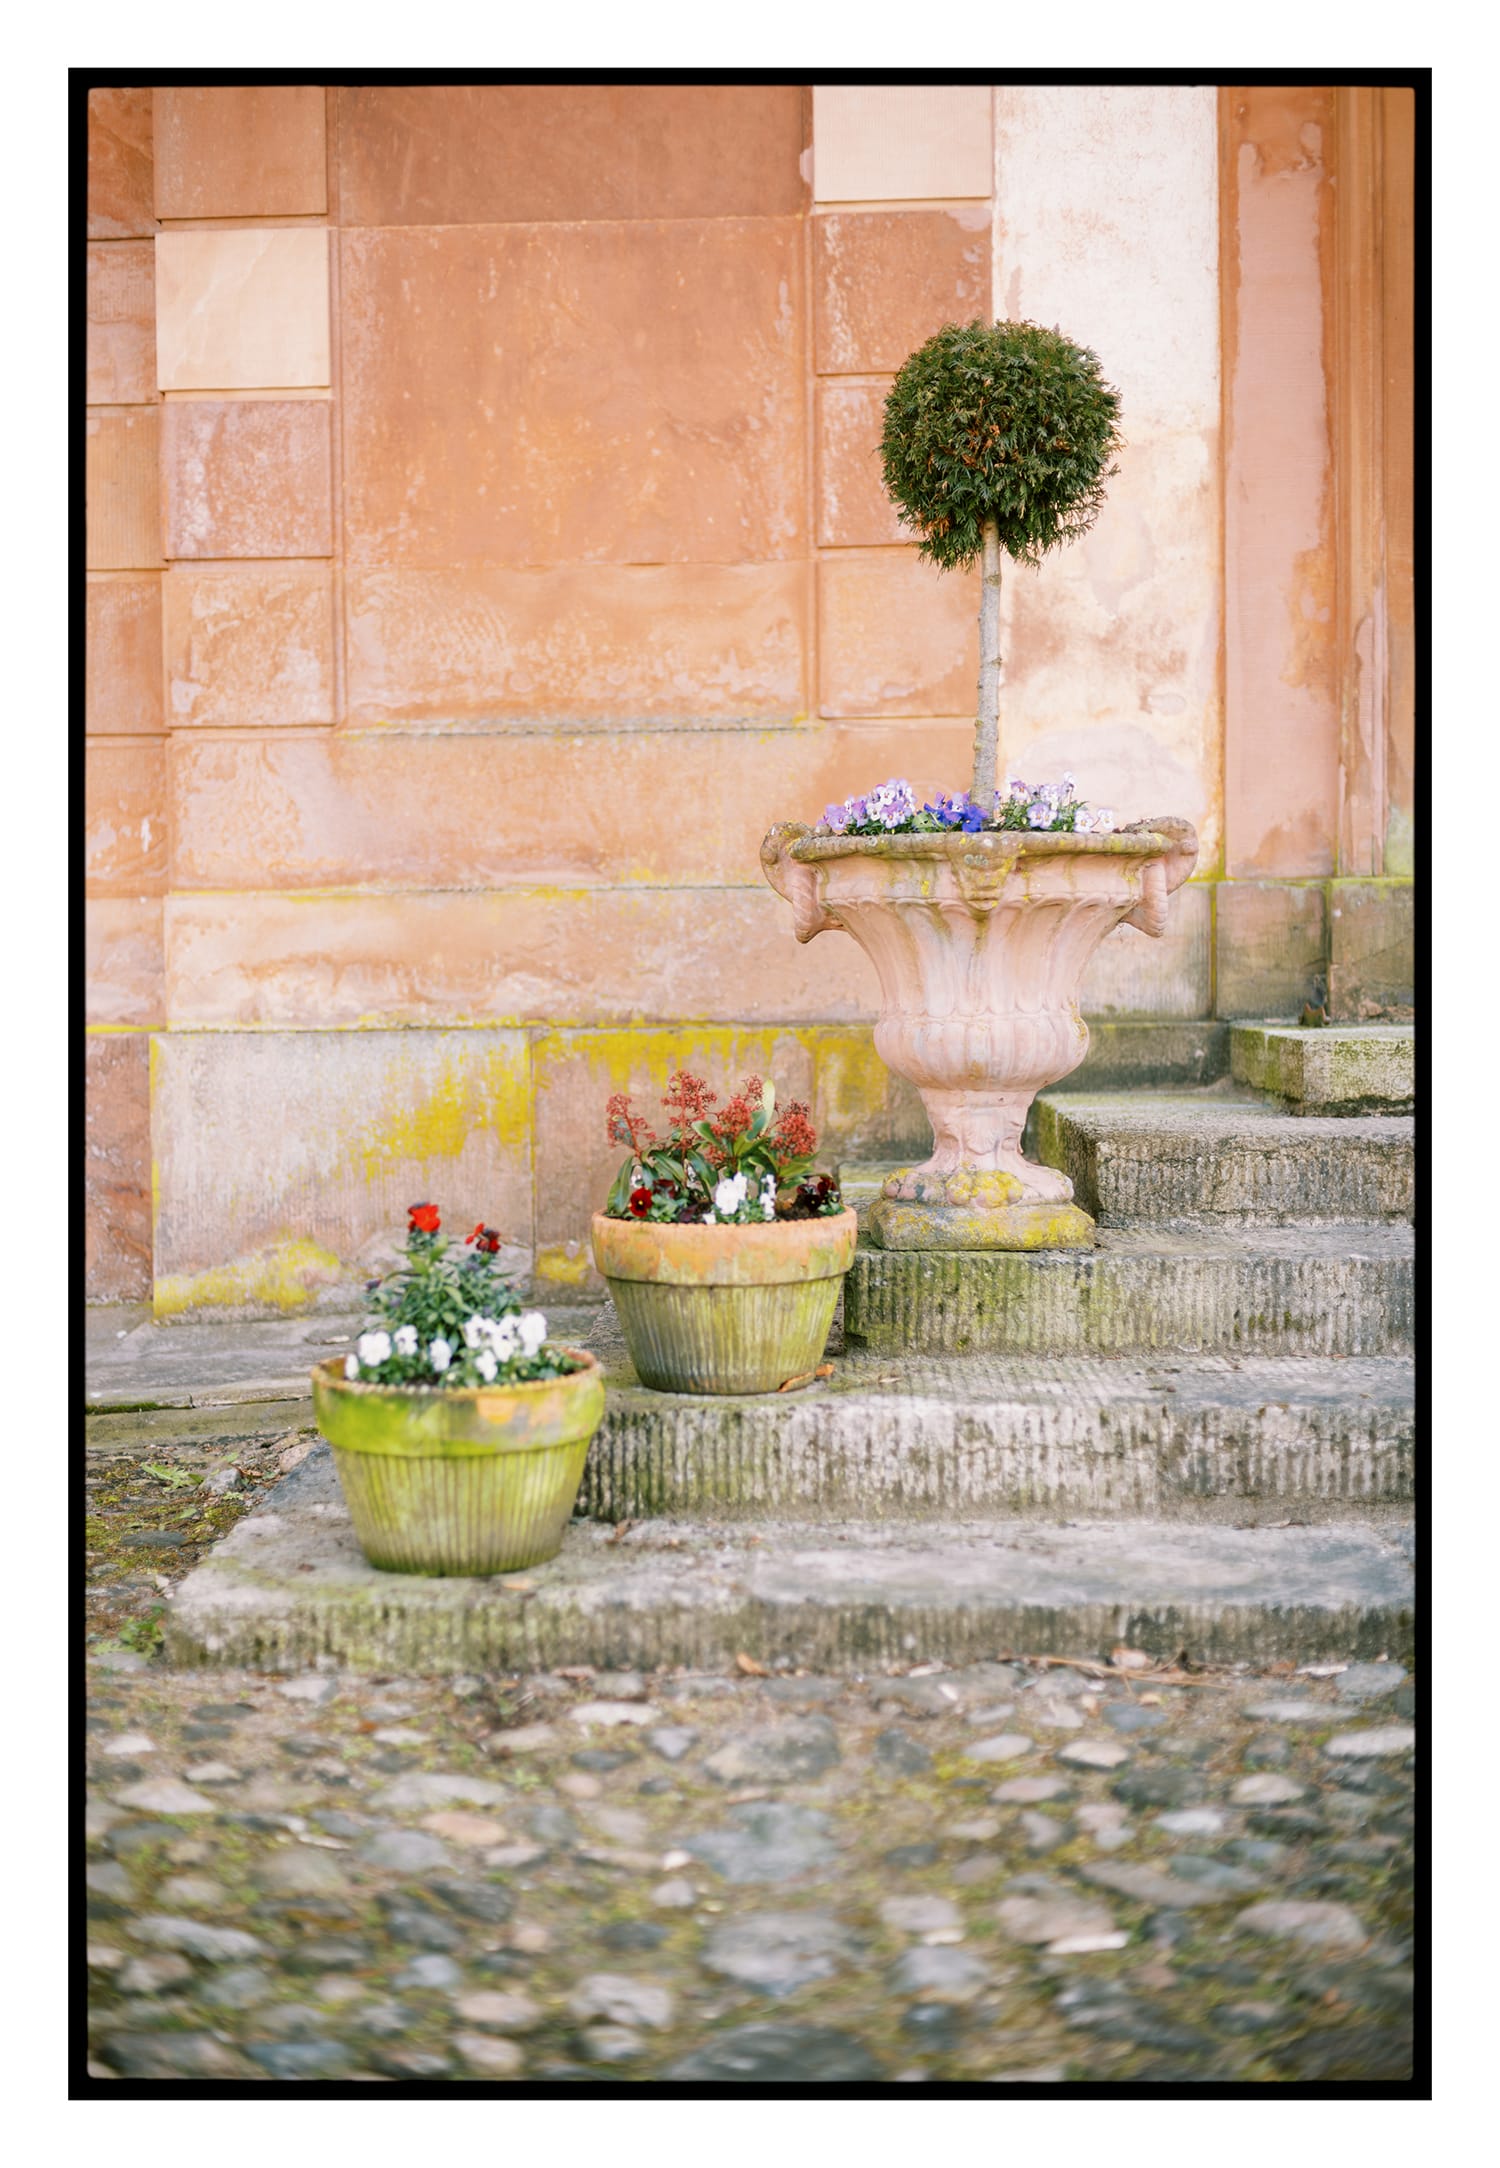
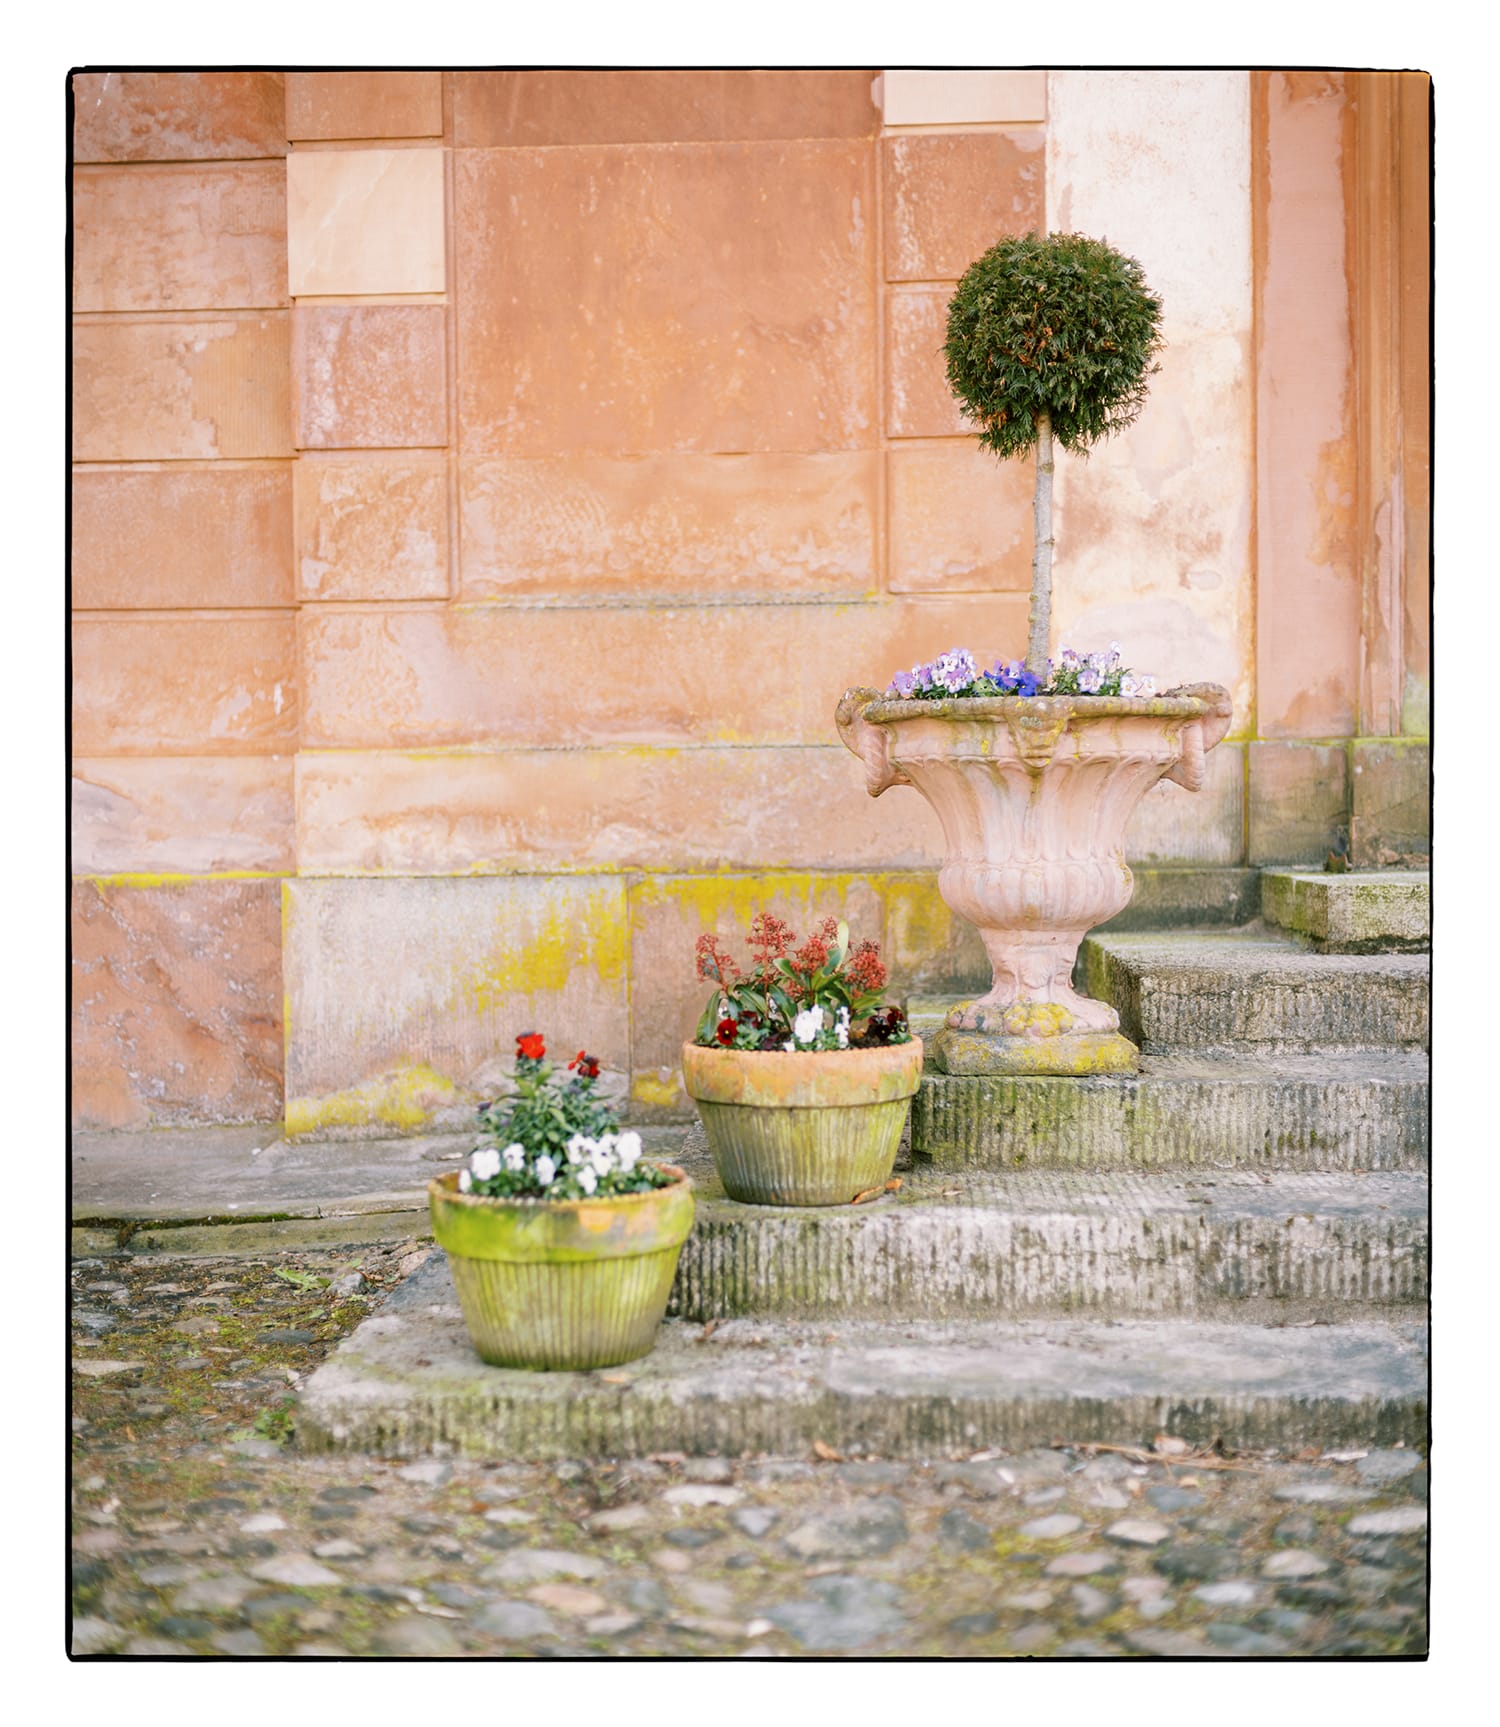
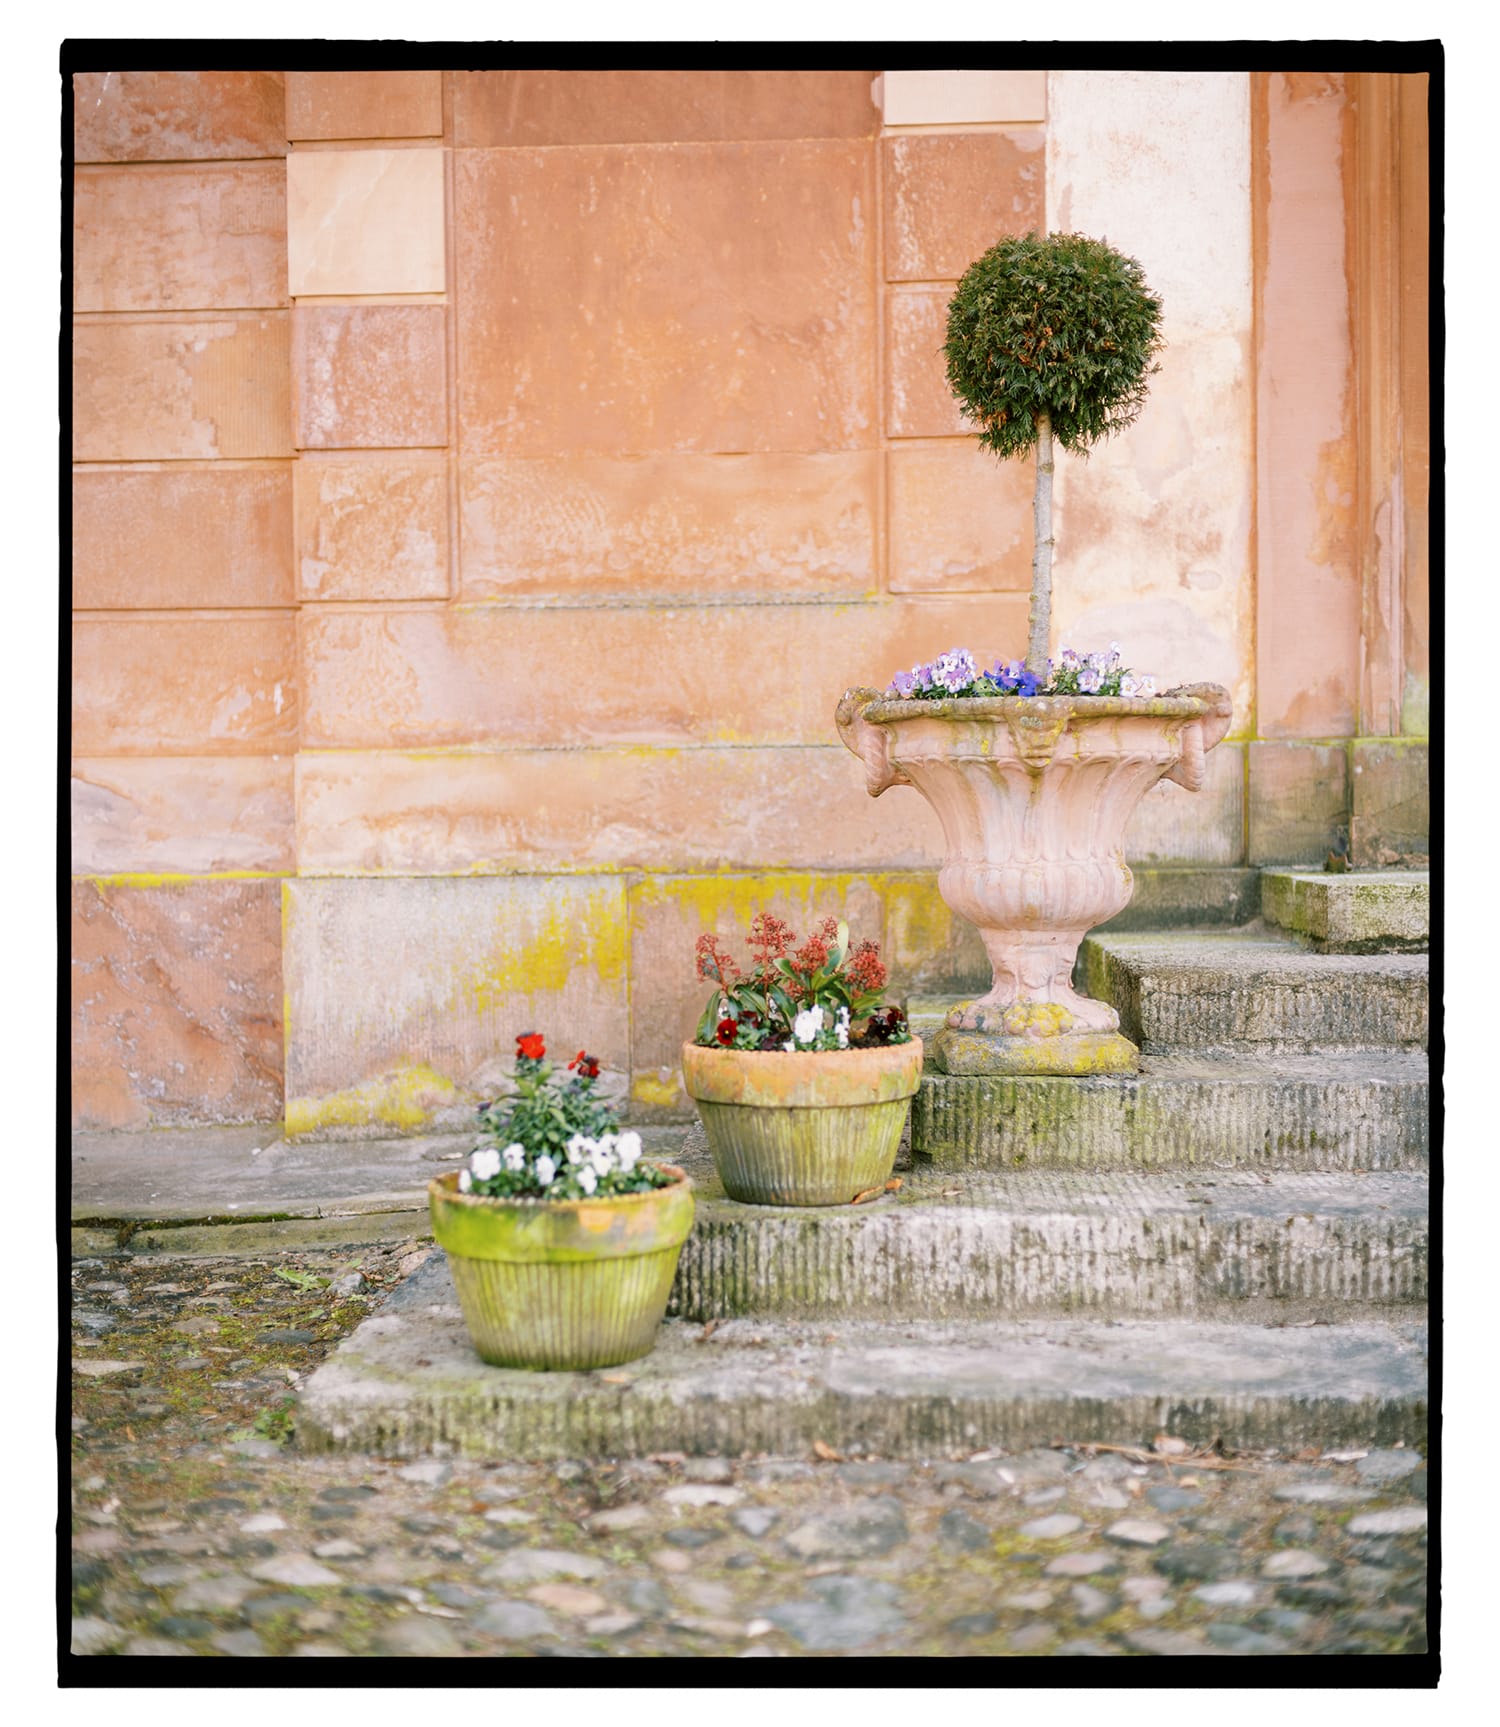
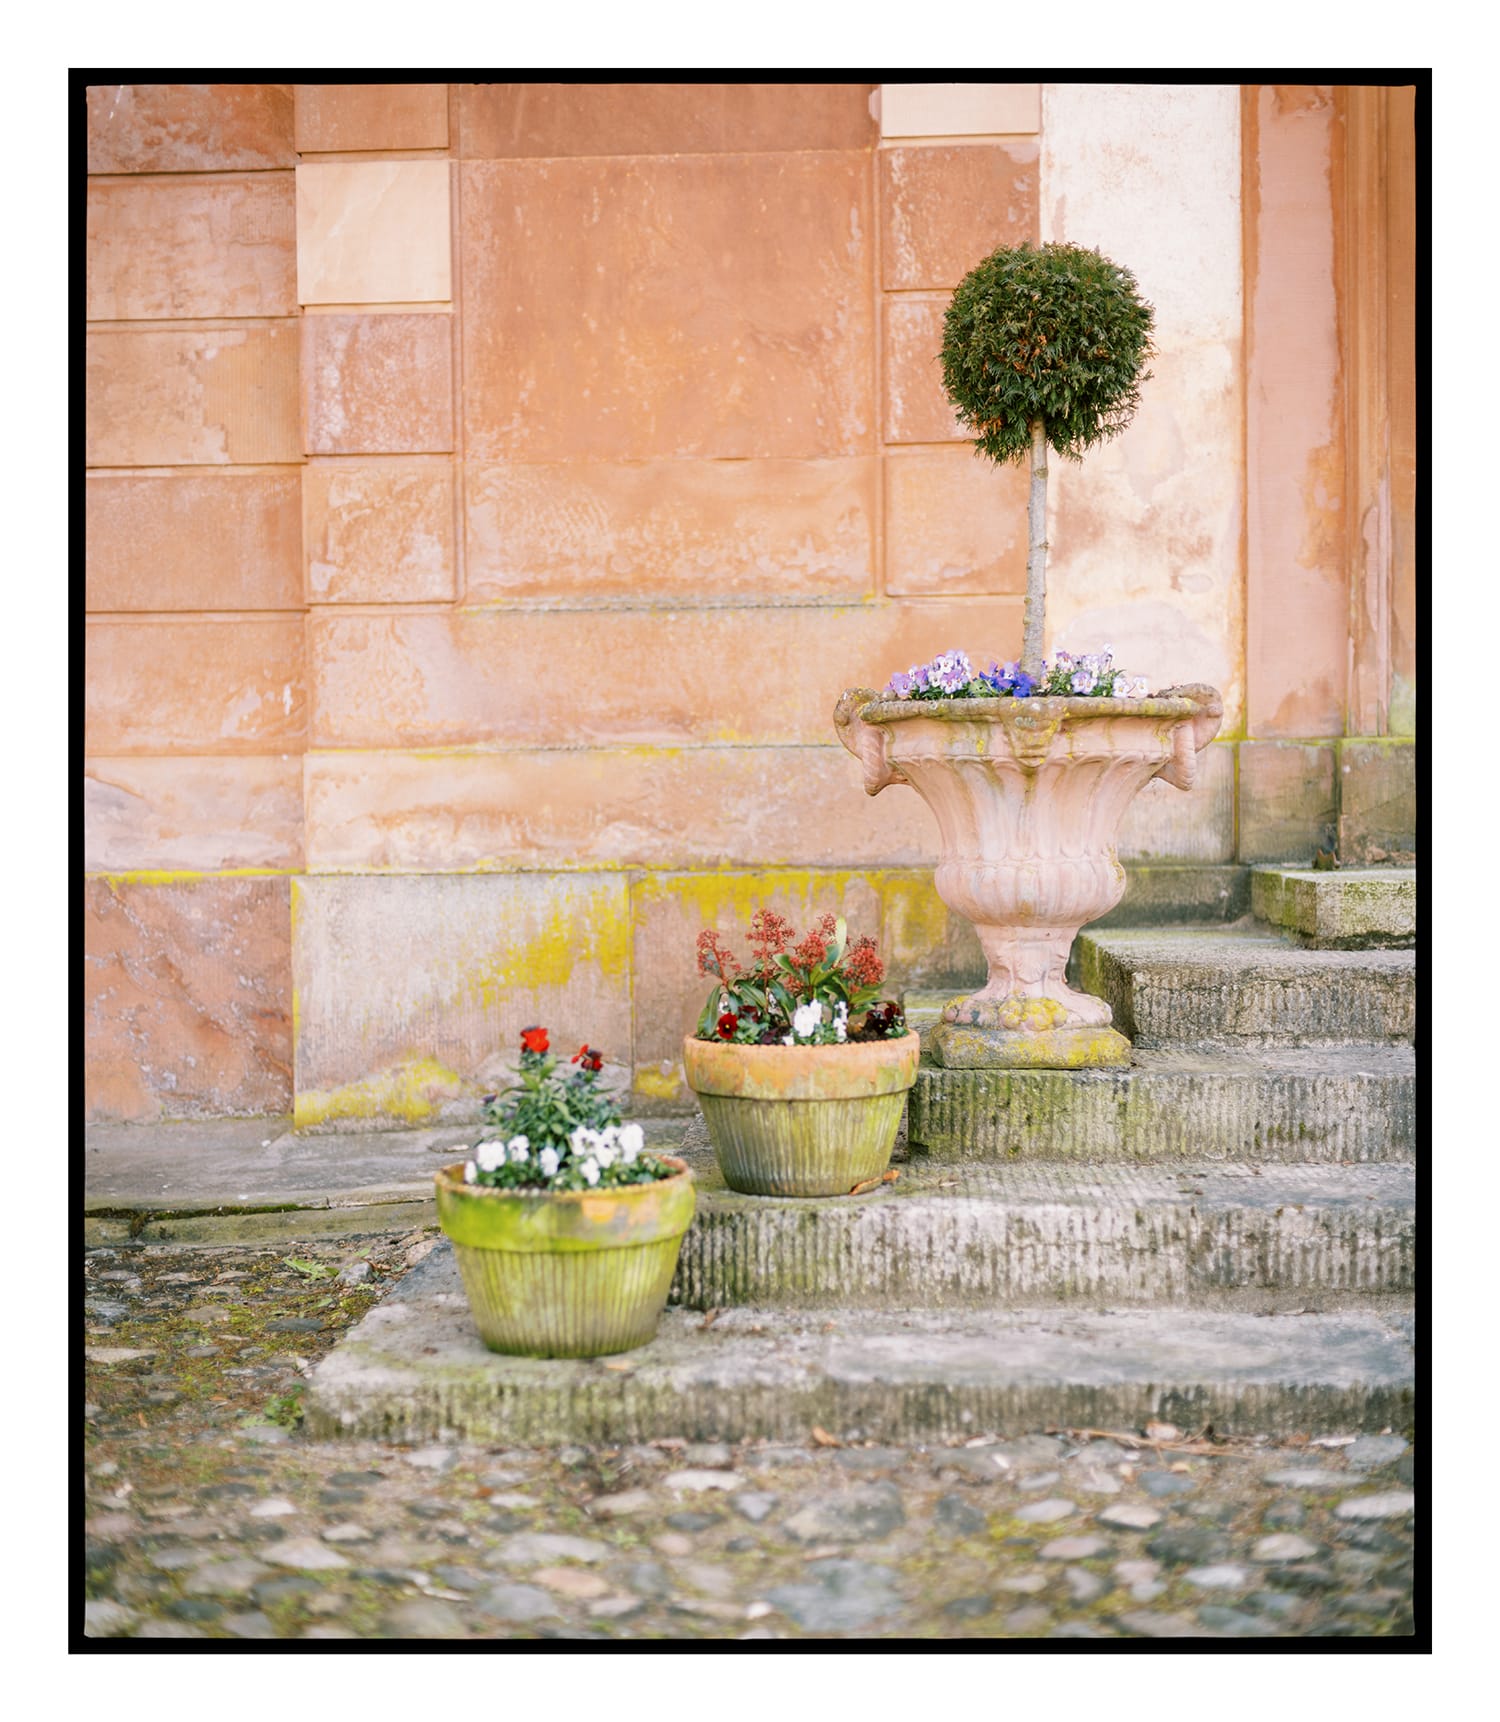
A 2:3 frame with fancy = false.
A 4:3 frame with fancy = true, negative_variant_4x3 = 1 and mask_variant_4x3 = 1.
A 4:3 frame with fancy = true, negative_variant_4x3 = 2 and mask_variant_4x3 = 1.
A 4:3 frame with fancy = true, negative_variant_4x3 = 1 and mask_variant_4x3 = 2.
A 4:3 frame with fancy = true, negative_variant_4x3 = 1 and mask_variant_4x3 = 3.
A 4:3 frame with fancy = true, negative_variant_4x3 = 1 and mask_variant_4x3 = 4.
A 4:3 frame with fancy = false.
A 6:7 frame with fancy = true and mask_variant_6x7 = 1.
A 6:7 frame with fancy = true and mask_variant_6x7 = 2.
A 6:7 frame with fancy = true and mask_variant_6x7 = 3.
A 6:7 frame with fancy = false.
A 4:5 frame with fancy = true and mask_variant_4x5 = 1.
A 4:5 frame with fancy = true and mask_variant_4x5 = 2.
A 4:5 frame with fancy = false.
A 1:1 frame with fancy = true, mask_variant_square = 1 and negative_variant_square = 1.
A 1:1 frame with fancy = true, mask_variant_square = 1 and negative_variant_square = 2.
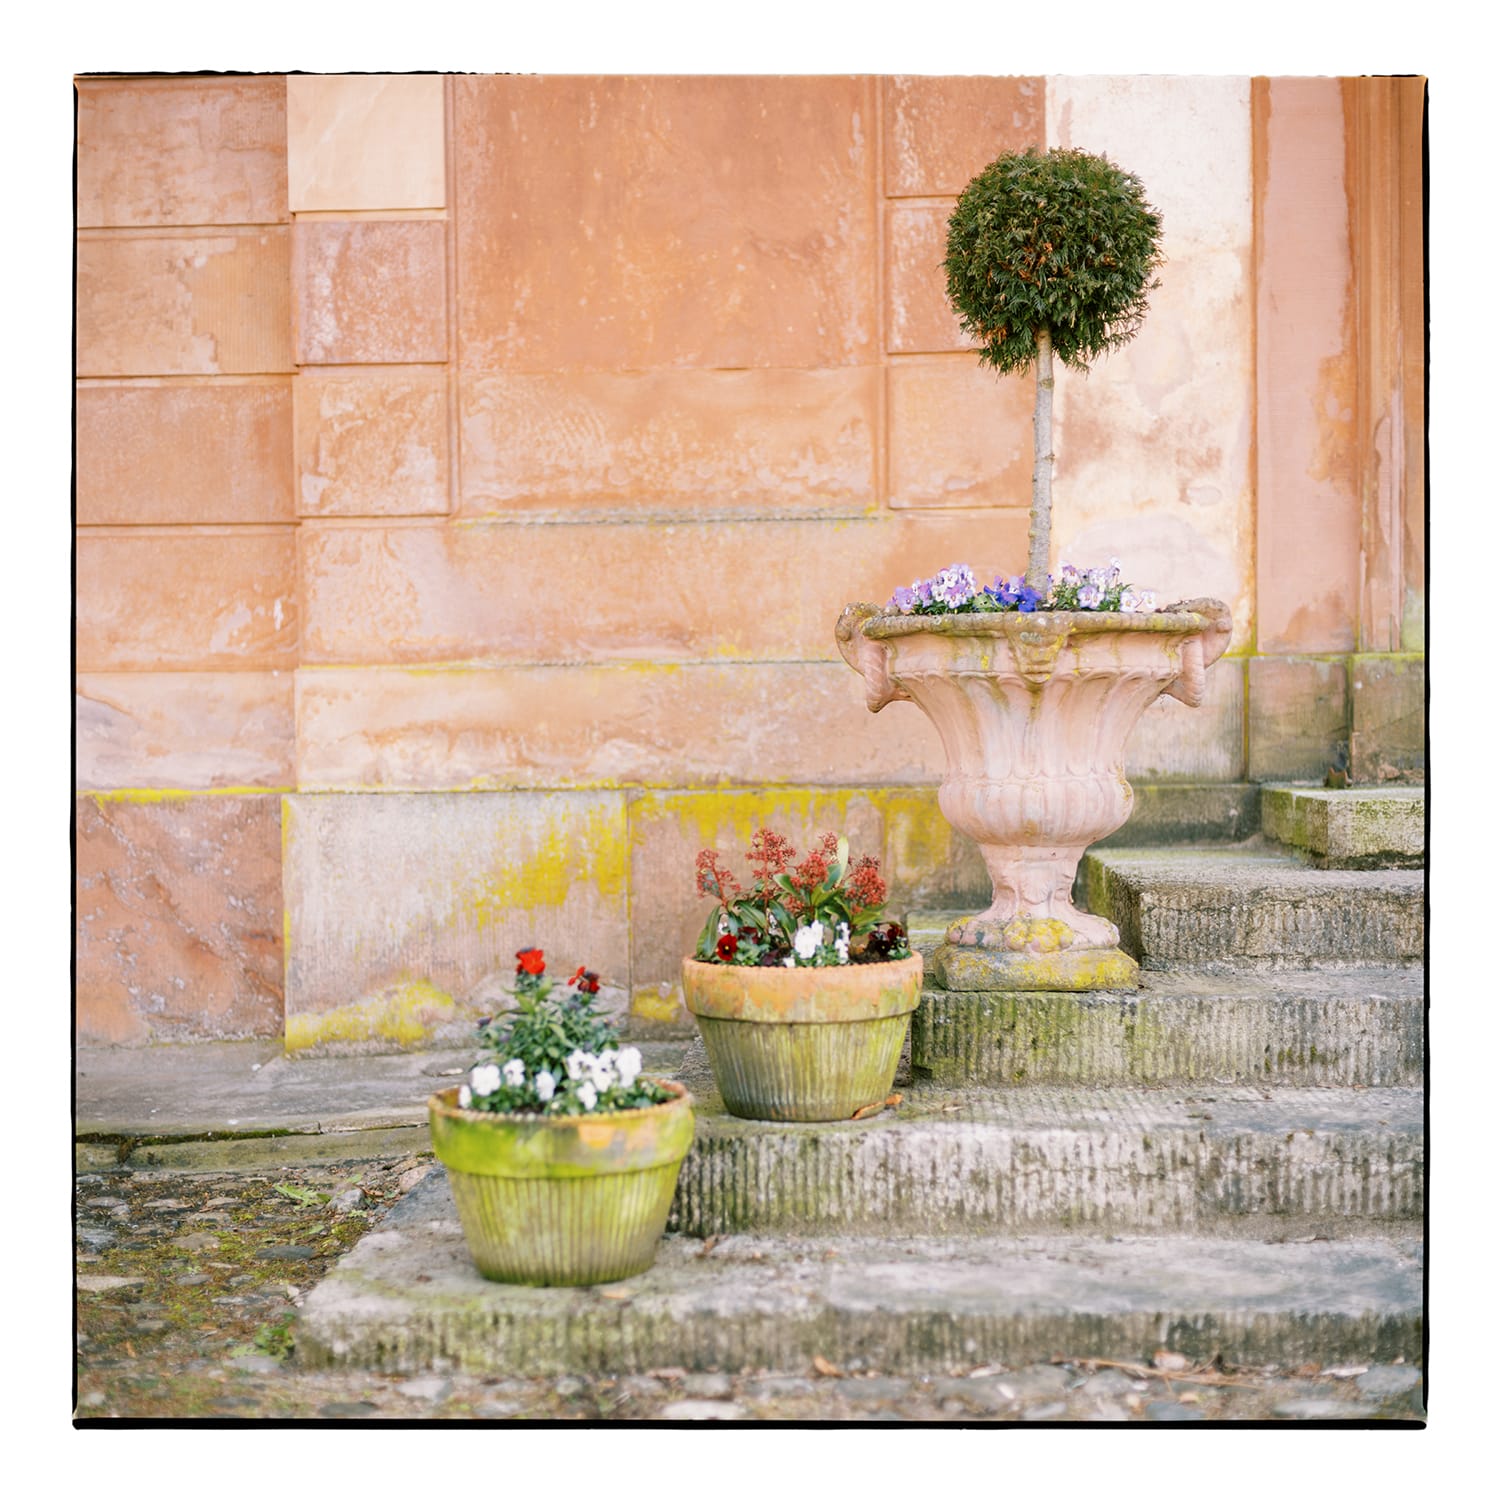
A 1:1 frame with fancy = true, mask_variant_square = 2 and negative_variant_square = 1.
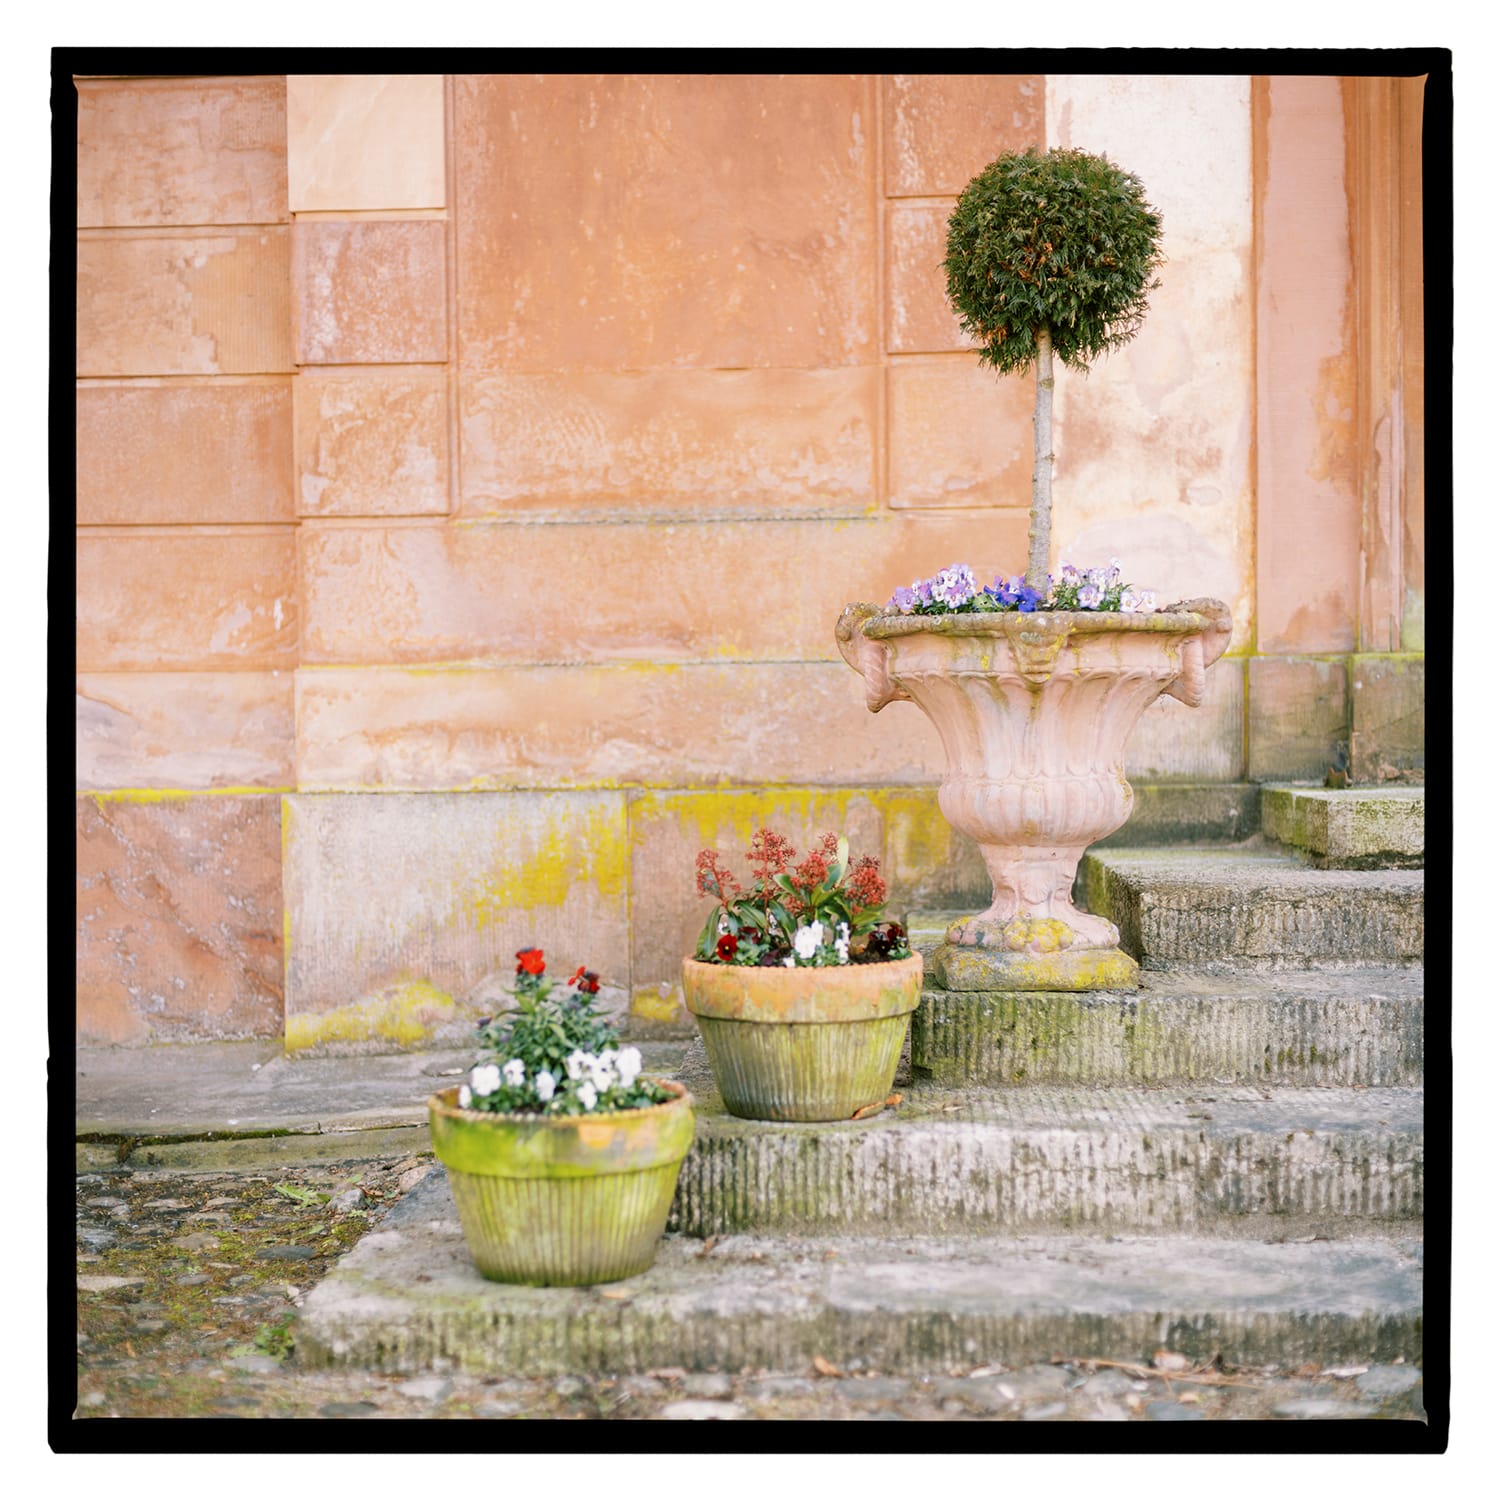
A 1:1 frame with fancy = true, mask_variant_square = 3 and negative_variant_square = 1.
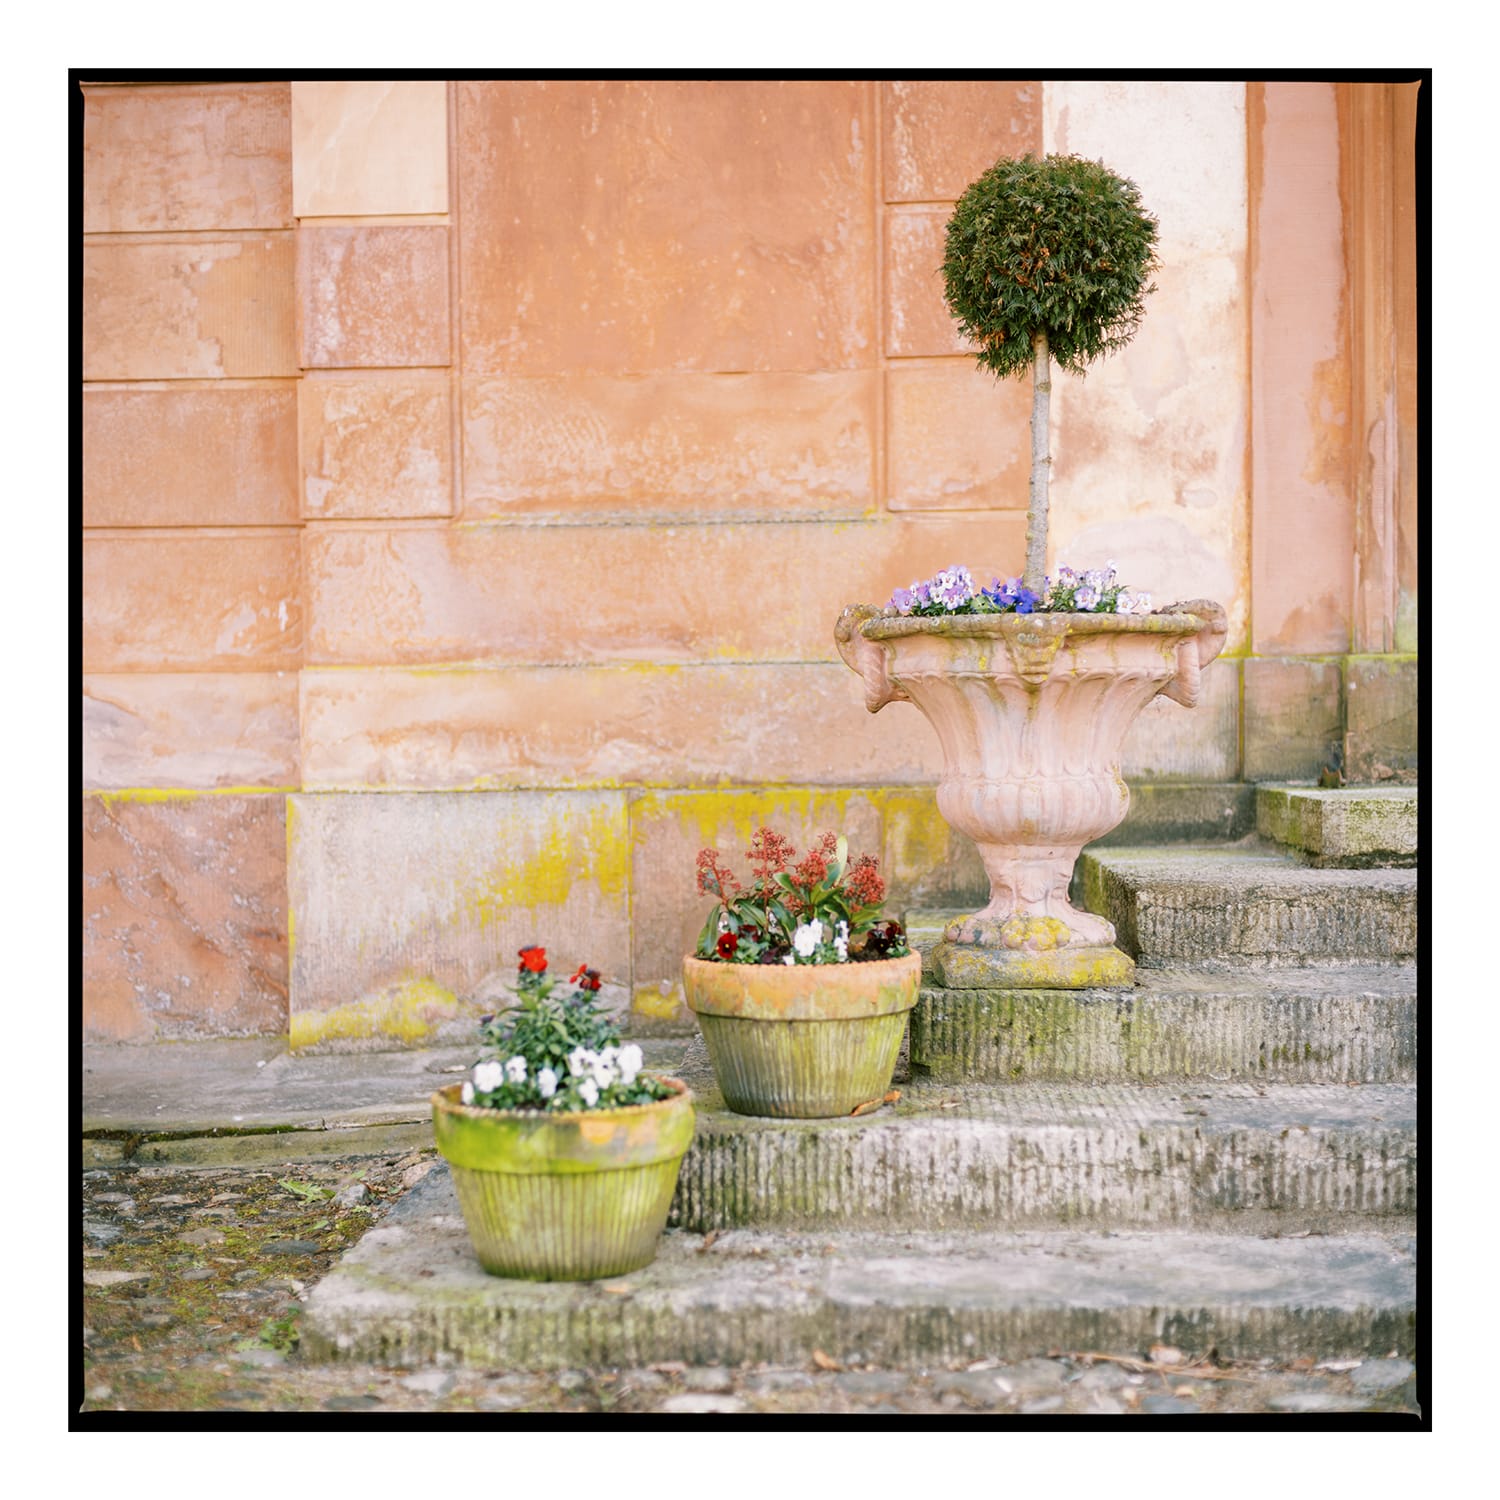
A 1:1 frame with fancy = false and negative_variant_square = 1.
A 2:3 frame with burn = true and jagged_filmburn = true`.
A 2:3 frame with burn = monochrome and jagged_filmburn = true`.

A 2:3 frame with burn = true and jagged_filmburn = false`.
Credits
Thanks to Marc Holstein and Andreas Georgiou for providing me with scanned negatives. Also, many thanks to Tom Wright for his creative input.
License
Poserframes by Joakim Hertze is licensed under CC BY-ND 4.0![]()
![]()
![]()